Kitchen designers have spent the past twenty-plus years moving electrical outlets away from the backsplash area and under the kitchen wall cabinets. The main reason for such movement is practicality rather than aesthetics. A set of electrical outlets located along the height of the countertop will inhibit the appearance of the backsplash, collect grease and direct cords on to the area where your kettle will be placed. The more practical solution is to place electrical outlets underneath the wall cabinets, at the location of the appliance, for maximum convenience. This change has also alleviated the largest customer complaint about working in a new kitchen.
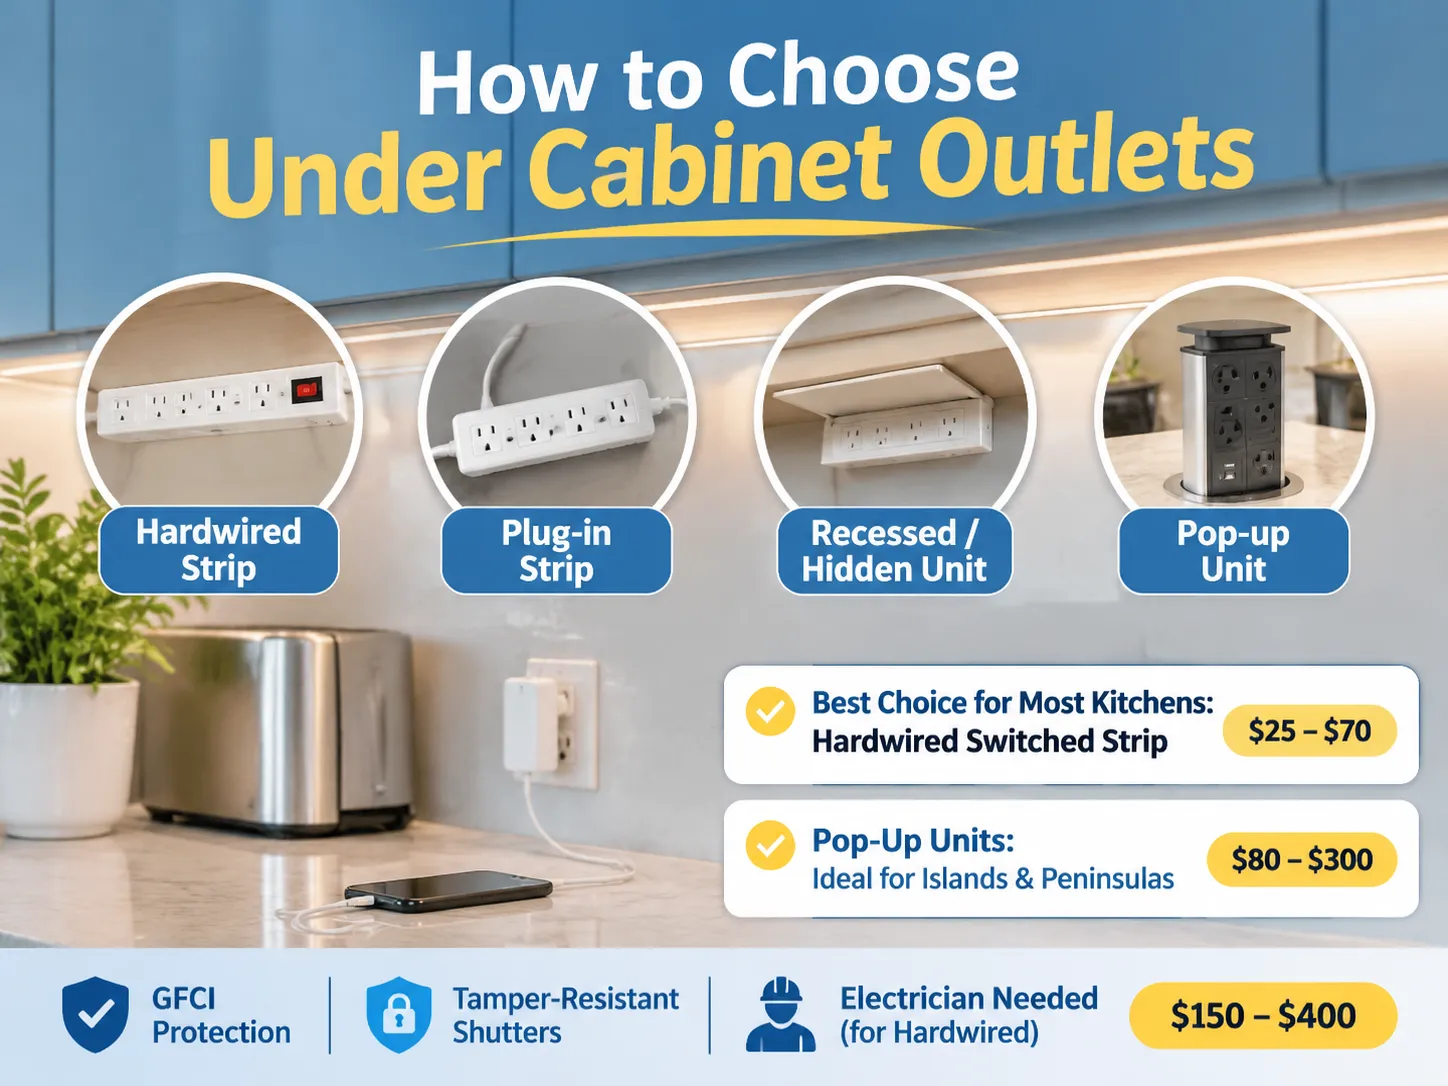
Quick answer: The overall answer to the question of “Under Cabinet Outlet” is that there are four different types available: a fixed wired power bar, a plug-in power strip, a concealed or recessed power unit that mounts under cabinetry and a pushup outlet that is integrated into the counter surface. The majority of all kitchens’ needs should be met with a Hardwired Switched Power Strip due to the balanced cost, code regulations compliance and durability. Pricing will range from $25-$70 per unit. The two items mentioned as options (hardwired strip & pop-up units) have a price range of $80-$300 depending on the style. Pop-up units work exceptionally well on islands or peninsulas where the actual under-cabinet placement would not be feasible. All kitchen electrical outlets require GFCI protection and Tamper Resistant Shutter protection, while Hardwired Installations will require an Electrician to complete the work (adding between $150 – $400 to the total cost of the installation).
The overall discussion of this article will cover each of the four types available, where they should be installed, considerations for faceplates & finishes, what options you should consider paying for and those you should not, code requirements which dictate what types of installations are legal, installation methods and their associated costs, and brands of products which would be worth considering in your final selection for your kitchen. The most impactful sections regarding type and installation will ultimately determine your project budget.
What Does a Under-Cabinet Outlet Solve?
First, the most obvious advantage is the ability to keep the backsplash area clear. In a modern kitchen, the 600mm backsplash often serves as the only continuous surface. However, when you put multiple outlets on the backsplash, you interrupt that flow with a row of twin sockets. When you put those sockets under the cabinet, you restore the smooth backsplash and remove the edge where grease accumulates from cooking.
Second, under-cabinet outlets help manage cords. Countertop appliances are frequently located on the countertop and have short cords. An under-cabinet outlet means that the cord goes directly down behind the appliance instead of across the counter toward the nearest wall outlet. This reduces the likelihood of having to use an extension cord, which is the biggest cause of overloaded circuits in kitchens.
Third, under-cabinet outlets are safer than wall-mounted outlets; they are considered more convenient than cords that dangle across the countertop. An under-cabinet outlet is out of reach from a child and away from the sink’s splash zone. For code reasons, under-cabinet outlets are still considered “wet locations,” so they must be protected by a GFCI. However, their location makes them safer than 100mm wall-mounted outlets.
The trade-off is that a hardwired strip has to be connected to your electrical system. If you want to move it to another location later, you’ll have to move the cable, so you should decide where you want the outlet before you install your cabinets.
The 4 Types of Hard-Wired Outlet Strips Available to You
Hard-wired strip. A hard-wired strip is either metal or plastic and is installed under the cabinets and wired to a dedicated circuit or spur; it usually has two to six switched socket outlets. The most durable option for a kitchen is a built-in option, which is generally the recommended option by electricians. Built-in units typically range from 300 to 900 mm long and 45 to 60 mm deep.
Plug-in strips are similar in shape and design to built-in units, but they come with a cable and plug. Some plug-in strips can be mounted on the underside of a cabinet or hung using brackets, whereas built-in units require an electrician to install them, making them much more prevalent in the retrofit market. Plug-in strips are limited by the socket rating of the outlet they plug into. Therefore, plug-in strips may be suitable for a kitchen with two small appliances, but they are not recommended for kitchens with a kettle, coffee maker, and toaster plugged into the same outlet.
Recessed units or units that are hidden provide the most polished look and cost more than surface-mounted options because the base of the cabinet will require cutting.
Pop-up units are flush to the countertop but rise up when pushed to reveal electrical outlets and frequently USB ports. Pop-up units solve the problem of kitchens where there is no wall-mounted cabinetry beneath the countertop. Therefore, the greatest weakness of pop-up units is their mechanism to raise and lower. If a low-cost pop-up unit is installed in a wet area, it will likely need to be serviced at some point due to failure.
| Type | Best location | Typical price | Main limitation |
|---|---|---|---|
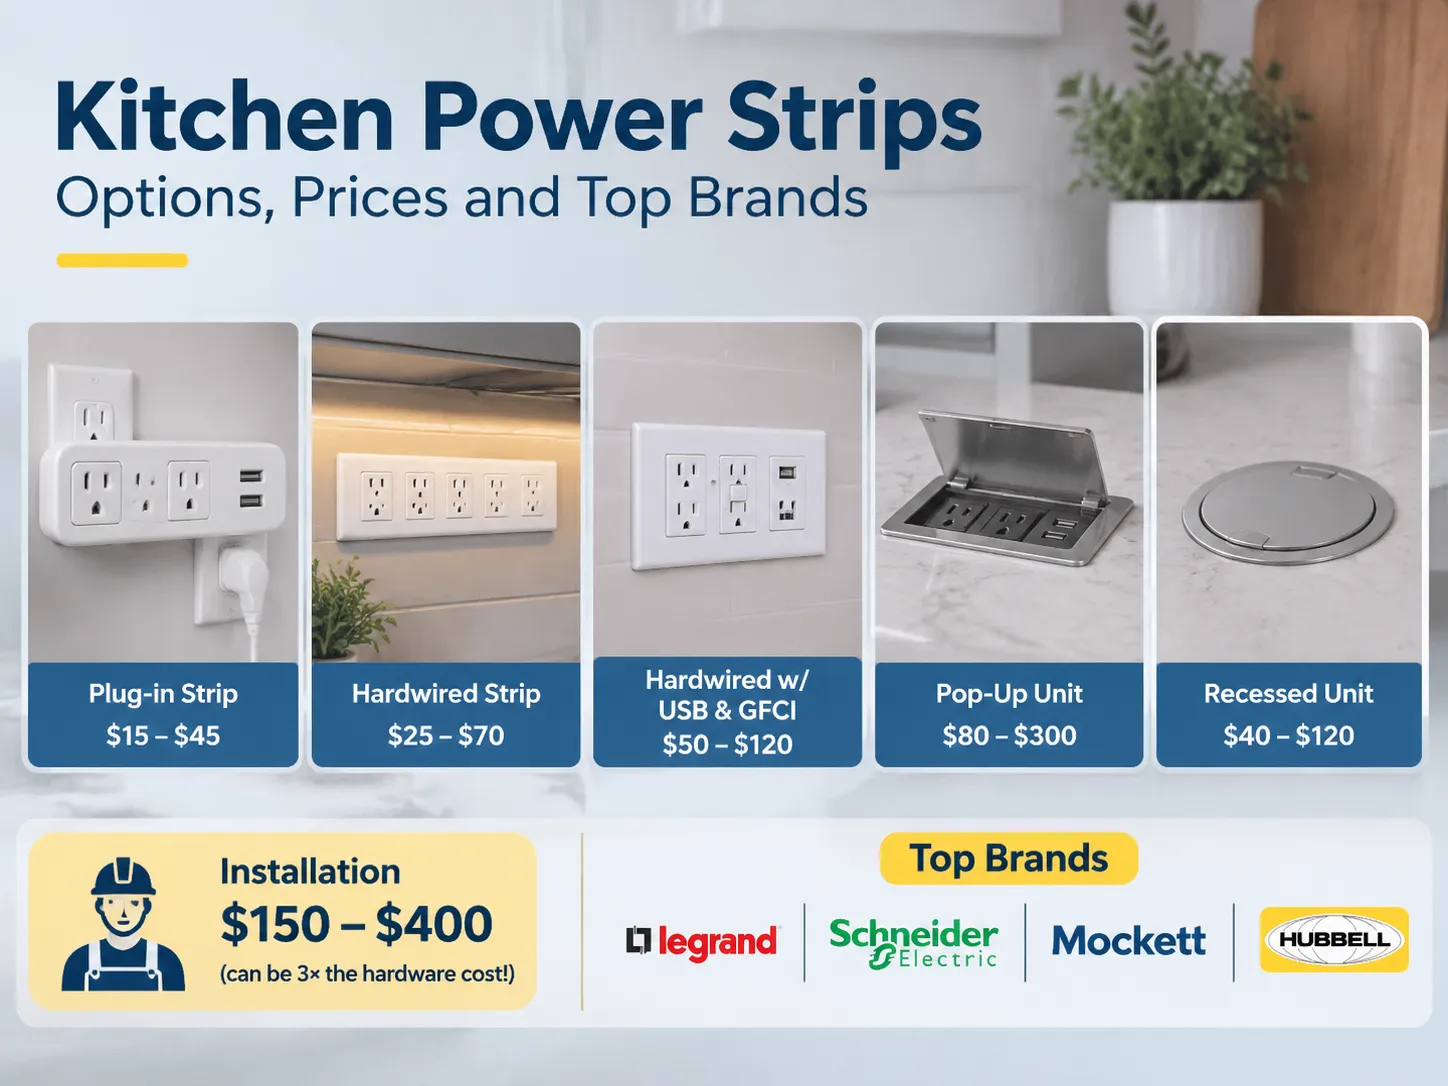
| Hardwired strip | Under wall cabinets, new kitchen or renovation | $25 – $70 per unit | Needs an electrician and a circuit |
| Plug-in strip | Retrofit, rental, temporary layout | $15 – $45 | Limited by the socket it plugs into |
| Recessed unit | Where a flush finish matters | $40 – $120 | The cabinet base has to be cut |
| Pop-up unit | Islands, peninsulas, breakfast bars | $80 – $300 | Mechanism wear, water ingress |
Hidden Versus Pop-Up: Which Fits Which Kitchen
Alright, here is a perfect example for you: “The market for kitchen power outlets is split between recessed hardwired and pop-up configurations. Depending on your needs and how you will use the space, the location of your cabinetry may impact the choice of your outlet solution.”
If your kitchen is a galley style or single wall configuration with cabinetry above the work surface, the recessed unit(s) under the cabinet(s) would likely be the best choice for available options. They are typically the least expensive, most durable, and easiest to maintain of the outlet solutions when located under cabinetry. Also, they allow for the flexibility to locate the power outlet in the exact same area as the appliance that will be utilizing it.
If your kitchen has an island, peninsula, or breakfast bar configuration and does not have a cabinetry type of overhang over the work surface, then the pop-up unit is likely your best option. However, there are other alternatives that can be considered when utilizing this type of configuration, including locating an electrical socket in the side of the island, using a floor-mounted junction box, or using a pendant-mounted fixture; however, each of these has limitations. The side-panel outlet can often be blocked by a bar stool or chair. The floor-mounted box collects food and debris and presents a tripping hazard when the lid is raised. A pendant-mounted fixture requires running a wire across the top of the work surface, which presents an obstacle as well as being in the way of the use of the countertop. The pop-up outlet addresses all three concerns but does come with a purchase price as well as the necessity of potential mechanical maintenance at some point in time.
If you do choose to use a pop-up outlet solution in your kitchen space, there are some details that will need to be considered. The first consideration is whether the product is a solid seal: a product rated at IP44 or better will be able to withstand spills, while one without that rating will likely fail if there is a spill. The other consideration is how water flows through the unit: since a pop-up is installed into an opening in the countertop, any water that gets to that opening will make its way down into the unit. Therefore, it is worth the added expense to purchase a pop-up that has a drainage channel and removable body, rather than simply being sealed to the countertop.
For a project that has both options (i.e. where a renovation has taken place), it would be sensible to install a hard-wired power strip under the wall cabinets on the front and one pop-up unit on the island. This way, all small kitchen equipment can be plugged where it will be used, and the cost of the pop-up unit is limited to one item.
Selecting the Cover and Finish
The cover is the part of the product that is visible to the customer, and as such, it is where poor-quality products can be easily identified.
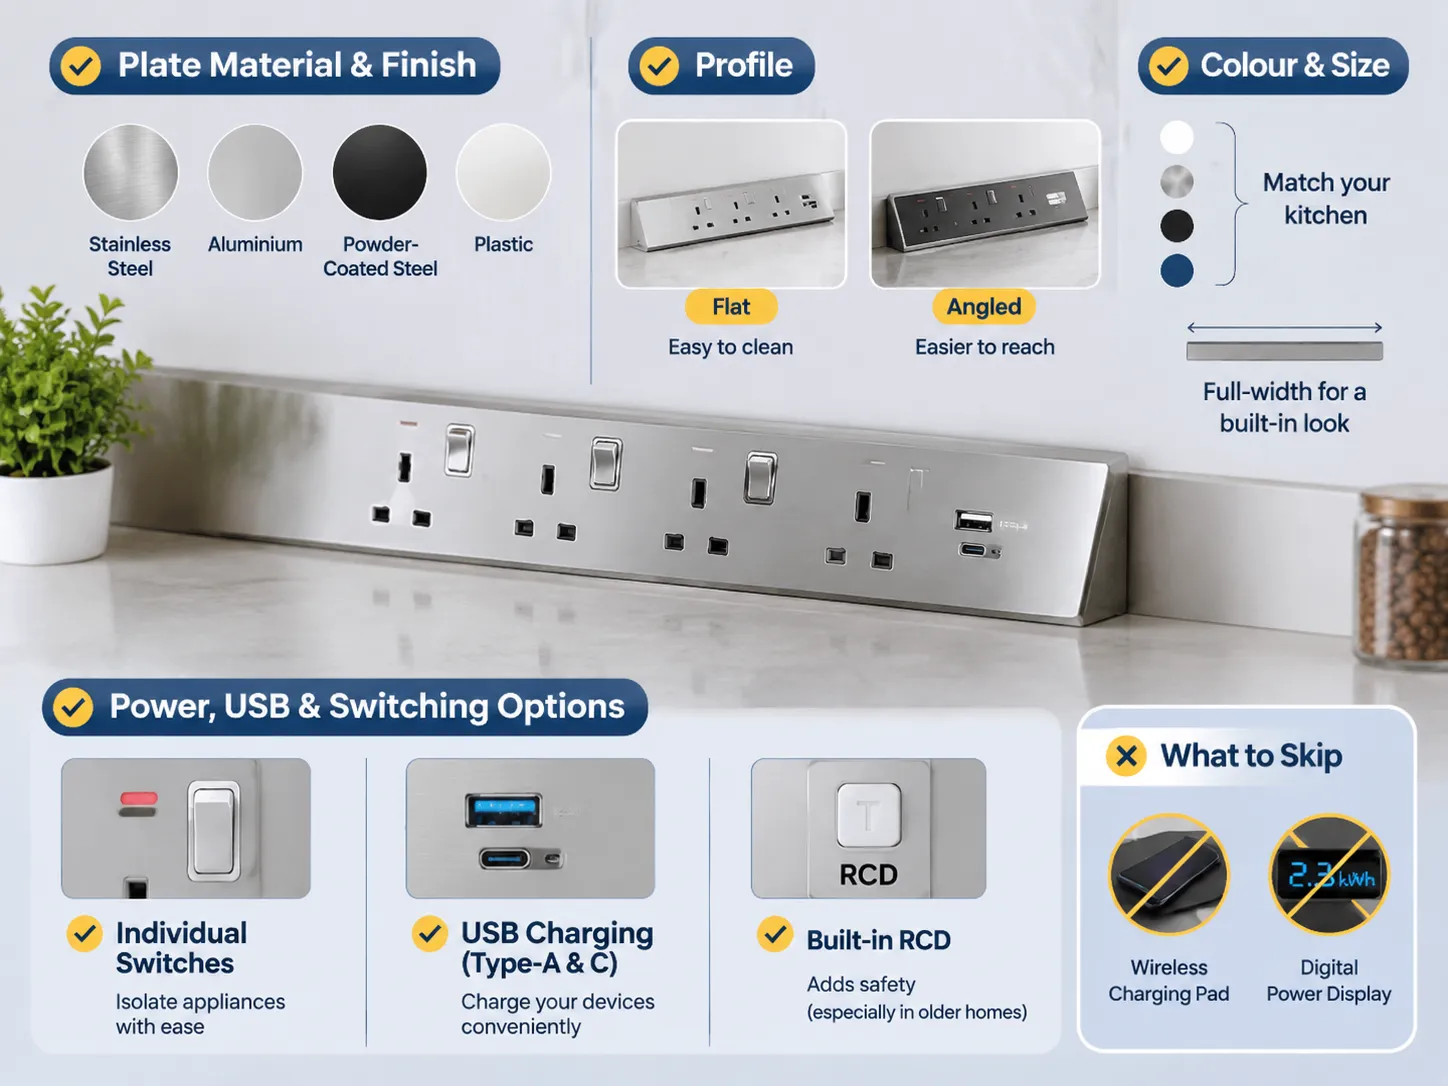
Material. Both stainless steel and aluminium match finishes of other cooking appliances and they have good heat resistance, however they also show fingerprints very easily. A powder-coated steel cover is less expensive and available in a colour that matches the other cabinet finishes. Plastic covers are the least expensive and they have a tendency to discolour from grease when placed near hot surfaces. The best option for a kitchen with a stainless-steel splashback is a brushed-stainless-steel power strip.
Profile. Flat covers are mounted flush against the base of the cabinetry and they tend to be the easiest to keep clean. Low-profile/angled covers are easier to reach and are also less likely to collect debris/dust on top. An angled power strip is also worth considering for a unit that sits on the back of a deep countertop, because the sockets face towards the person using it instead of facing down towards the floor.
Color and Finish. Many kitchens feature white and stainless steel appliance finishes, whereas a growing number of kitchen designs incorporate the color black due to the increased popularity of dark cabinetry. In most cases, when a finish is chosen to complement the cabinetry, rather than match the appliance, it creates a more custom look that gives the impression of being part of the cabinetry rather than an afterthought.
Appliance strip size is relative to the size of cabinetry; a strip that runs the length of the cabinet will appear built-in, while a short appliance strip will appear as an added-on piece. Also, the length of the appliance strip is important for determining how many appliances can be connected to the strip without having to rearrange or move plugs around, which can be frustrating when dealing with a small kitchen.
Power, USB, and Switching Options
There are three options that are definitely worth the investment, and there are two that are not.
Individual switches for each outlet: An appliance strip with individual switches for each outlet provides the ability to turn on and off appliances, such as a coffee maker or kettle, without the need to unplug them. It also helps reduce the wear and tear associated with unplugging and plugging appliances back in; unlike a standard appliance strip that has only one switch, an individual switch for each outlet is less expensive yet provides greater utility.
USB Charging: A USB charging port is an excellent investment for a kitchen workspace as many people use their kitchen as an office workspace. When using a Type-A and Type-C combination, devices such as smartphones, tablets and laptops can be charged from one outlet. By having USB ports built into the appliance strip, there is no need to have a charging station taking up counter space. Additionally, when selecting an appliance strip with USB port capabilities, ensure that the USB module has a current rating that will support the type of devices that will be plugged into it; a two amp shared output will charge devices much slower than a higher amperage output.
Built-in Residual Current Device (RCD): A built-in RCD is an excellent investment for appliance strips that are being powered from an ungrounded outlet circuit. If you are purchasing an appliance strip that does not have built-in GFCI protection, it would be wise to invest in a built-in RCD to provide GFCI protection and to ensure that your installation will be compliant with electrical code, without the need to rewire the entire circuit.
A strip that has a wireless charging pad incorporated into the top (so that you have to leave your phone lying on the countertop for recharging) is useless. The same holds true for a strip that has a digital display that shows you how much power your powered devices consume. Although you will probably look at the display for at least one week after buying the strip, you will probably never look at it again.
As with the previous example, the range of available electrical sockets behind the strip will play a major role in your selection of the strip. The footprint of the modules will help decide which combinations of the modules will fit on the strip.
Code and Safety Requirements
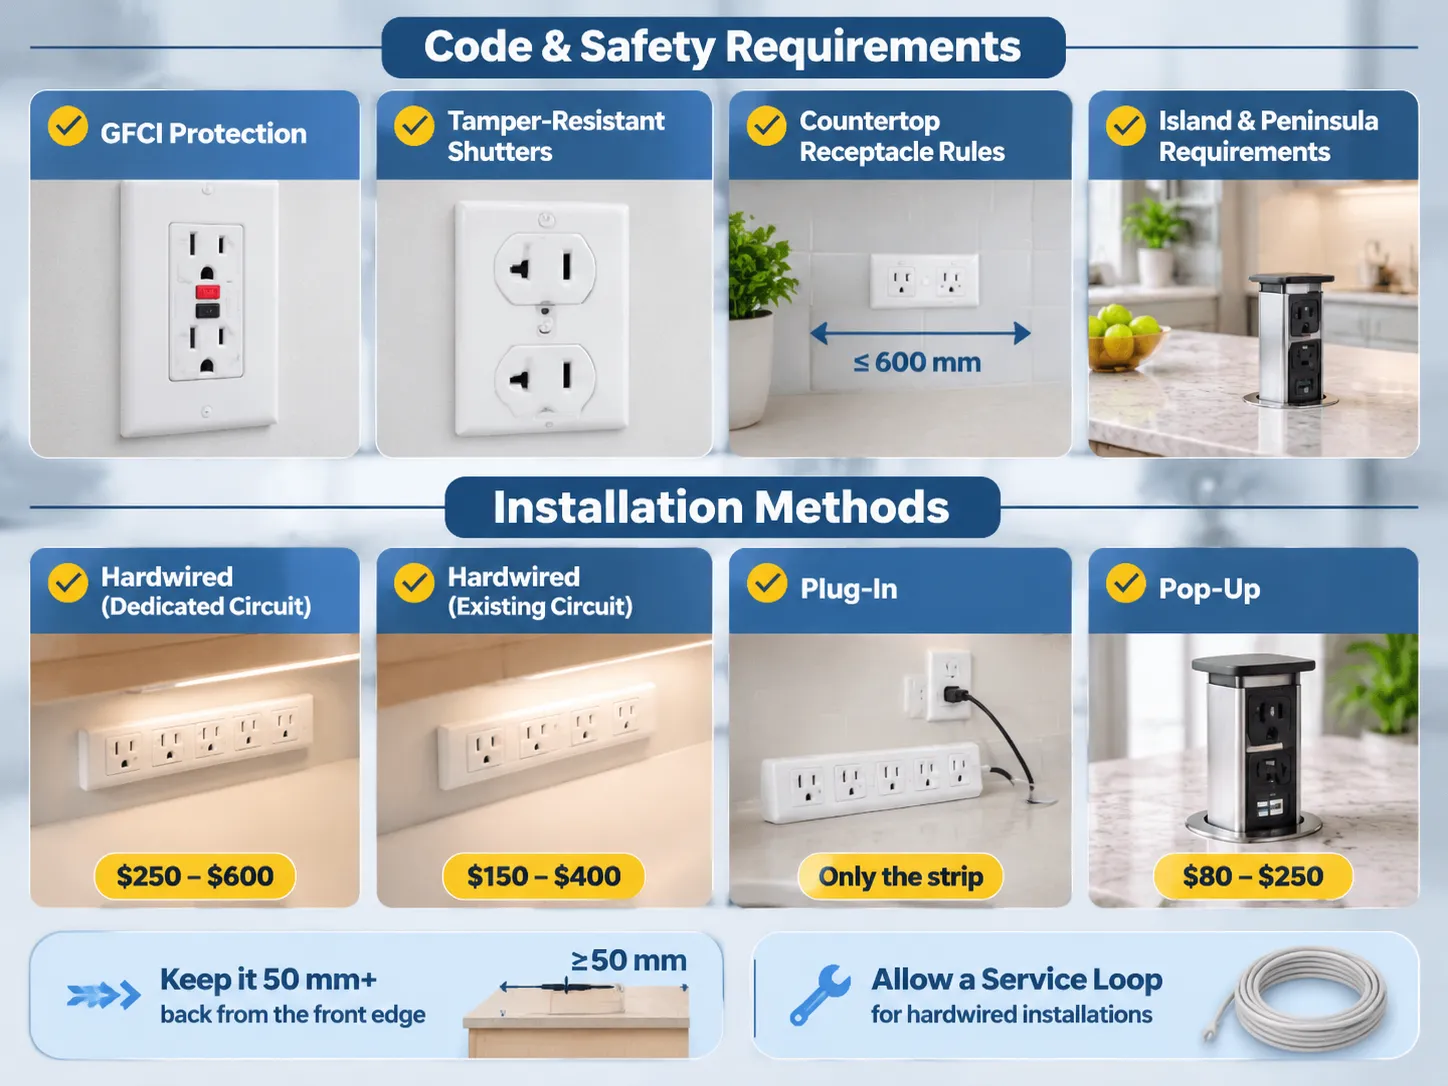
The same 4 code and safety requirements apply to a strip as to a wall outlet. The following is a list of code and safety requirements for both a hard-wired strip and a wall outlet:
1. GFCI protection. Code has always required that kitchen countertop receptacles provide protection from a ground fault. Therefore, if the strip is fed from a circuit that is not protected by a GFCI device, you must use either a GFCI breaker or a GFCI receptacle upstream from the strip. A plug-in strip connected to an unprotected socket does not meet code compliance for use in a kitchen.
2. Tamper-resistant shutters. All receptacles in occupancy units (e.g., apartments, houses) must be designed to be tamper-resistant. If a strip does not have shutters, it is either an older version of the product or one that was made for a market that does not require shutters; therefore, it will be flagged.
3. Kitchen countertop receptacle requirements. Code requires that receptacles for countertops be located at specified spacing intervals along the countertop. Only receptacles that are intended to serve the countertop are counted; therefore, while a strip located under a cabinet will meet these requirements, the spacing requirements must still be met, and a single strip located in the middle of a long countertop will not meet the spacing requirements.
Designers most often disagree with inspectors at this stage of the project. Therefore, it is cheaper to address these issues before the cable is pulled.
Island and peninsula receptacles – The most recent code cycles have required at least one receptacle at islands and peninsulas. This also led to the widespread acceptance of pop-up receptacles. The receptacle must be in a readily accessible location, and typically cannot be below the countertop on the island itself, hence pop-up and side mount receptacles are most commonly used.
None of the above is difficult to understand, and it is much cheaper to get a design solution settled in the design phase. The guidelines for the spacing of kitchen receptacles and their locations include in-depth descriptions of the spacing rules, and the zones around sinks and hobs where receptacles should never be located.
Installation Methods and Costs
Installation types and costs associated with each option:
Hardwired from a dedicated circuit – The best and most expensive way to install a receptacle; a dedicated circuit runs 20 Amps from the panel to a junction box under the cabinets, and the receptacle strip receives power from the junction box; costs between $250 and $600, including material and labour and a new circuit breaker and usually more if the route is difficult or the panel is full.
Hardwired from an existing countertop circuit – A spur-off from a nearby receptacle or a refeed-off an existing circuit; costs between $150 and $400. If a kitchen has GFCI protection and the home runs hot and neutral for the outlet, then the load calculation allows the kitchen with the kettle, toaster and coffee maker to supply a maximum of 20 amps.
A plug-in unit can be installed by the homeowner in 20 minutes with only two screws and will only cost the price of the strip itself, barring the wiring of the outlet it is plugged into and the visible wire that runs to the unit. This is the reason they are so often used in rental properties, but not installed in new kitchen designs.
A pop-up unit requires the cutting of a 60-80 mm diameter hole in the countertop and then lowering the unit into place. The unit must then be secured to the underside of the countertop with clamps. If an electrician is required to make the cuts and electrical connections, then the cost of installation will be around $80-$250 and the cut is not reversible. You should cut the hole while the unit is on site; do not make cuts using only a drawing.
All pricing information is based on historical data.
This page provides an overview of the price range for electrical installations. The price of a hardwired installation will vary based on the number of required electrical connections and whether you require the services of an electrician to do the installation. Installation prices can frequently equal or exceed the cost of the hardware itself. For example, you might purchase a $40 power strip, but if you hire a $350 electrician to install it, your total investment is now $390. You could instead purchase a higher quality power strip that costs $390 and is easy to install on a pre-existing electrical circuit.
In addition to price, users will want to consider the style of the installation and how that will impact the amount of work required, as well as how much time you have available for the installation.
| Item | Typical price | Notes |
|---|---|---|
| Plug-in strip, 2 to 3 sockets | $15 – $45 | No electrician, limited by the host socket |
| Hardwired strip, 2 to 4 switched sockets | $25 – $70 | Best balance for a new kitchen |
| Hardwired strip with USB and built-in GFCI | $50 to $120 | Useful where the circuit has no GFCI |
| Recessed unit | $40 – $120 | The cabinet base has to be cut |
| Pop-up unit, 2 sockets plus USB | $80 – $300 | Island and peninsula solution |
| Electrician for a hardwired installation | $150 – $400 | More with a new circuit or panel work |
Manufacturers of Wiring Devices and Other Appliance Accessories
Wiring Device Manufacturers (Wiring Devices) provide the actual outlets for electrical devices, while other manufacturers of appliance accessories (i.e., Power Strips) make the cords that connect multiple devices to the electrical outlet.
Mockett specializes in all things desks and cabinets related to power, from pop-up power units to grommet-style power outlets and is the preferred brand for most furniture manufacturers. Hubbell specializes in products that are used primarily for commercial or laboratory environments and expect to last much longer than a residential kitchen’s worth of use.
Mockett manufactures wiring devices using the same parts and wire as their under-cabinet strips. They have manufactured both switched and un-switched types and currently manufacture under-cabinet strip mounted socket/plate combinations to meet the switched pattern specifications of UK, Middle East, Southeast Asia, and Australia. The sockets will have tamper-proof shutters and will be constructed of both screw terminals and plates with an indicated amount of torque. The majority of their manufacturing volume comes from production of wall mounted sockets, with most fabricators purchasing the socket modules to build their own under-cabinet strips, rather than using the socket manufacturers to make their strips.
Where GOG Lies
GOG provides distributors, contractors, and developers with switch/socket products and provides sockets for under-cabinet work. Under-cabinet work is a small part of GOG’s sales volume, but is steadily increasing due to the similarity of socket products throughout the entire facility in which they are applied. Among the socket/plate combinations typically sold for kitchen applications, the plates will be similar in appearance and function to the sockets and the modules are the components of the socket/plate combination that must have the highest reliability in terms of performance.
Three items are critical to buyers who are specifying their kitchen mounted sockets: The socket module must incorporate silver alloy contacts as well as screw terminals with a clamping plate, since the kitchen mounted socket may power both a kettle and a coffee maker on an average daily basis; The socket/plate combination must be available in all of the same finishes that the kitchen is using (i.e., in actual usage, white, stainless steel or black).
A consistent batch will show any inconsistencies in colour or fit, as seen in the kitchen below, which has six sockets on one strip.
If you are ordering all the electrical sockets for your installation in one bulk order, you should ensure that your sockets can be produced with all the appropriate finishes and configurations (including plate systems and module sizes) to avoid having the strip arrive in a finish that no longer matches the rest of your installation (this is especially important for developers who typically order high volume runs of 13 A sockets from the production side of an electrical distributor).
Frequently Asked Questions
What code requirements govern under cabinet receptacles?
In most jurisdictions throughout the US, the following four items must be met to comply with local codes: 1) under cabinet outlets (receptacles serving as counter top receptacles) must be GFCI protected; 2) residentially located receptacles must have tamper resistant shutters; 3) under cabinet receptacles must comply with spacing requirements as designated by code; and 4) all work surfaces or islands and peninsulas must have at least one easily accessible receptacle. The only exception to this is a hardwired receptacle strip that provides power to the countertop. This strip must still comply with the spacing requirements established within the code. Therefore, a single receptacle strip in the middle of a long run would not be able to cover the required spacing between multiple receptacles.
How much do under cabinet outlets cost?
The average cost of a plug-in receptacle strip is approximately $15 – $45. A hardwired receptacle strip may range from $25 – $70 depending on whether two, three or four of the receptacles are switched or dedicated. A hardwired receptacle strip with at least one USB outlet and built-in GFCI typically retails from $50 to $120. Recessed outlet units will cost approximately $40 – $120 and pop-up outlet units will cost approximately $80 – $300.
The installation of under cabinet outlets requires additional electrical work from an electrician and can be between $150-$400 for the electrician’s labour plus another $200-$600 for the new circuit.
How to install under cabinet outlets?
To install hardwired under cabinet outlets, you’ll need to do the following: cut the power to the circuit, run the required wire (approved for use with Ground-Fault Circuit Interrupter (GFCI)) from a GFCI source to a junction box located beneath your cabinets, secure the outlet strip to the underside of the cabinets with the outlet plugs facing down, connect the wires and verify that everything is working correctly.
If you want to install an outlet strip that is powered by plugging it into your wall outlet, you’ll need to secure the strip to the cabinet and plug it into your wall outlet. If you want to install a pop-up outlet strip, you should cut a 60-80 mm hole in the worktop while you have the unit onsite so you can drop it in, secure it with the clamps from underneath and connect it to a protected power supply.
What are the design considerations for under cabinet outlets?
Design considerations for under cabinet outlet placement include the positioning of the outlet in relation to the edge of the worktop, so that you will not inhibit the door of your cabinet from opening. You should also consider how many appliances you will need to connect to the strip. It is common to use multiple appliances (electrical kettle, coffee maker and toaster) from one outlet strip. You should consider what finish you would like for the outlet strip. If the outlet strip finish is similar to the finish of your cabinets, then it will be perceived as being more integrated into the kitchen design. The profile or angle of the outlet strip should also be considered. An angled unit is more accessible for use on the back of a deep worktop. Finally, if the outlet will be on an island, then you must choose between an outlet strip or a pop-up unit.
If you want to learn more, I suggest you take a look at the references below.
References
- National Fire Protection Association (NFPA), National Electrical Code (NEC), Kitchen Receptacles
- UL Solutions — Standards for Receptacles and Relocatable Power Taps
- National Electrical Manufacturers Association (NEMA) — Wiring Devices & Kitchen Electrical Products
- Legrand — Modular Wiring Device Systems
- Mockett — Under Cabinet Power and Power Solutions for Desktops
Conclusion
When deciding what type of under cabinet outlet to install, the three most significant factors are whether the cabinets will be above the worktop, how many different appliances will be used at once and whether the circuit is already protected. For most applications, a hardwired, switched outlet strip meets the first two factors while providing a lower cost alternative to other outlet types. A pop-up outlet is best for kitchen islands and should be selected based upon the quality of the sealing rather than appearance.
Three decisions that should be made prior to cabinet installation are: (1) the height of the outlet strip in relation to the edge of the worktop; (2) the number of appliances that will be plugged into the circuit; and (3) the finish of the outlet strip. All remaining aspects of the outlet strip can be decided after the cabinets have been installed, with the exception of the circuit protection requirements.