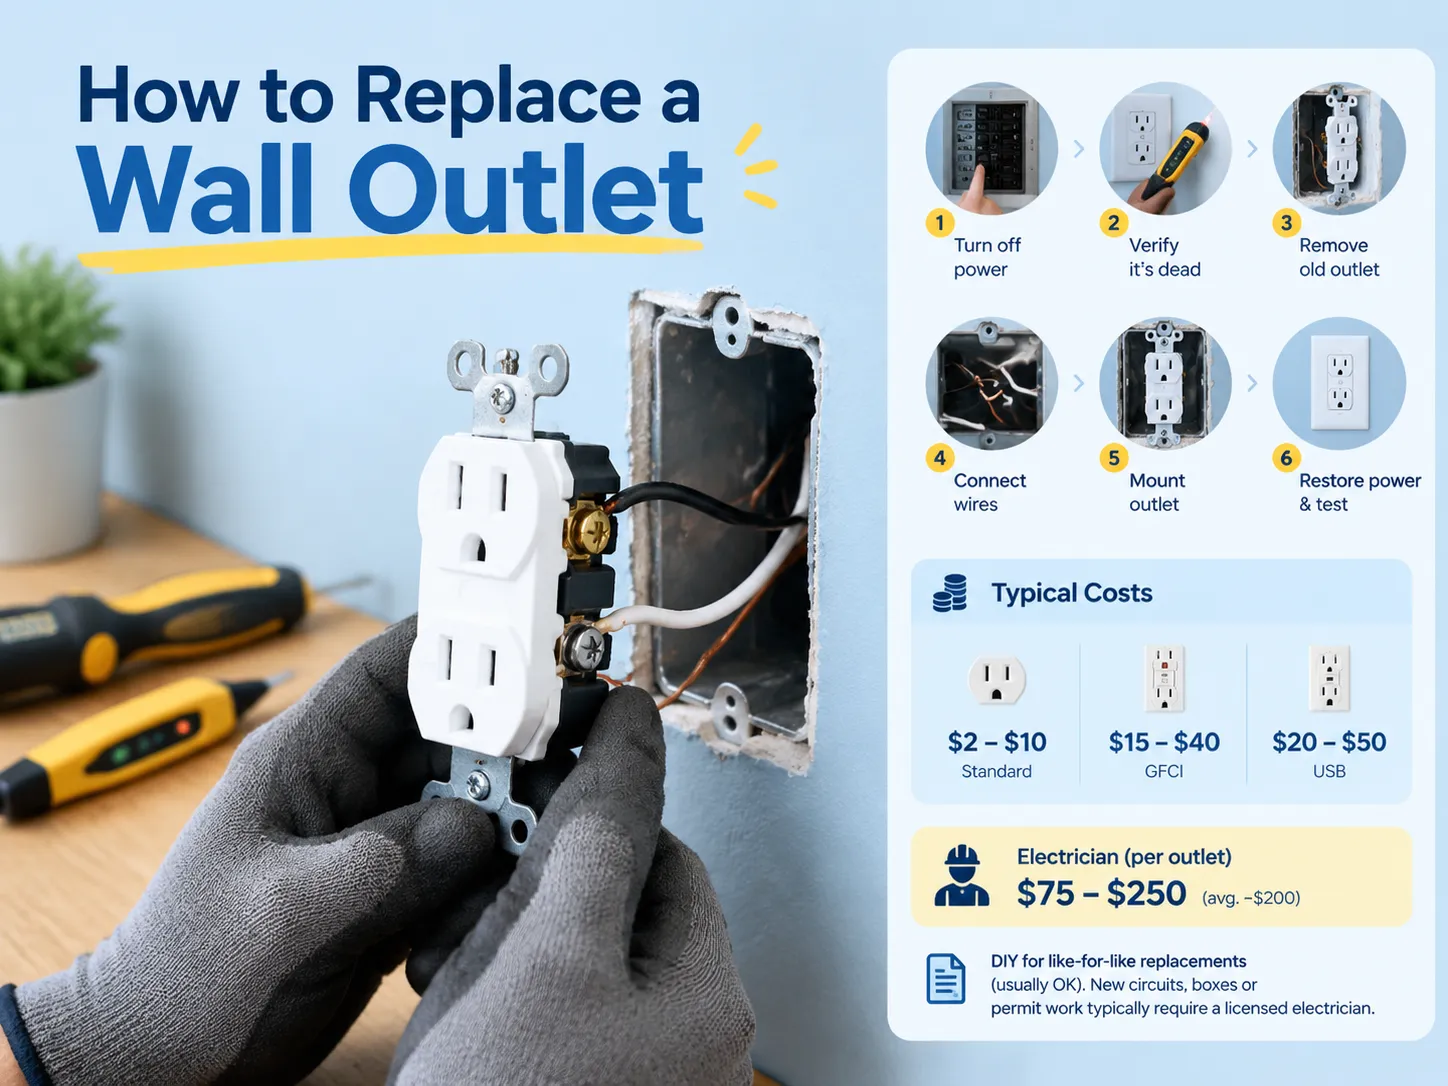
Though changing a wall receptacle may seem to be hard task, it is no big deal if two things are done. First, it is necessary to make sure that the electricity is shut off and second it is necessary to make sure that the wires are connected to the right terminals. In fact, the only thing that needs to be done is proper use of the screwdriver.What stops people from taking care of the task is not the complication but a burden of being held responsible for a mistake, since a faulty connection will fill the faceplate with power as well as damage the wiring, even though it will work as it should.
This article describes each stage of the process from the preparation and removal to installation and testing of the receptacle. The article also highlights many problems connected with the use of things like the USB or ground fault receptacles, the prices of the devices, and the new boxes installed into the existing walls.
To briefly summarize, it usually takes 20-40 minutes if you are already familiar with replacing electrical outlets. First, previous electrical work will need to be turned off and confirm with the tester that power is indeed off. Then, outlets cover and outlet itself is removed, pictures taken of the wiring. Thereafter a new outlet is placed after the hot wire is connected to brass terminal and neutral to silver terminal, wires being concealed in the wall. The price for a regular electrical outlet is usually between $2-$10, GFCI outlets cost $15-$40 while USB outlets are priced between $20-$50. As for the cost of hiring a licensed electrician, it varies between $75-$250 with an average price being about $200. In general, replacement of an electrical outlet does not have to be permitted, but mostly people are allowed to replace their electrical outlets without changing the type of the outlet being replaced while making new circuits is the responsibility of professionals.
What Replacing a Wall Outlet Actually Involves
Firstly, let’s clarify the terminology, which tends to bring about some misunderstanding in the search results.
To start with, the thing mounted on the wall is referred to in code as a receptacle, in everyday life – outlet, and in the majority of parts of the English-speaking world, it is called a socket. The thing which is located at the end of the cord of the appliance is called a plug. This means that when people request “how to replace wall outlet plug,” they mostly mean the receptacle on the wall rather than the plug on the cord. The present guide aims to explain how to replace a receptacle, so if the plug itself is broken, then the situation is slightly different. Either the plug has to be replaced or the whole cord – no wall opening is required.What you will do here is basically swapping appliances. The circuit, the wire, and the box are going to remain as they are, you will just change receptacles.
When an Outlet Needs Replacing, Not Repairing
Receptacles do not have user-replaceable parts. There is nothing to tighten, nothing to clean, and nothing to adjust within them. If they fail, you should only get a replacement. However, it is important to know what symptoms send you a message that you need to be looking for a replacement now, and which ones indicate that you should watch it carefully and take action only when necessary.
- One of the most noticeable and dangerous signs of a faulty outlet could be the fact that the plugs do not stay in. The contacts have stopped working properly, and this means that it could be dangerous due to hot elements in case of poor contact.
- Discoloration or warmth of the outlet is another characteristic feature of malfunctioning. High temperature in the outlet is an indicator of a situation of damaged wires or excessive load, and any of these can lead to fire.
- Any cracks or scratches at the outlet is a sign suggesting a fuse replacement, which was a result of impact that the device has undergone.
- If you observe scorching marks, smell of burning or buzzing sounds, call an electrician, because this cannot be fixed at home.
- When the power supply goes on and off depending on whether you move the cable around the outlet, this most likely means you need to change the outlet.
- It is often an issue of age since an electrical device has been in operation for a very long time. They usually last for 15-25 years, which means they could be even 15-25 years old depending on whether the house was built in the mid-1980s. There’s a fuller treatment of how long these devices actually last, and what accelerates the end, in this article on how long outlets last and what to watch for.
The idea of “replace it while you’re in there” is especially true here. If you are opening up a box anyway — whether it is to paint, it’s because the outlets are loose or just when you are replacing a set of four outlets in a room — changing out the outlet will only cost a few bucks and get rid of the most frangible point in the electrical system of house altogether.

What to Have Ready Before You Start
Gather everything first. Going to the hardware store mid-job with a live circuit open is how people make mistakes.
| Item | Why you need it |
|---|---|
| Non-contact voltage tester | To prove the outlet is dead. This is not optional |
| Multimeter or plug-in outlet tester | For confirming correct wiring after the job |
| Flathead and Phillips screwdrivers | Terminal screws, mounting screws, cover plate |
| Wire strippers | For trimming damaged conductor ends |
| Needle-nose pliers | Forming hooks in the conductors for terminal screws |
| Replacement receptacle | Match the amperage and the circuit rating |
| New cover plate | Old plates crack, and they’re cheap |
| Wire nuts (assorted) | For pigtails and for repairing a short conductor |
| Electrical tape | Wrapping the device sides on a metal box installation |
| Work light or headlamp | The circuit you’re working on is the one lighting the room |
| Phone or camera | Photograph the wiring before you disconnect anything |
As a concluding note, I would like to offer you some guidance. While video tutorials can provide a clear idea of how to twist wires in a box and there are many good options available too, they are not able to demonstrate what is being housed inside your wall. The houses can differ a lot: they can be equipped with aluminum wires, backstabbed connections, cloth-insulated wires, the plug can be too small or too shallow for the installed device, or even the wiring with several circuits. Therefore, while watching a video, it is important to remember that first, check everything before you follow the instructions.
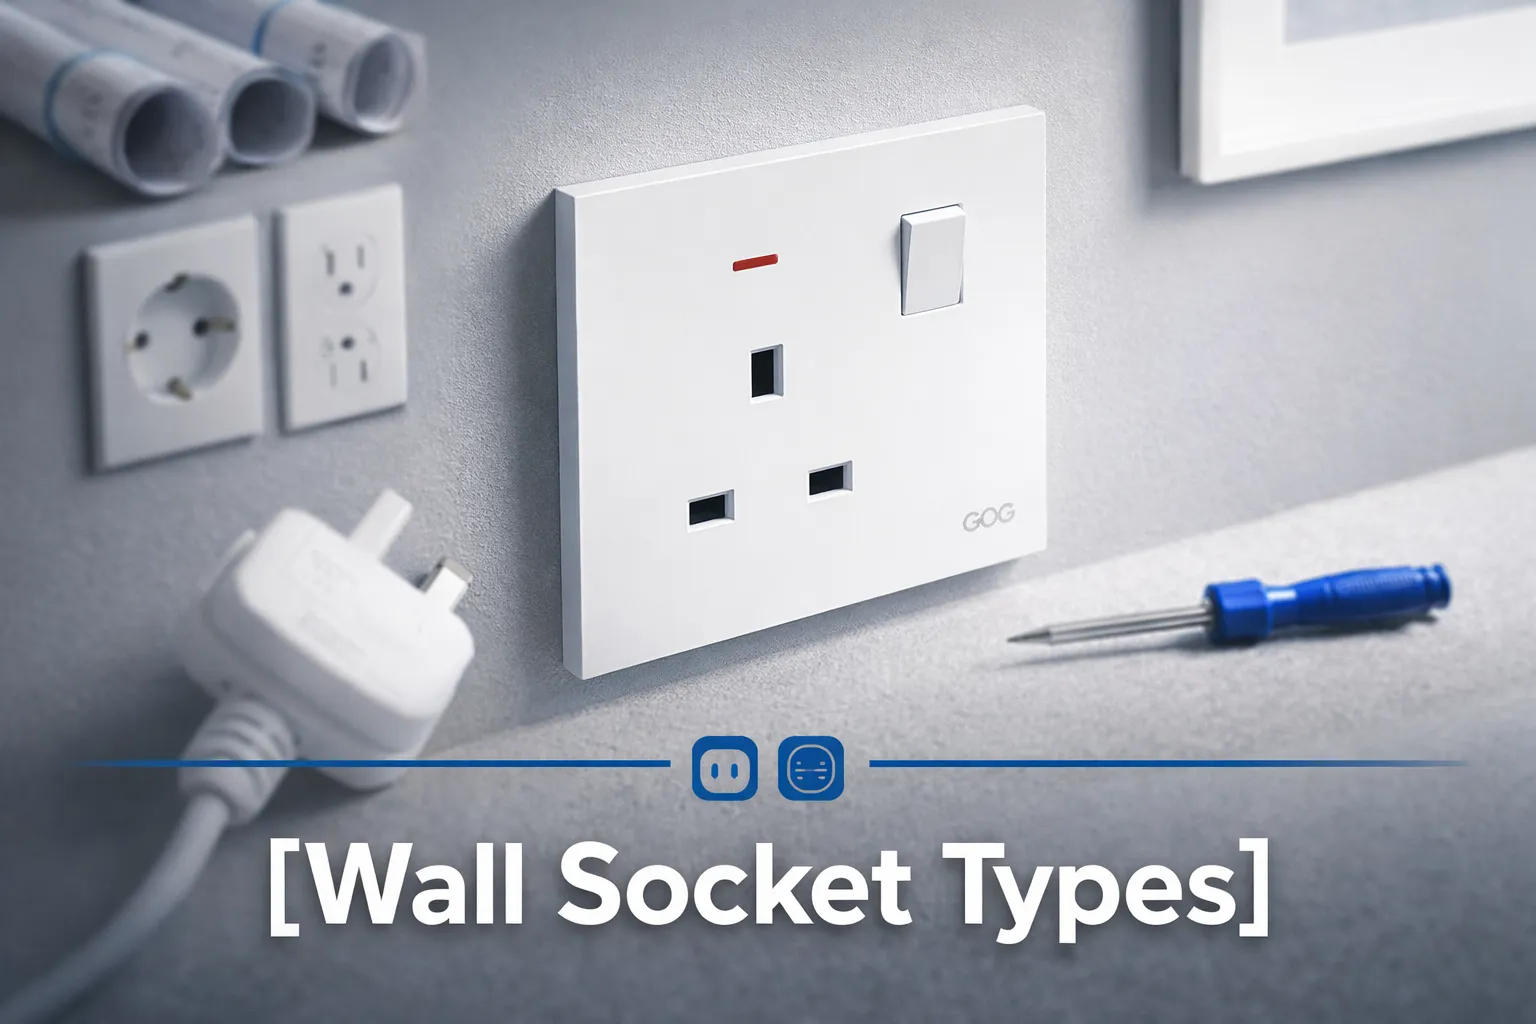
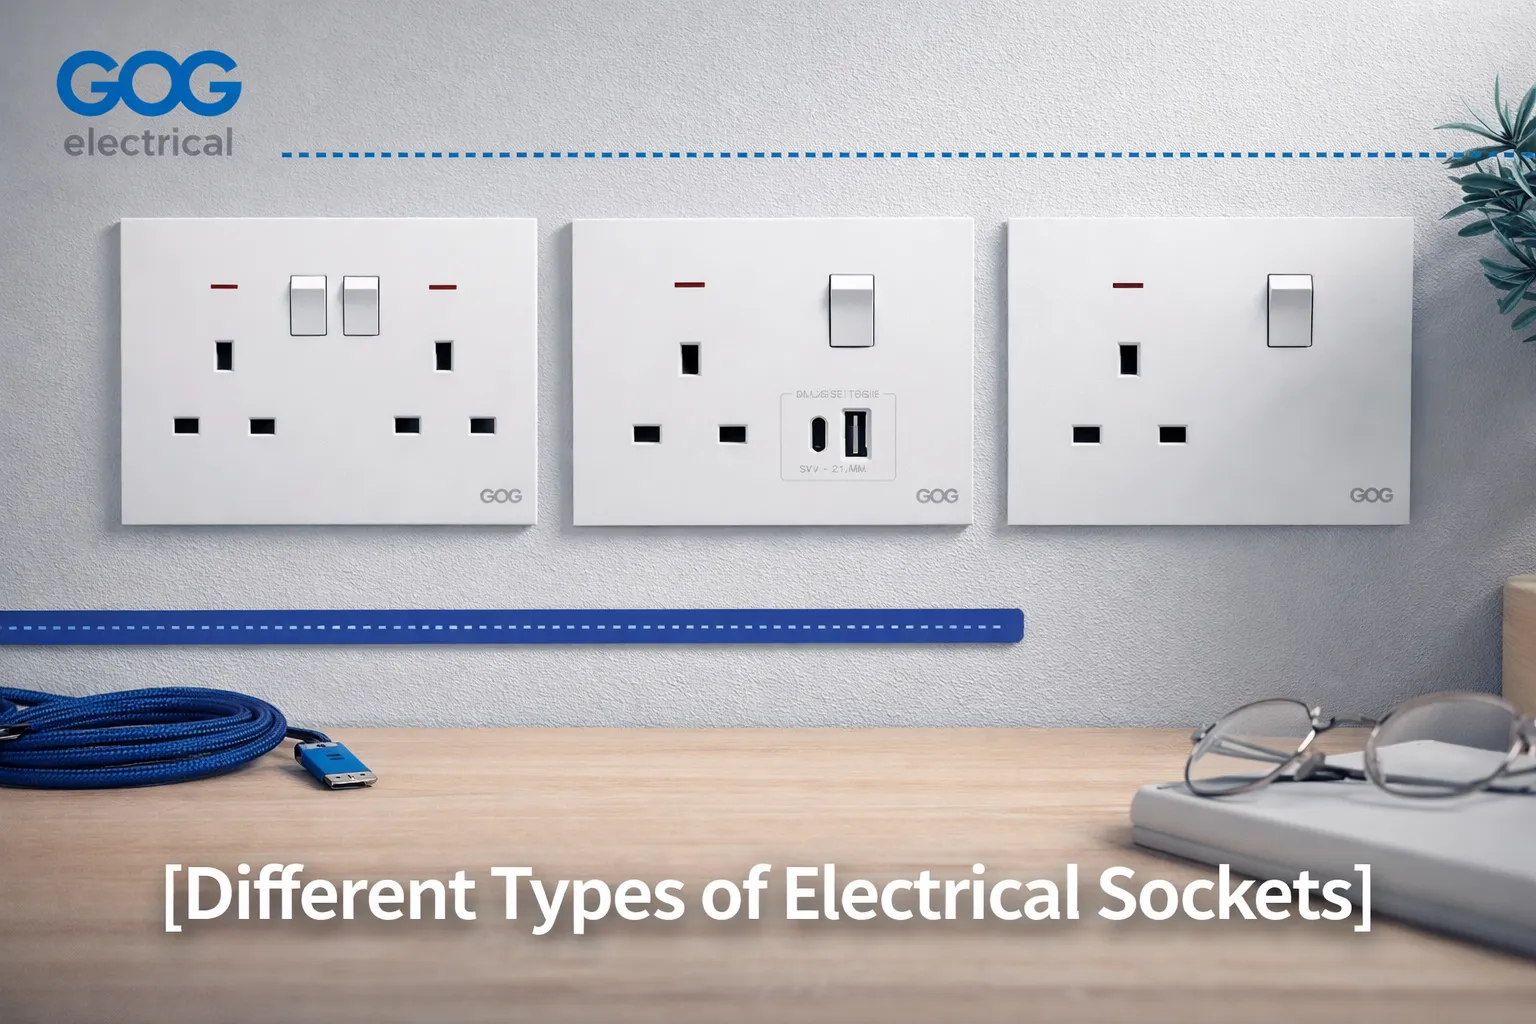
If you want to know which type of outlet is suitable for you before buying anything, you need to understand the types of sockets, which types there are, and where each type is used, since the design you choose has to correspond to the system used behind it.
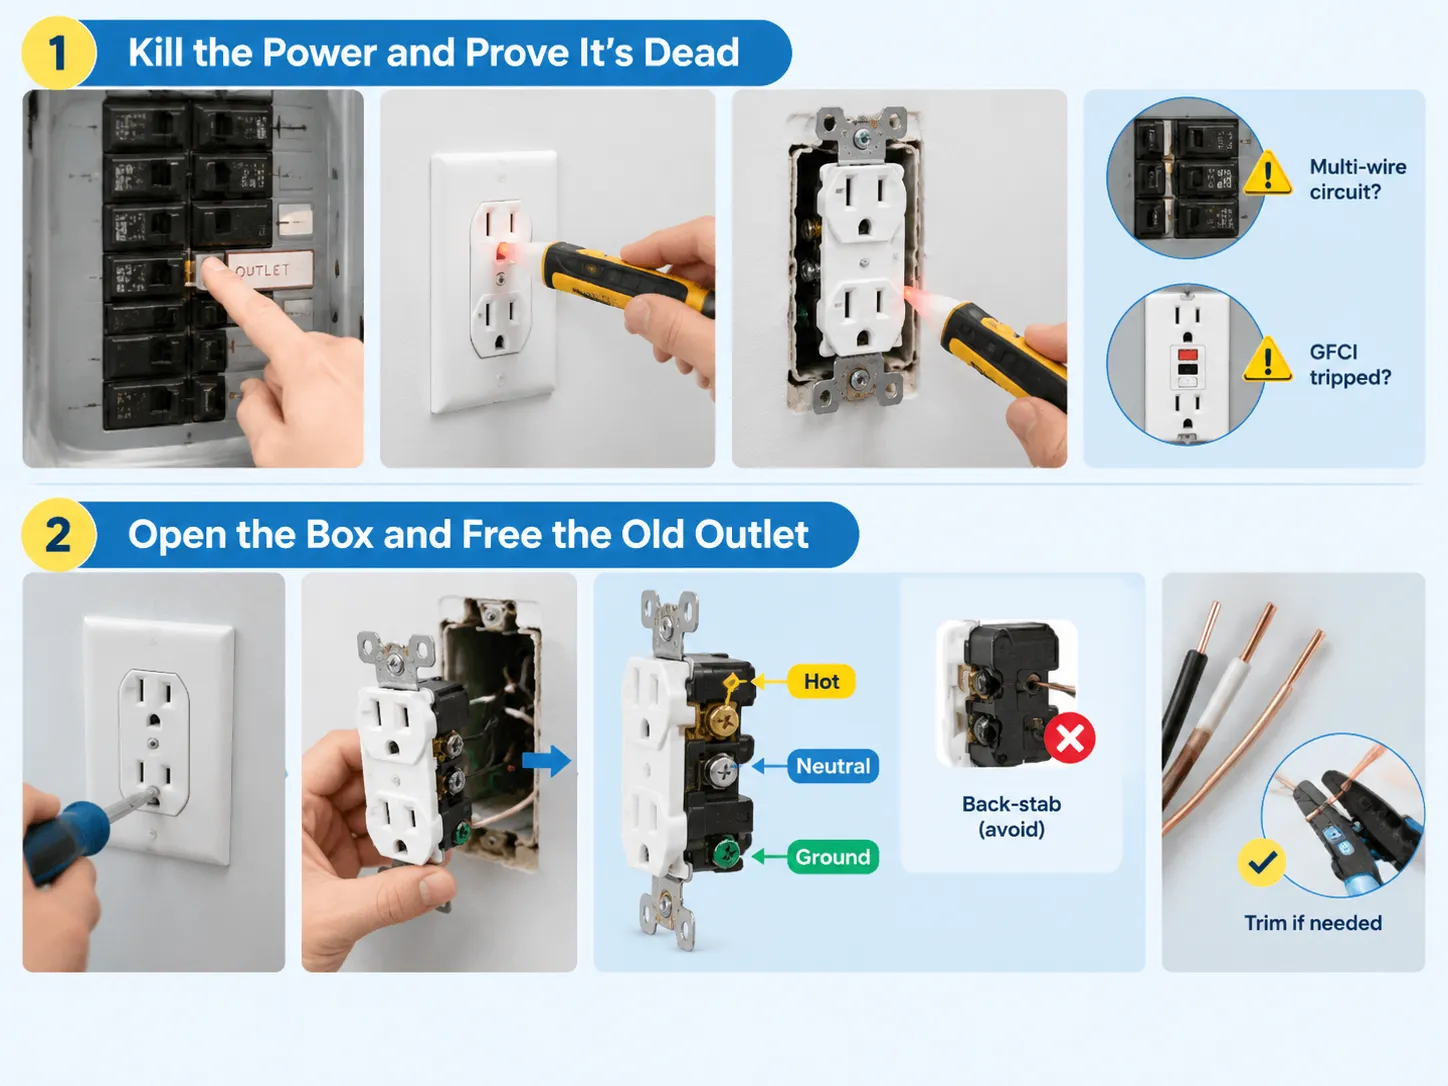
Step 1: Kill the Power and Prove It’s Dead
This is the important step that takes precedence over all the other steps.
- The first thing to do is to turn off power at the breaker panel. Look for the breaker that controls the outlet. In case it is not labeled, plug a light or a stereo in the outlet, turn it on and have someone observe the outlet while you switch the breaker on and off. Remember which breaker controls your outlet and make sure that you label your panel.
- Use the non-contact voltage tester to test the outlet. With the circuit turned off, put the tester on the outlet. It should show no readings when the outlet is checked and you are using the correct circuit. In case there is any reading, you might have turned off the wrong circuit or the outlet is connected to a different source of power.
- Remove everything which may be connected to the circuit you are testing. Make sure that everything is unplugged even from nearby outlets since the presence of appliances connected to the circuit may lead to infinite results in your tests and cause confusion.
- Test the circuit again. Initially, remove the cover plate and check the terminals themselves. This will help avoid situations when the outlet gets power from another source while the circuit you think you have switched off is really switched off.
There are two warnings to follow. First, a multi-wire branch circuit should be avoided here as it may give power to the neutral wire even if the circuit is turned off. Second, make sure to check with the tester that the receptacle is not downstream of GFCI because it may go out of order when the breaker is switched off.
Step 2: Open the Box and Free the Old Outlet
- Take out the screw on the cover plate and put the cover plate aside.
- Take out the two screws that fix the receptacle in its place. In older installations, these screws could be painted over and oxidized but usually a little turn can help them get loosened.
- Gently pull out the receptacle from the box without pulling it too hard. The wires are rickety and could be short, and excessive pulling can damage the wires from the terminal ends or the insulation in the box.
- Make photos of the connections from different angles before you start dealing with the terminals. This is very important thing to do because it will help you understand which conductor goes where.
- Pay attention to the connections on the sides of the existing device. The brass screws are for hot wire, silver ones are for neutral wires, and green ones are for grounding purposes. If you notice wires that are inserted into the slots on the backside of the device, keep in mind that this kind of wiring is problematic and should not be repeated.
- Now let’s disconnect the wires from the terminals. If the ends of the wires are bent or damaged, use wire strippers to adjust them.
Take a good close look at what you have insider the box. If your wires are aluminum instead of copper or there is cloth and rubber insulation, a missing ground wire, or too many wires inside the box, make sure to reach the electrician.
Step 3: Choose the Right Replacement
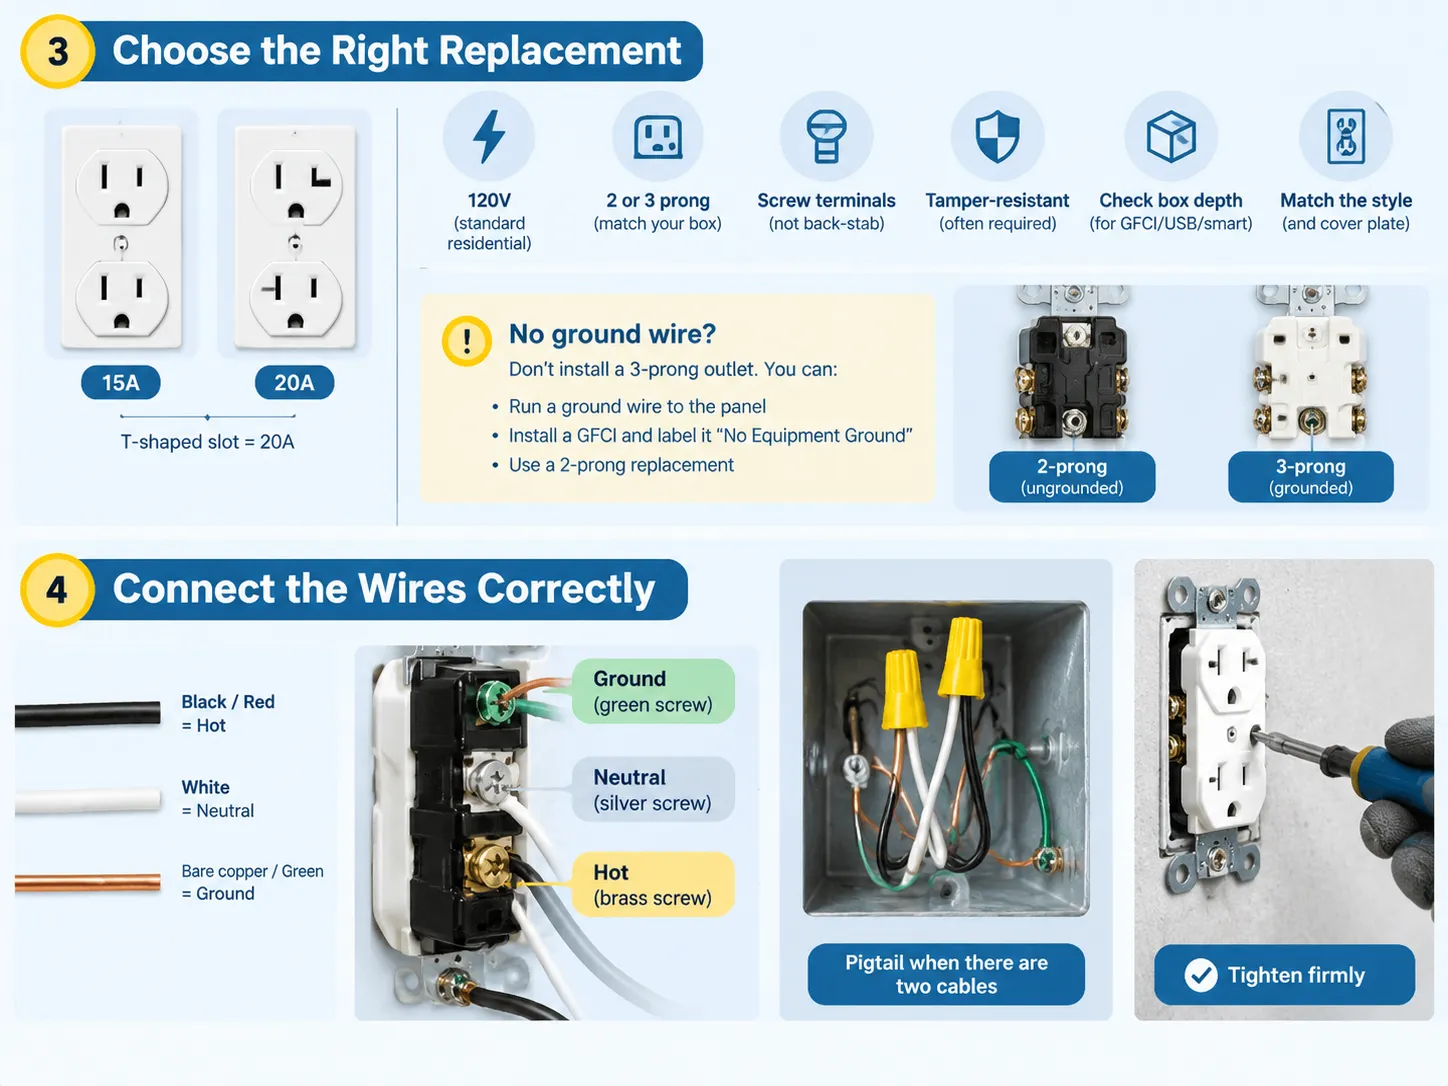
Buying the wrong device is the most common avoidable mistake, and it’s usually an amperage mismatch.
| What to check | How to get it right |
|---|---|
| Amperage | Match the circuit: 15 A on a 14-gauge circuit, 20 A on a 12-gauge circuit. A 20 A receptacle is legal on a 15 A circuit; the reverse is not, and a 20 A receptacle has a T-shaped slot so you can tell them apart |
| Voltage | 120 V for standard North American residential circuits |
| Number of poles | Two-prong (ungrounded) or three-prong (grounded). If the box has a ground conductor, fit a three-prong; if it doesn’t, see the note below |
| Terminal type | Prefer screw terminals over back-stab. Tamper-resistant outlets are required in many jurisdictions for residential use |
| Box depth | A GFCI, a USB outlet or a smart outlet is physically deeper than a standard receptacle and needs enough box volume |
| Colour and style | Match the rest of the room, and match the cover plate you bought |
A common situation that often arises in older homes is the issue of converting a two-prong ungrounded socket into a grounded three-prong socket. The problem arises when the installation of a three-prong outlet cannot be done if there is no ground conductor inside the box as it would leave a terminal (the third prong) hanging and ineffective. You can choose from three exceptionally effective options to deal with the situation – you can install a ground wire to the panel, install a GFCI rated outlet, and make sure to label it as “Not Equipment Ground” according to the existing regulations or simply install a two-prong replacement outlet.The differences between the formats, and how to tell which one you’re dealing with, are covered in this comparison of two-prong and three-prong outlets.
Step 4: Connect the Wires Correctly
Now we come to the decisive moment. Take your time and do it carefully.
- Ascertain which wires are which; color code identification helps: black/red is positive, white is negative, and bare copper or green wires are grounding wires. In some cases, many old installations do not follow color coding, which means that the wire that is shorter is usually positive, while a wire with ribbed or white stripes is likely negative; however, it is always better to test with a multimeter than to guess.
- Remove about 3/4 inches of insulation from the wires if necessary; then, hold the wire at an angle and form a clockwise hook using the pliers so that the screw grips the wire instead of displacing it from its location.
- Begin with the ground wire. Use the green screw for the green wire connection. In metallic boxes, one should remember to connect metal parts of the box to the ground.
- Connect the negative wire to the terminal with a silver screw; this is the white wire and this is the silver terminal.
- Connect the positive wire to the brass screw; this is the black wire and this is the brass terminal.
- If there are many wires close to one another, use the pigtail method; do not stick multiple wires into one terminal. Connect both wires of one color and then take one length of pigtail from one color and connect it to the terminal.
- Tighten properly; too tight will break the wire.
- Double-check your work; compare with the initial picture of the wires.
Now, the question of which wire belongs to which terminal could answer the question of why the device does not work.
Step 5: Fold, Mount and Restore
- Fold the conductors like an accordion into the box, in the order of ground, neutral, and hot conductors. Ground should be the last to be named because it should be put farthest back. Also, folding the wires will prevent them from getting stuck inside the device.
- Fit the receptacle into place and double check that no wire is pinched between the device and the edge of the box. If this is a metal box, cover the sides of the device with several rounds of electrical tape to avoid any problems with getting in contact.
- Put in the two mounting screws to make sure the device is installed properly. Take care to install the receptacle flush with the wall.
- Put the cover plate on with the screw kind of tight, because any over-tighting will crack the plastic plate making it an eyesore for the whole installation which looks like an amateur job.
- Restore the power. If anything else in the circuit is working, it will prove that you have done the panel labeling correctly.
Step 6: Test Everything
No matter how simple you think the installation will be or how easy it is to find the wiring, you should never forget to complete the four steps below in order.
- Begin by using a non-contact tester against the faceplate of the outlet, but not at the sockets. If the faceplate is shown to be live it would indicate a problem with the installation.
- Use a plug-in outlet tester to identify the current state of the outlet and all three lights should be on which establishes the fact that the wiring is valid and there are no irregularities present.
- Attempt to plug in a lamp and check if it works and try other equipment as well. If it works with a lamp, but not another heavier device, it would indicate that the wiring is loose, and you should fix this.
- The last step is to make sure the outlet works properly by putting your hand on the faceplate. If it is warm, it indicates that the wiring is out of place.
Don’t forget to test the outlet that you replaced on the switched wiring. The outlet should be tested with the switch on, as this would confirm the wiring is in place.
Upgrading to a GFCI Outlet
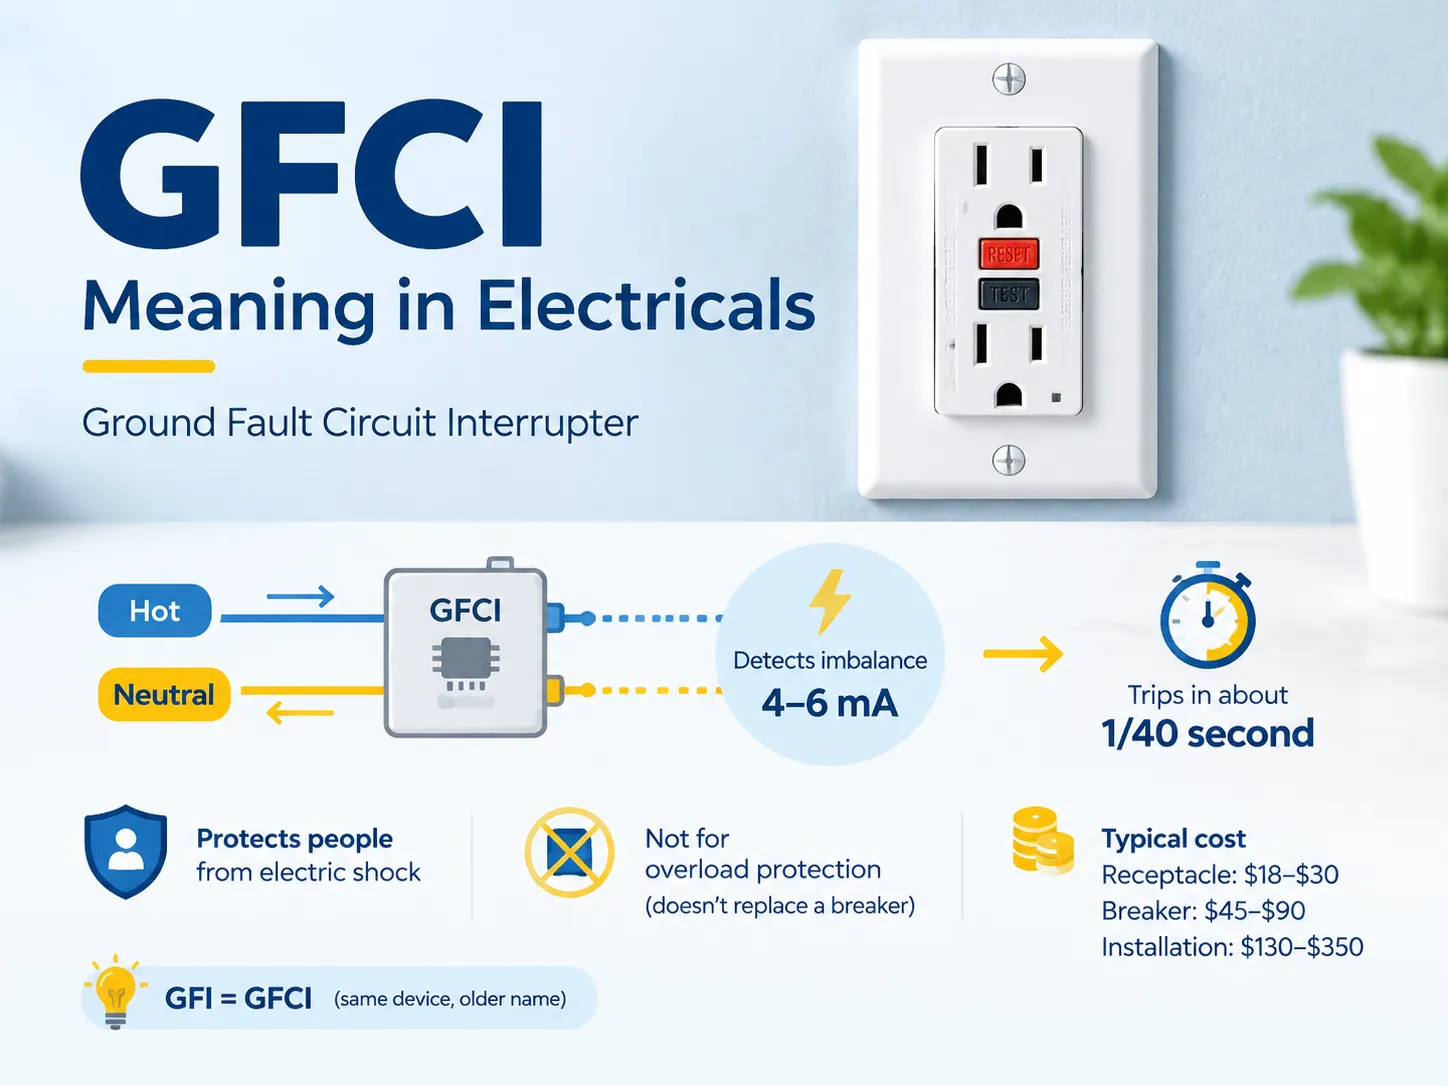
In case you are swapping out an outlet in bathrooms, kitchens, garages, laundries, basements, crawl spaces, or outdoor spaces, you will most probably need to replace it with a GFCI outlet.Building regulations have changed over the years, which means that even if an old property had an outlet type that was exempt from codes, it may need to comply today.
Now, the main point to distinguish your past installations of non-GFCI vs. GFCI outlets is to remember the importance of LINE and LOAD. In this case, GFCI outlets have two sets of outlets and terminals at the hot and neutral sides of the outlet. One set will connect to the LINE and the other to the LOAD line. If you swap them, the installation will be correct but will provide no protection for downstream outlets, i.e., the classical installation mistake.
There are just two things to bear in mind. First, if you are working with a two-wire branch circuit, you should not use the GFCI outlet at this point but rather use a two-pole device instead. If you are installing the outlet outdoors or in humid areas, you should use a GFCI model that is weather resistant, not gas resistant! If you’re not sure which format applies, the functional differences between a ground-fault device and a standard receptacle are set out in this explanation of how GFCI and regular outlets differ.
Upgrading to USB Outlets
Swapping out a traditional outlet for a USB version is identical to installing a normal outlet with the added bonus of two things to keep in mind.
- Depth. USB outlets use a power adapter inside, meaning it will take more space compared to a regular electrical outlet. If your box is shallow or has wires close when you install an outlet there it may not fit because of how wide it is. Check the depth of your electrical box and choose one accordingly.
- Load and circuit. Remember that USB outlets draw from the same circuit as regular outlets. This is generally acceptable at home, but it would be wise to properly understand the circuit’s load capacity before putting in constant usage.What a modern USB outlet actually delivers in terms of charging rates, port types and the difference between USB-A and USB-C versions is covered in this guide to choosing a USB charger socket, and it’s worth reading before you buy, because the port specification matters more than the brand.
Here is a helpful tip: If the circuit is switched on and off, even if the USB port is plugged into a wall socket, it will only be charged when the switch is turned on. Choose to install your socket in a location where there is no switch involved unless that’s exactly what you are trying to achieve!
Replacing the Box and the Cover
In replacing the outlet, one is merely replacing the device, but replacing the box is a different beast altogether, and it is good to be clear about the difference.
Replacing a cover plate is incredibly simple: two screws, one plate, and a couple of dollars. All one needs to do is match the type of the cover plate with that of the device — for example, A GFCI cover plate is larger than the standard receptacle and needs a larger cover plate, and one cannot fit a single-gang cover plate in the two-gang opening.
Now, replacing the box is where it gets tricky. In case a box is replaced in the already finished wall, one has to work with old-work boxes that clamp to the drywall from the back or adjustable retrofit box for plaster/lath walls. In order to do this, one has to either use the existing opening or make it bigger, and also has to fish wires without losing them in the wall. Tricks include binding cable ends while the box is being swapped, and knowing whether or not the opening is square enough for a retrofit clamp to grip on it and whether the old box is metal, if so along with whether or not the opening is square, this is a great indication to have someone do the work instead of you.
The main reason anyone would replace a box in the first place is that it is too small. Code limits box fill, and the use of a GFCI, a USB, or smart switch to a box that was sized for the normal receptacle is a usual reason that makes the installation work, but fail inspection.
What It Costs
Whether you’re doing it yourself or hiring, the numbers are easy to plan against.
| Item | Typical cost | Notes |
|---|---|---|
| Standard replacement receptacle | $2–$10 | Tamper-resistant versions at the upper end |
| GFCI receptacle | $15–$40 | Weather-resistant models for outdoor use cost more |
| USB or USB-C outlet | $20–$50 | Higher-power USB-C versions sit at the top |
| Smart outlet | $25–$60 | Plus a hub in some ecosystems |
| Cover plate | $1–$8 | Decorative and metal plates cost more |
| Old-work box | $3–$15 | Retrofit and adjustable versions at the upper end |
| Electrician, replacement outlet | $75–$250 per outlet | Average around $200 including materials in most US markets |
| Multiple outlets, one visit | $50–$125 each | The labour is in the visit, so batching pays |
| New outlet where none existed | $150–$500 | Fishing cable, opening the wall, extending the circuit |
| Box replacement | $100–$300 | Material is cheap; access and finishing are not |
| Emergency or weekend call-out | Add $50–$150 | Rates rise outside normal hours |
The labor economics involved in this process is worth knowing. The charge for an electrician typically includes the first or second outlet, hence replacing one outlet will cost you nearly the same as four outlets. If you have multiple problematic outlets, it’s better to have them all replaced at once. Whenit comes to DIY, because the cost of the part is minimal, replacing an outlet you have already opened is always reasonable — and the same applies when you would do some construction anyway.
When the Outlet Is Fine but the Circuit Isn’t
There are instances where it’s the outlet that is a sign rather than the issue. You may swap it, but it won’t solve your troubles.
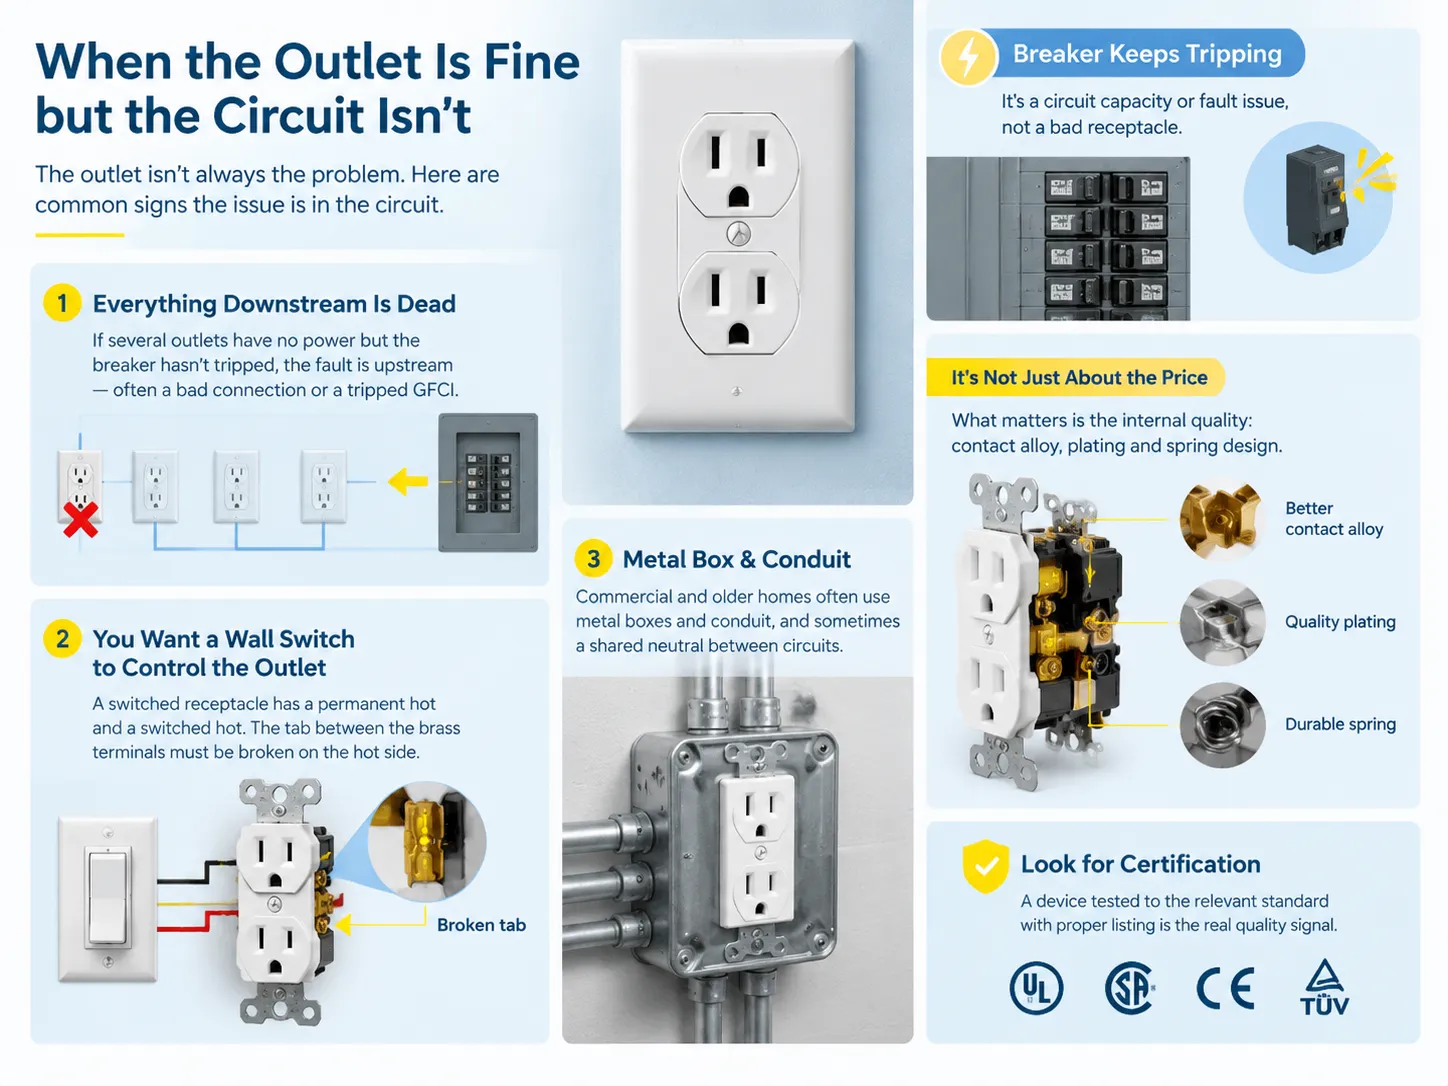
The breaker keeps tripping for you is a circuit capacity problem and not an issue concerning the outlet. If the breaker still trips after disconnecting the outlet, you may have a wiring problem or an issue with other loads in the circuit while determining how much load a circuit can take and how many outlets it can carry has already been explained.
If everything downstream is dead, keep in mind that the breaker did not trip in this case. In this scenario, your fault is somewhere upstream, as it often happens due to the failure of the first outlet on the run back-stab connection. All you have to do is check your outlet starting from the panel going down.
You want to swap a receptacle for one that is wall-switch-controlled. If this is the case, it is important to clarify that the switch obviously separates the circuit maintenance of the socket compared to the regular receptacle with an intact tab so the switched part and the un-switched part of the receptacle slot work separately. When replacing, you would need to replicate the disconnected tab correctly to make it work since otherwise you will have to go through more than a device swap to transform your normal socket into a switched one.
The box is metal and full of conduits. Commercial installation of electrical wiring in apartments and houses involves the use of metal boxes and conduits and sometimes involves the use of shared ground or neutral wires between the circuits and duplicating the process of swapping the devices accordingly. However, it is very important to understand that at the same time, there are different safety issues involved in this process, and therefore it is a considerably more complicated job requiring a licensed electrician to perform it.
It is important to highlight how the devices involved in the process are made because it helps to understand what you get for your money when making purchases. All the devices share the same structure with brass contacts, springs and moulded cases. In other words, a common thing exists, where the difference between a device that would last you for years and the one that would go loose in five years is the alloy, the spring design and the plating. The main area GOG Electric operates in is manufacturing switches and sockets of any quality according to the top class BS, American and European standards.
FAQ
Can I replace a wall outlet myself?
In most cases and states, yes: a homeowner can change a receptacle in their own single-family residence without a license or permit — assuming that the rating of the circuit remains the same and no new wires are added. You’ll have to be able to work comfortably in an electrical box, verify that power is off using a tester instead of relying on the breaker label, and know how to recognize hot, neutral, and ground. However, if you want to change any of the existing wires, make sure to avoid any involvement with aluminum wiring, a multi-wire branch circuit, a metallic commercial box, a broken or damaged box, or a circuit addition. Before starting any kind of work on your home, please check the requirements in your area and state, as they may differ, with someplaces requiring and others not requiring a permit for any types of electrical work.
Do I need an electrician to replace an outlet?
While it’s true that many simpler electrical tasks can be performed by a home handyman, it is also true that certain tasks are quite impossible to do without the assistance of a licensed electrician. When hiring an electrician is a must, you should be aware that this may include: installing additional wiring or new outlets, replacing an existing electrical box in a finished wall, working with aluminum wires, converting ungrounded circuits to grounded ones, establishing multi-wire branch circuits, and repairing any equipment with a recurring tripping breaker, burned applications, or burnt smell. The most competent solution is to make a call for an electrician, if you are in doubt what category you belong to.
What is the 2 6 12 rule for outlets?
This is an abbreviation for the NEC requirement that specifies the number of receptacles installed on a wall in habitable environments. The number two refers to the fact that any wall space that is two feet or wider must have a plug. The number six means there cannot be a point that is further than six feet away from a receptacle. The number 12 means that the farthest distance allowed between plugs is twelve feet. This rule only applies to living spaces, such as living rooms, bedrooms, and dens, and the distance is along the wall’s surface, taking into consideration the space taken by a door opening. Other rooms such as kitchens, bathrooms, garages, and hallways will fall under different regulations.
Should I turn off the breaker before changing an outlet?
It is important that you both turn off the breaker and verify that it is off. Turning off the breaker is not enough; you need to confirm that it has worked. Use a non-contact voltage tester on the slots and on the terminals inside the box after you remove the cover. This matters because sometimes, a turned off breaker does not necessarily cancel circuit activity due to the second source of power feeding the receptacle, or due to a different outlet, or sometimes in a setup called a multi-wire branch circuit in which the neutral stays live. In addition, never make the mistake of relying on a light switch because although it is in the off position, the circuit is still live at the switch. Always follow the three rules: breaker off, use the tester and then proceed with work.
How long does it take to replace a wall outlet?
Experiences that the average person has when installing an outlet result in a time rating of about 20 to 40 minutes, provided the person has done it before, which includes testing. For someone doing this for the first time, the recommended allowance is one hour, since the person has to spend time checking connections and folding the wires back into the box. An electrician allows 15 to 30 minutes of actual time per outlet when on site, which includes getting there and setting up, that is why their minimum fee is for two or three outlets and why having all of them done in one go is cheaper.
References
- NFPA 70 — National Electrical Code — receptacle spacing, GFCI and AFCI requirements referenced throughout this guide
- UL Solutions — certification and listing information for receptacles and wiring devices
- Electrical Safety Foundation International — consumer guidance on outlet safety, tamper resistance and shock protection
- US Consumer Product Safety Commission — electrical product safety, recalls and household electrical fire data
- OSHA — Electrical Safety — electrical safety principles and de-energisation practice in the workplace
- US Department of Energy — household electrical efficiency and safety reference material
Conclusion
The ability to change wall plugs without rewiring is one of the reasons why this operation can be referred to as simple. The specific steps are the following: first, the breaker is switched off, then its absence of power is determined with the tester, next the old device and cover are removed, then the wires are photographed; finally, the hot wire is connected to the brass terminal, the neutral one to the silver terminal, while the ground wire should be connected to the green terminal. The price range for standard switch replacement is anything between two and ten dollars, while GFCI plug replacement costs approximately from fifteen to forty dollars and USB plug replacement is in the range of twenty to fifty dollars. When hiring professionals for the job, one can expect to pay from seventy-five to two hundred fifty dollars.
The only thing that one needs to keep in mind to successfully complete the job is to test for power with the tester instead of relying only on the breaker label and to connect the wires to the right terminals.