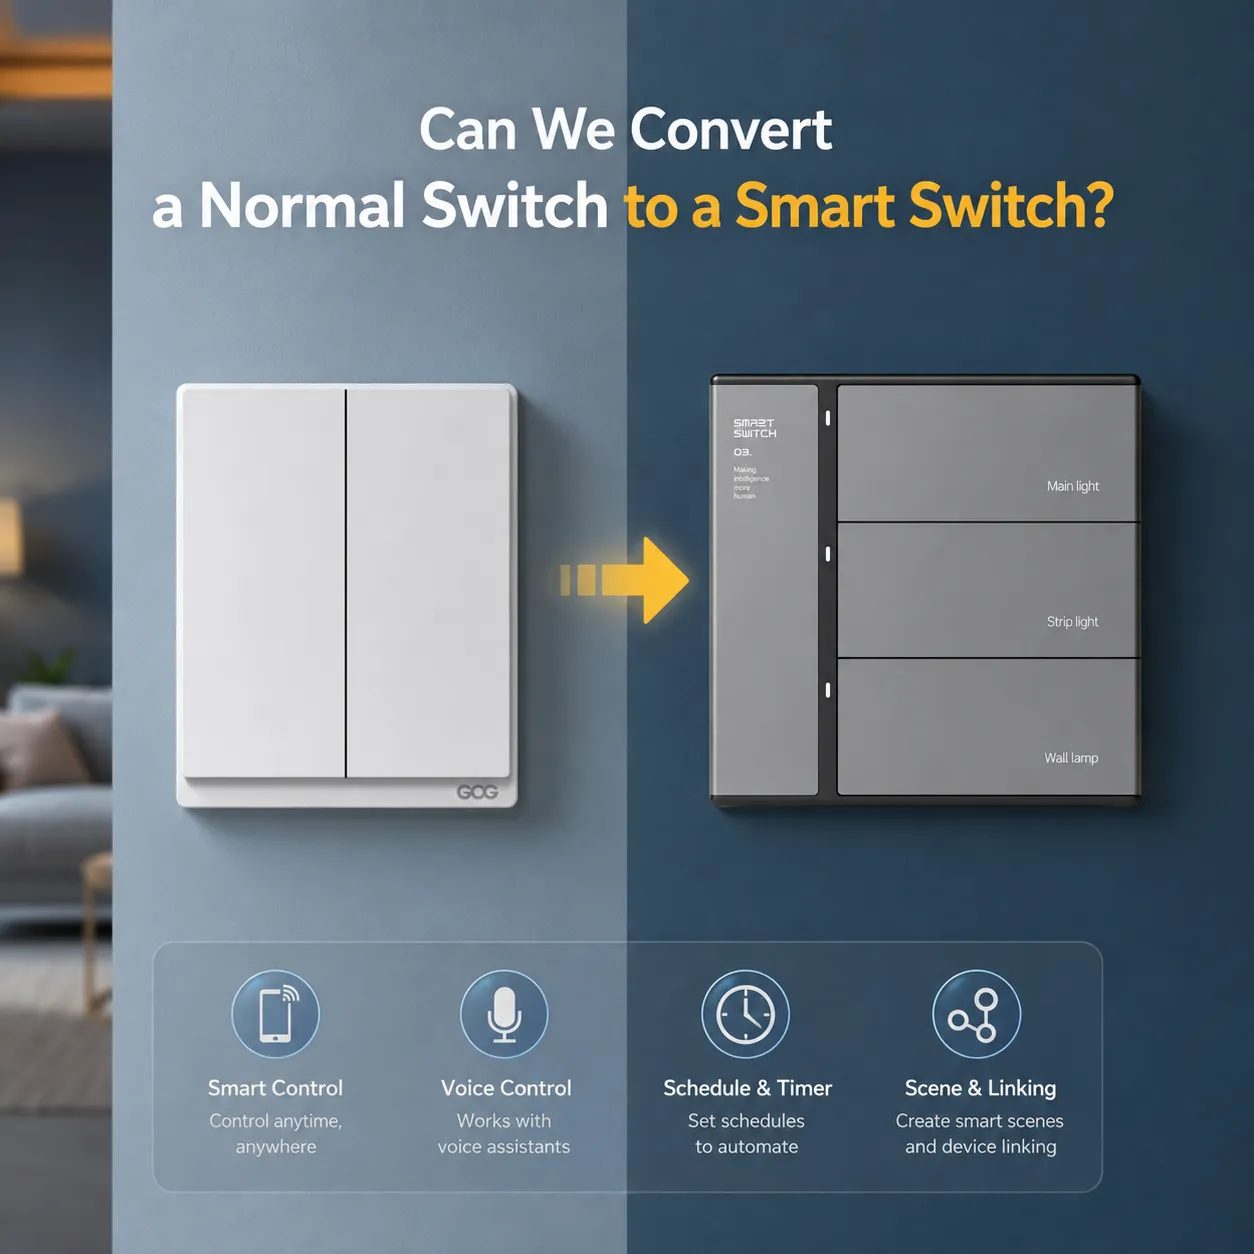
جالسًا على الأريكة، مرتاحًا وسعيدًا، ترى أضواء مطبخك لا تزال مضاءة. يمكنك النهوض وإيقاف تشغيل المفتاح أو يمكنك فقط التقاط هاتفك والنقر على زر لإيقاف تشغيله دون الحاجة حتى للنهوض. هذا هو وعد المفاتيح الذكية وهذا هو السبب وراء سؤال العديد من أصحاب المنازل عما إذا كان من الممكن استبدال مفتاح عادي بآخر ذكي. للإجابة بإيجاز على هذا السؤال – في معظم الحالات، نعم، يمكن تحويل المفتاح العادي إلى مفتاح ذكي متصل باستخدام تقنيات Wi-Fi أو Zigbee أو Z-Wave التي تتيح لك التحكم فيه من هاتفك الذكي، باستخدام الأوامر الصوتية، وكذلك برمجته مسبقًا. ومع ذلك، هناك أكثر من مجرد استبدال الأجهزة. يجب فهم مخطط الأسلاك الحالي، اختيار مفتاح ذكي مناسب، واتباع احتياطات التركيب. هذا الدليل يهدف إلى توفير كل ما تحتاج لمعرفته حول الموضوع – وقت استبدال المفتاح العادي بآخر ذكي، التحقق من التوافق، اختيار النموذج المناسب وتوصيله بشكل صحيح.
إجابة سريعة: نعم، من الممكن تحويل مفتاح بسيط إلى مفتاح ذكي ببساطة عن طريق إخراج المفتاح التقليدي ذي الرافعة أو الزر ووضع مفتاح ذكي في نفس تركيبة الحائط. يجب استيفاء الشروط التالية لنجاح التحويل: (1) التأكد من وجود سلك محايد في الأسلاك لأن معظم المفاتيح الذكية تتطلبه (إذا لم يكن موجودًا، يمكنك شراء مفتاح ذكي لا يحتاج إلى سلك محايد)، (2) التحقق من نوع المفتاح الذي لديك، (3) اختيار مفتاح ذكي قادر على الاتصال بنظام المنزل الذكي الخاص بك (Alexa، Google Home، Apple HomeKit، إلخ)، و(4) القيام بنفس إجراء ‘إيقاف تشغيل التيار الكهربائي’ كما هو الحال في أي عمل كهربائي. قد يستغرق استبدال المفتاح حوالي 20-40 دقيقة إذا كان المفتاح أحادي القطب، ومع ذلك، ليس كل مفتاح يمكن تحويله، خاصة في حالة الأسلاك القديمة جدًا (نوع knob-and-tube)، أو الأسلاك المصنوعة من الألمنيوم، أو صناديق المفاتيح بدون سلك تأريض، مما يستدعي الاستعانة بفني كهربائي مرخص لهذه الأنواع من المفاتيح.
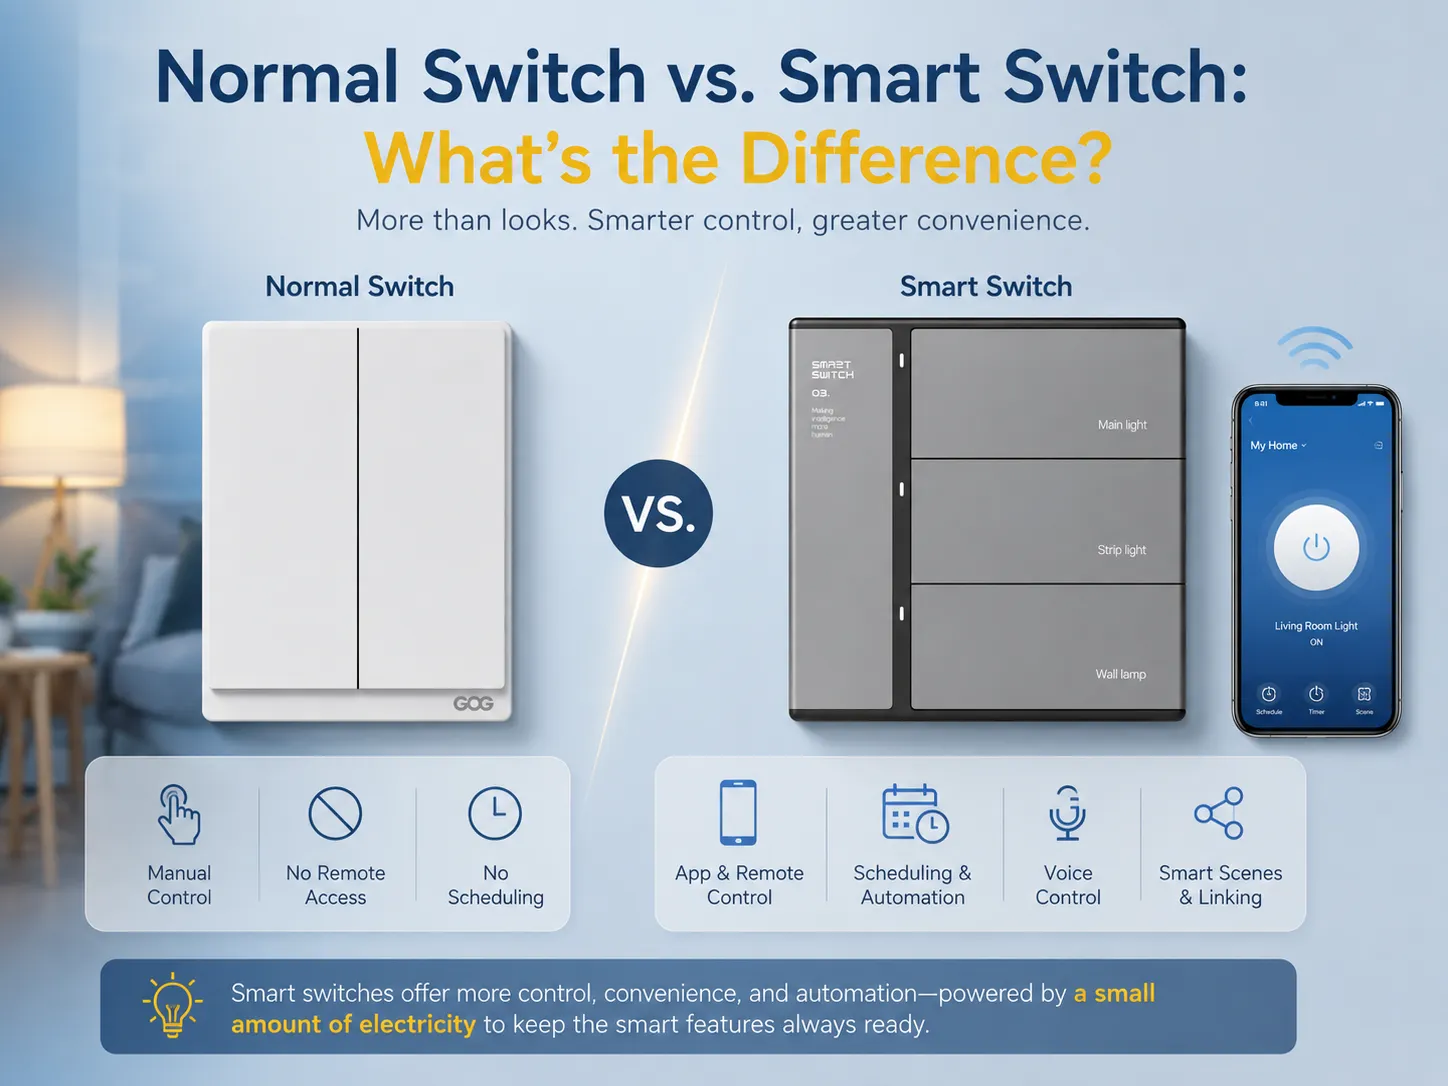
المفتاح العادي مقابل المفتاح الذكي: ما الفرق؟
قبل الدخول في إجراءات استبدال المفتاح، من الضروري فهم الفرق بين المفتاح العادي والمفتاح الذكي لأن هذا الفرق ليس فقط بصريًا بل يؤثر أيضًا على كيفية عمل هذه المفاتيح، ما يمكنها القيام به، ونوع الأسلاك المطلوبة.
| الميزة | المفتاح العادي | مفتاح ذكي |
|---|---|---|
| طريقة التحكم | الرافعة/الزر الفيزيائي فقط | زر فيزيائي + تطبيق + صوت + أتمتة |
| بروتوكول الاتصال | لا يوجد (تلامس ميكانيكي) | Wi-Fi، Zigbee، Z-Wave، أو Bluetooth |
| التشغيل عن بُعد | غير ممكن | التحكم من أي مكان عبر الهاتف الذكي |
| الجدولة | غير متوفر (يتطلب مؤقت خارجي) | جداول مدمجة، مشغلات شروق/غروب الشمس |
| التحكم الصوتي | لا | Alexa، Google Assistant، Siri، إلخ. |
| استهلاك الطاقة | صفر (سلبي) | سحب مستمر صغير لتشغيل وحدة الراديو |
| متطلبات السلك المحايد | لا | معظم النماذج تتطلب سلك محايد؛ بعضها لا يتطلب |
| التكلفة النموذجية | $2–$8 لكل مفتاح | $15–$60 لكل مفتاح |
| العمر الافتراضي | 10–20 سنة (تآكل ميكانيكي) | 5–10 سنوات (قد تتدهور الإلكترونيات) |
المفتاح العادي هو ببساطة أداة ميكانيكية؛ يؤدي قلب المفتاح إلى إغلاق أو فتح دائرة كهربائية داخلية. ومع ذلك، يحتوي المفتاح الذكي على لوحة دائرة صغيرة تحتوي على وحدة راديو تكون دائمًا مفعلة. لذلك، تتطلب معظم المفاتيح الذكية وجود سلك محايد، حيث يسمح هذا النوع من التوصيل بتدفق التيار الكهربائي حتى عندما يكون الضوء مطفأ. لمقدمة أعمق حول ما يمكن أن تفعله المفاتيح الذكية، مقالنا عن ما هو المفتاح الذكي وفوائده الرئيسية يغطي مجموعة الميزات الكاملة.
متى يجب استبدال المفتاح العادي بمفتاح ذكي؟
التحول من مفتاح عادي إلى مفتاح ذكي ليس ضروريًا دائمًا، لكن هناك حالات يحدث فيها فرق واضح في الراحة، والحفاظ على الطاقة، وأمان المنزل. فيما يلي الأسباب الأكثر إقناعًا للقيام بذلك:
تريد التحكم عن بُعد في أضوائك
إذا سبق لك الذهاب إلى العمل وتساءلت عما إذا كنت قد تركت ضوء الحمام مضاءً، فإن المفتاح الذكي يمكن أن يكون حلاً لك. بهذه الطريقة، سيساعدك المفتاح الذكي على معرفة ما إذا كان الضوء قيد التشغيل أو الإيقاف باستخدام هاتفك المحمول.
تبني نظام منزل ذكي
إذا كنت تملك أيًا من هذه المنتجات، سيسمح لك المفتاح الذكي بالتحكم في أضوائك باستخدام الأوامر الصوتية. يمكنك إصدار الأمر “Alexa، أطفئ جميع الأضواء”، على سبيل المثال. تعمل المفاتيح الذكية مع منصات مكبرات الصوت الذكية المختلفة مثل Alexa وGoogle Home وApple HomeKit.
تريد جداول زمنية مؤتمتة
تتيح لك المفاتيح الذكية إنشاء روتينات، على سبيل المثال، لتشغيل ضوء الحديقة عند غروب الشمس وإيقافه عند شروقها، أو لجعل أضواء الممر تضيء في الساعة 7 صباحًا كل يوم عمل. يمكن لبعض المفاتيح حتى التعرف على موقعك من خلال تحديد المواقع الجغرافية، مما يعني أن الأضواء ستشتغل عندما يقترب هاتفك من منزلك.
تهتم بأمان المنزل
يمكن للمفاتيح الذكية تقليد النشاط عندما تكون بعيدًا في إجازة عن طريق التحكم في الأضواء. تختلف المفاتيح الذكية عن المؤقتات الأساسية القابلة للتوصيل، حيث لا تتبع الآلية نفس الجدول الزمني يوميًا.
تريد تقليل استهلاك الطاقة
تتيح لك المفاتيح الذكية رؤية استهلاك الطاقة لكل دائرة إضاءة. يمكن للعديد من المفاتيح الذكية إخبارك بكمية الطاقة المستخدمة من قبل كل دائرة، وإمكانية إيقاف تشغيلها عن بُعد تعني أنك لن تهدر الكهرباء على أضواء تُركت مضاءة عن طريق الخطأ. في النهاية، يمكن أن تغطي التوفير على مدار العام بسهولة تكاليف شراء المفاتيح نفسها.
نصيحة: يمكنك البدء باستبدال بعض المفاتيح في منزلك على الفور. ابدأ بالمواقع التي تستخدمها بشكل متكرر مثل غرفة المعيشة والمطبخ، مما يضعك في موقف للاستفادة الحقيقية من الفائدة. بعد ذلك، يمكنك إكمال غرف النوم والأضواء الخارجية بمفاتيح جديدة.
هل يمكن تحويل جميع المفاتيح العادية إلى مفاتيح ذكية؟
هذا أحد أكثر الأسئلة شيوعًا بين أصحاب المنازل، والإجابة هي: معظمها يمكن، لكن ليس كلها. تحدد عدة عوامل ما إذا كان يمكن تحويل مفتاح معين:
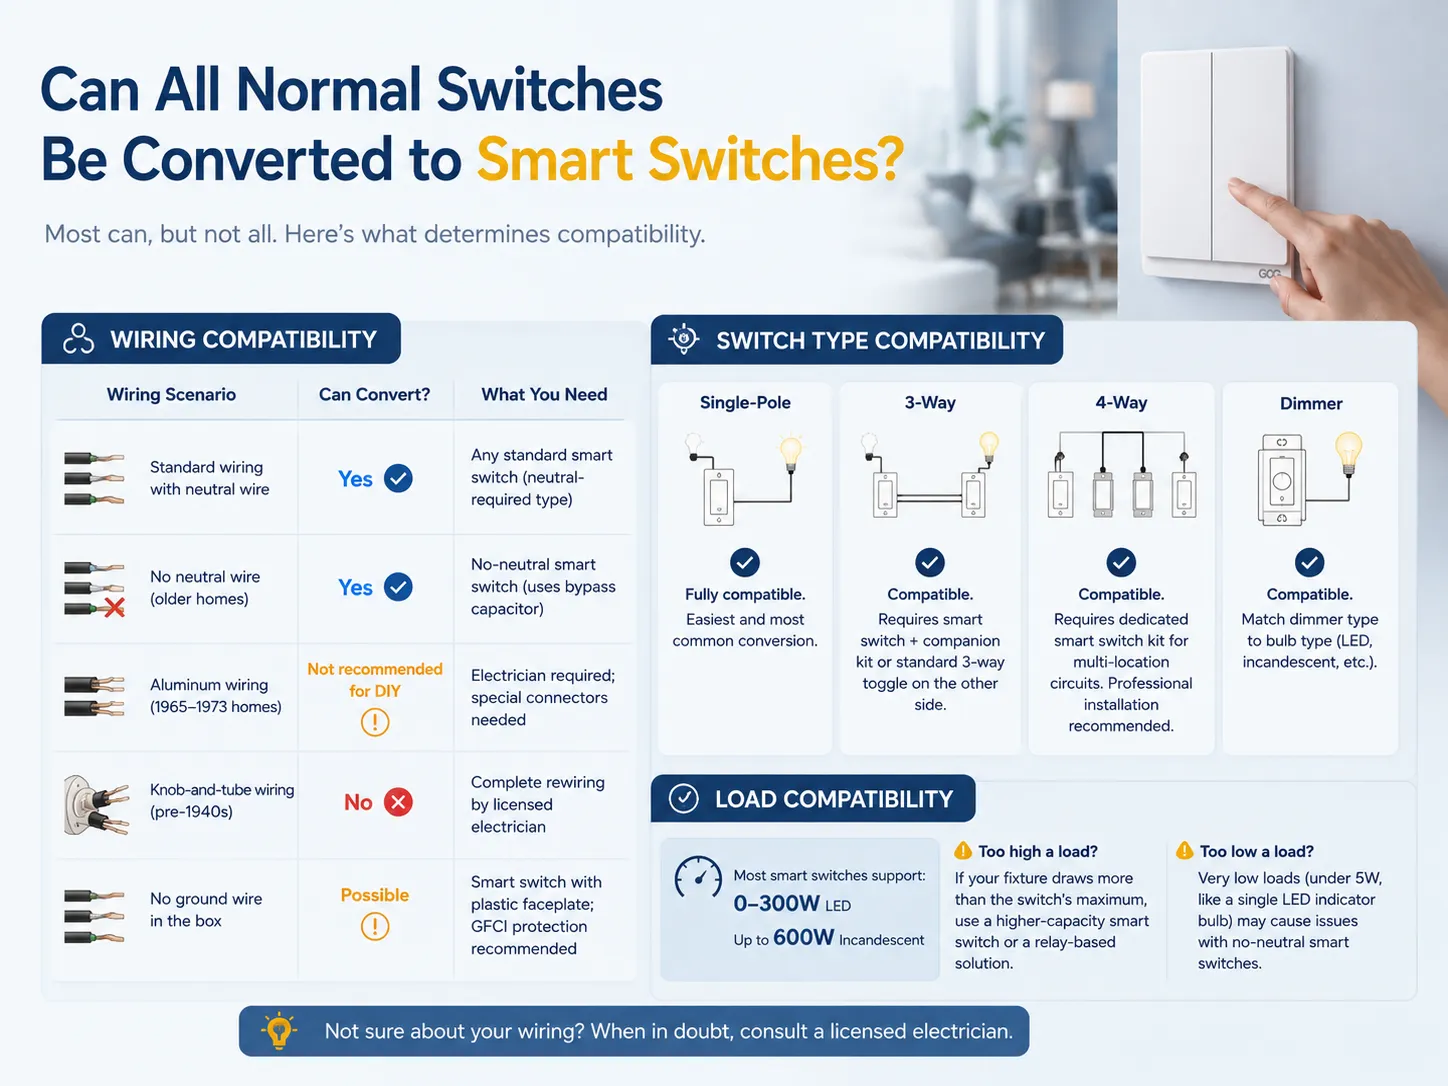
توافق الأسلاك
| سيناريو الأسلاك | هل يمكن التحويل إلى ذكي؟ | ما تحتاجه |
|---|---|---|
| الأسلاك الحديثة القياسية مع سلك محايد | نعم — بسيط ومباشر | أي مفتاح ذكي قياسي (نوع يتطلب سلك محايد) |
| لا يوجد سلك محايد (شائع في المنازل القديمة) | نعم — مع بعض القيود | مفتاح ذكي بدون سلك محايد (يستخدم مكثف تجاوز) |
| أسلاك الألمنيوم (منازل 1965–1973) | غير موصى به للقيام به بنفسك | مطلوب كهربائي؛ موصلات خاصة ضرورية |
| أسلاك المقبض والأنبوب (قبل الأربعينيات) | لا — لا تحاول | إعادة توصيل كاملة بواسطة كهربائي مرخص |
| لا يوجد سلك تأريض في الصندوق | ممكن مع الحذر | مفتاح ذكي بغطاء بلاستيكي (بدون معدن مكشوف)؛ يوصى بحماية GFCI |
توافق نوع المفتاح
- مفاتيح القطب الواحد (مفتاح واحد يتحكم في ضوء واحد): متوافق تمامًا. هو أسهل وأشهر تحويل.
مفاتيح 3-طرق (مفتاحان يتحكمان في ضوء واحد): متوافق، لكنك تحتاج إما إلى مفتاح ذكي + مجموعة مفتاح مرافق أو مفتاح ذكي على جانب ومفتاح 3-طرق قياسي على الجانب الآخر. تصبح الأسلاك أكثر تعقيدًا.
مفاتيح 4-طرق (أكثر من مفتاحين يتحكمان في ضوء واحد): متوافق، لكنك ستحتاج إلى مجموعة مفتاح ذكي مخصصة خاصة للدوائر متعددة المواقع. يُنصح بشدة بتركيب احترافي.
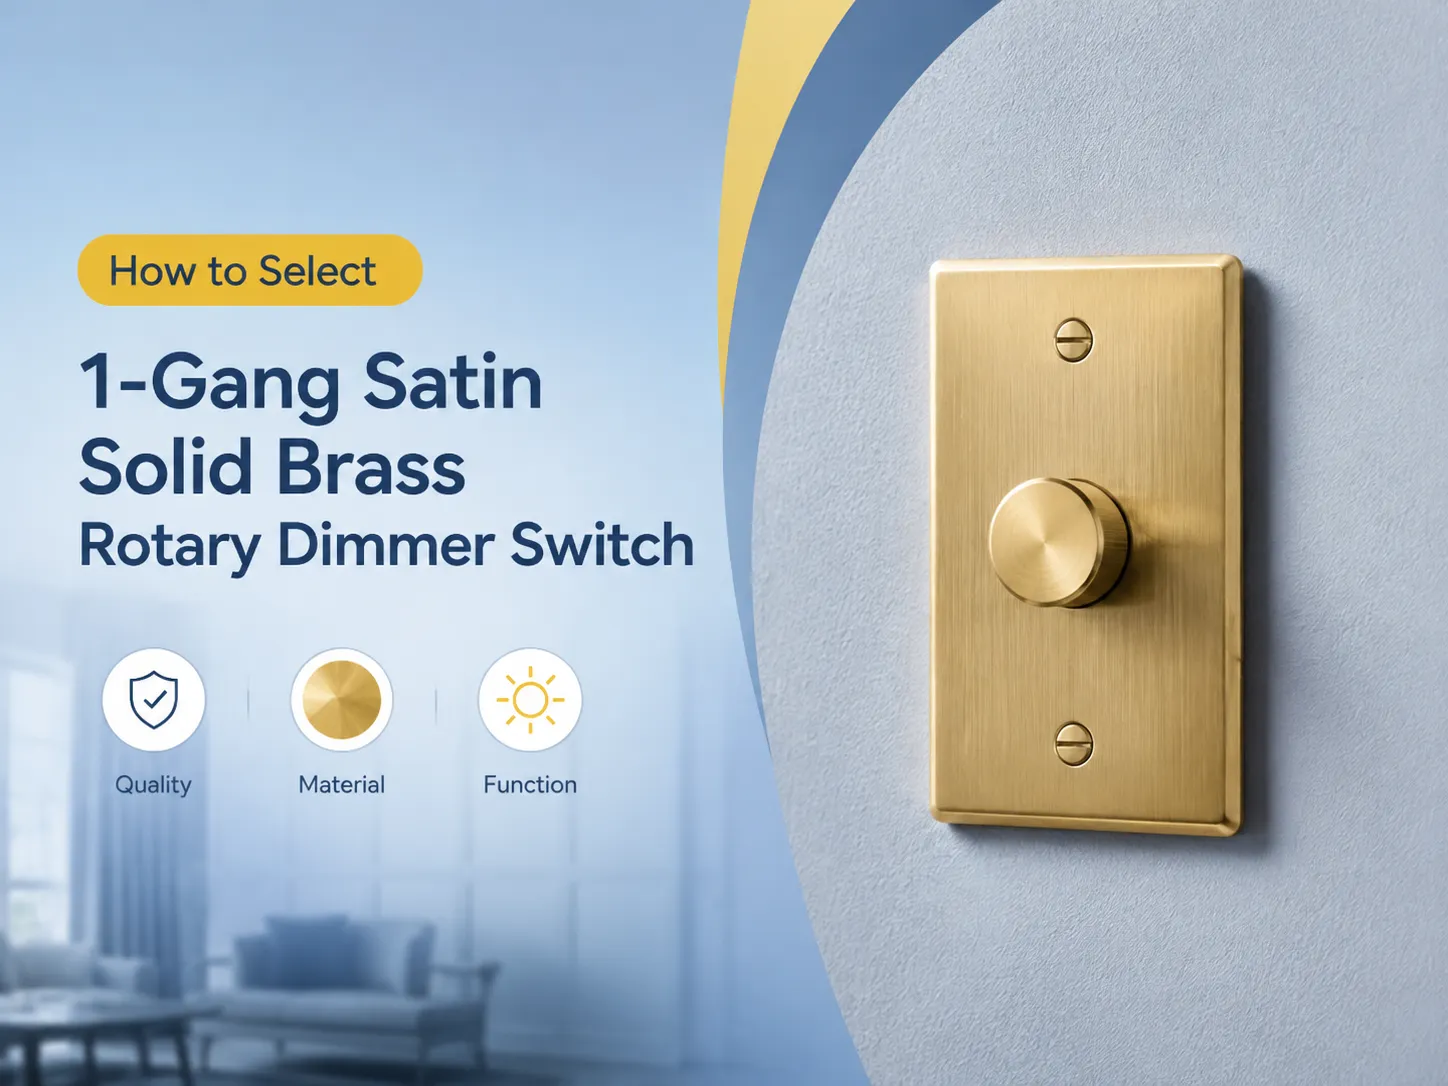
مفاتيح التعتيم: يمكنك ببساطة استبدال مفتاح التعتيم القياسي بمفتاح تعتيم ذكي، لكن تأكد من مطابقة نوع المفتاح مع نوع المصباح (LED، متوهج، إلخ).
توافق الحمل
تأتي المفاتيح الذكية مع نطاق خاص من قدرات الحمل. يدعم معظمها حتى 300 واط لأجهزة LED و600 واط للأجهزة المتوهجة. إذا كان استهلاك الطاقة لجهازك أعلى من قدرة المفتاح — على سبيل المثال، ثريا ضخمة تحتوي على 20 مصباحًا — تحتاج إلى استبدال المفتاح الذكي بجهاز يحمل حملًا أعلى أو حل مرحل. علاوة على ذلك، الأحمال المنخفضة جدًا (أقل من 5 واط، مثل مصباح مؤشر LED عادي) يمكن أن تكون مشكلة عند استخدام مفاتيح ذكية بدون سلك محايد.
لتمييز أنواع المفاتيح المستخدمة في منزلك، يجب أن تتعرف أكثر على مفاتيح القطب الواحد، 3-طرق، 4-طرق، والقطب المزدوج حيث أن لكل منها متطلباته الخاصة فيما يتعلق باستبدال المفتاح الذكي.
كيفية اختيار المفتاح الذكي المناسب
تكمن عملية اختيار المفتاح الذكي المثالي في مطابقة ميزات ومواصفات المفتاح الذكي مع أسلاك منزلك وتفضيلاتك للمنزل الذكي. فيما يلي العوامل الأساسية التي يجب مراعاتها:
سلك محايد مقابل بدون سلك محايد
النقطة الأهم هي أنه إذا كان صندوق المفتاح يحتوي على عدة أسلاك بيضاء متصلة معًا، فهذا يعني وجود سلك محايد، ويمكنك استخدام أي مفتاح ذكي. وإلا، ستحتاج إلى مفتاح ذكي بدون سلك محايد، يستخدم مكثف تجاوز يأتي معه لتغذيته عند جهاز الإضاءة. على الرغم من أن المفاتيح بدون سلك محايد أغلى قليلاً، إلا أن لديها متطلبات حمل دنيا أقل. لمعرفة المزيد، راجع مقالتنا حول المفاتيح الذكية المحايدة مقابل غير المحايدة للمقارنة التفصيلية بين النوعين.
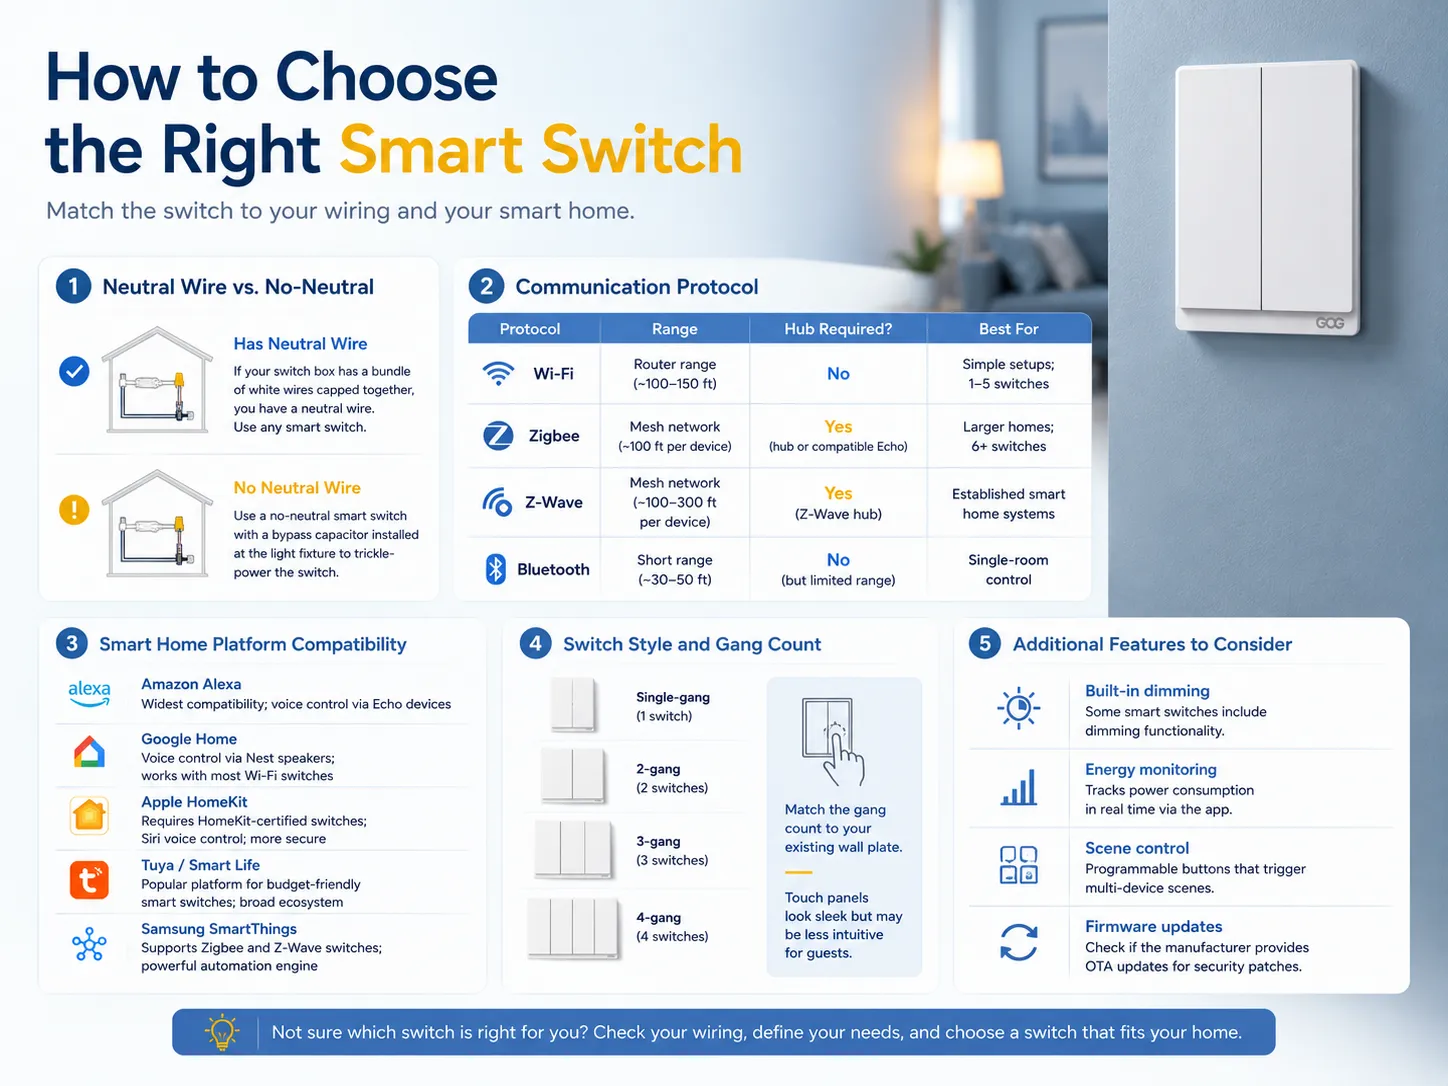
بروتوكول الاتصال
| البروتوكول | النطاق | هل يتطلب محور؟ | الأفضل لـ |
|---|---|---|---|
| الواي فاي | نطاق الراوتر (~100–150 قدم) | لا | إعدادات بسيطة؛ 1–5 مفاتيح |
| زيغبي | شبكة شبكية (~100 قدم لكل جهاز) | نعم (محور أو Echo متوافق) | منازل أكبر؛ 6+ مفاتيح |
| زد-ويف | شبكة شبكية (~100–300 قدم لكل جهاز) | نعم (محور زد-ويف) | أنظمة المنازل الذكية المعتمدة |
| البلوتوث | نطاق قصير (~30–50 قدم) | لا (لكن بنطاق محدود) | التحكم في غرفة واحدة |
مفاتيح Wi-Fi هي الأبسط من بين الأنواع المختلفة. لا تتطلب أي محور؛ فقط قم بتوصيلها بالموجه. ومع ذلك، كل مفتاح إضافي يزيد العبء على اتصال Wi-Fi. لذلك، إذا كانت تركيبتك تشمل أكثر من 6 مفاتيح، فمن الأفضل استخدام نظام قائم على Zigbee مع محور للتوسع. تشكل مفاتيح Zigbee شبكة شبكية تسمح لكل جهاز بتغطية اتصال الأجهزة الأخرى.
توافق منصة المنزل الذكي
تأكد من أن المفتاح الذكي الذي اخترته متوافق مع المنصة التي تختارها:
- استخدم Amazon Alexa لأعلى مستوى من التوافق مع مجموعة متنوعة من الأجهزة ووظائف الصوت عبر أجهزة Echo.
- يتم استخدام التحكم الصوتي Google Home بواسطة مكبرات Nest للاتصال بمعظم مفاتيح Wi-Fi.
- يتطلب Apple HomeKit استخدام مفاتيح معتمدة بمعايير HomeKit ويدعم أوامر الصوت Siri.
- Tuya / Smart Life هي واحدة من أكثر المنصات شعبية للمفاتيح الذكية ذات التكلفة المعقولة وتتوافق مع مجموعة واسعة من الأجهزة.
- Samsung SmartThings متوافق مع مفاتيح Zigbee و Z-Wave مما يجعله واحدًا من أقوى منصات الأتمتة.
نمط المفتاح وعدد المفاتيح
تتوفر المفاتيح الذكية بتكوينات مختلفة مثل مفتاح واحد (single-gang)، مفتاحين، ثلاثة مفاتيح، وحتى أربعة مفاتيح. طابق عدد المفاتيح مع اللوحة المثبتة حاليًا على الحائط. تأتي بعض المفاتيح الذكية مع لوحات لمس بدلاً من الأزرار الفيزيائية، مما يجعلها تبدو أنيقة ولكن قد يصعب على ضيوفك تشغيلها. للحصول على خيارات ذات تقييم عالي، دليلنا لـ أفضل مفاتيح الإضاءة الذكية تقييمًا يتضمن توصيات عبر نقاط سعرية وبروتوكولات مختلفة.
ميزات إضافية يجب مراعاتها
جعلت خاصية التعتيم في بعض المفاتيح الذكية من الممكن للمستخدمين الاستفادة من جهازين مدمجين في واحد. أصبح تتبع استهلاك الطاقة ممكنًا الآن لأن المفاتيح الذكية يمكنها تتبع استخدام الطاقة في الوقت الحقيقي عبر التطبيق. يمكن استخدام بعض المفاتيح الذكية لإنشاء أزرار مسبقة الضبط للتحكم في الأجهزة الإلكترونية المختلفة في المنزل مثل زر “وضع الفيلم” الذي يشغل التلفاز ويخفض الإضاءة. قبل شراء المفاتيح الذكية، يُنصح بالتحقق مما إذا كان المصنع يوفر تحديثات OTA (عبر الهواء) للمفتاح الذكي.
الأدوات والمواد التي ستحتاجها
تجهيز كل شيء قبل البدء يمنع الانقطاعات أثناء التركيب. إليك قائمة التحقق الكاملة:
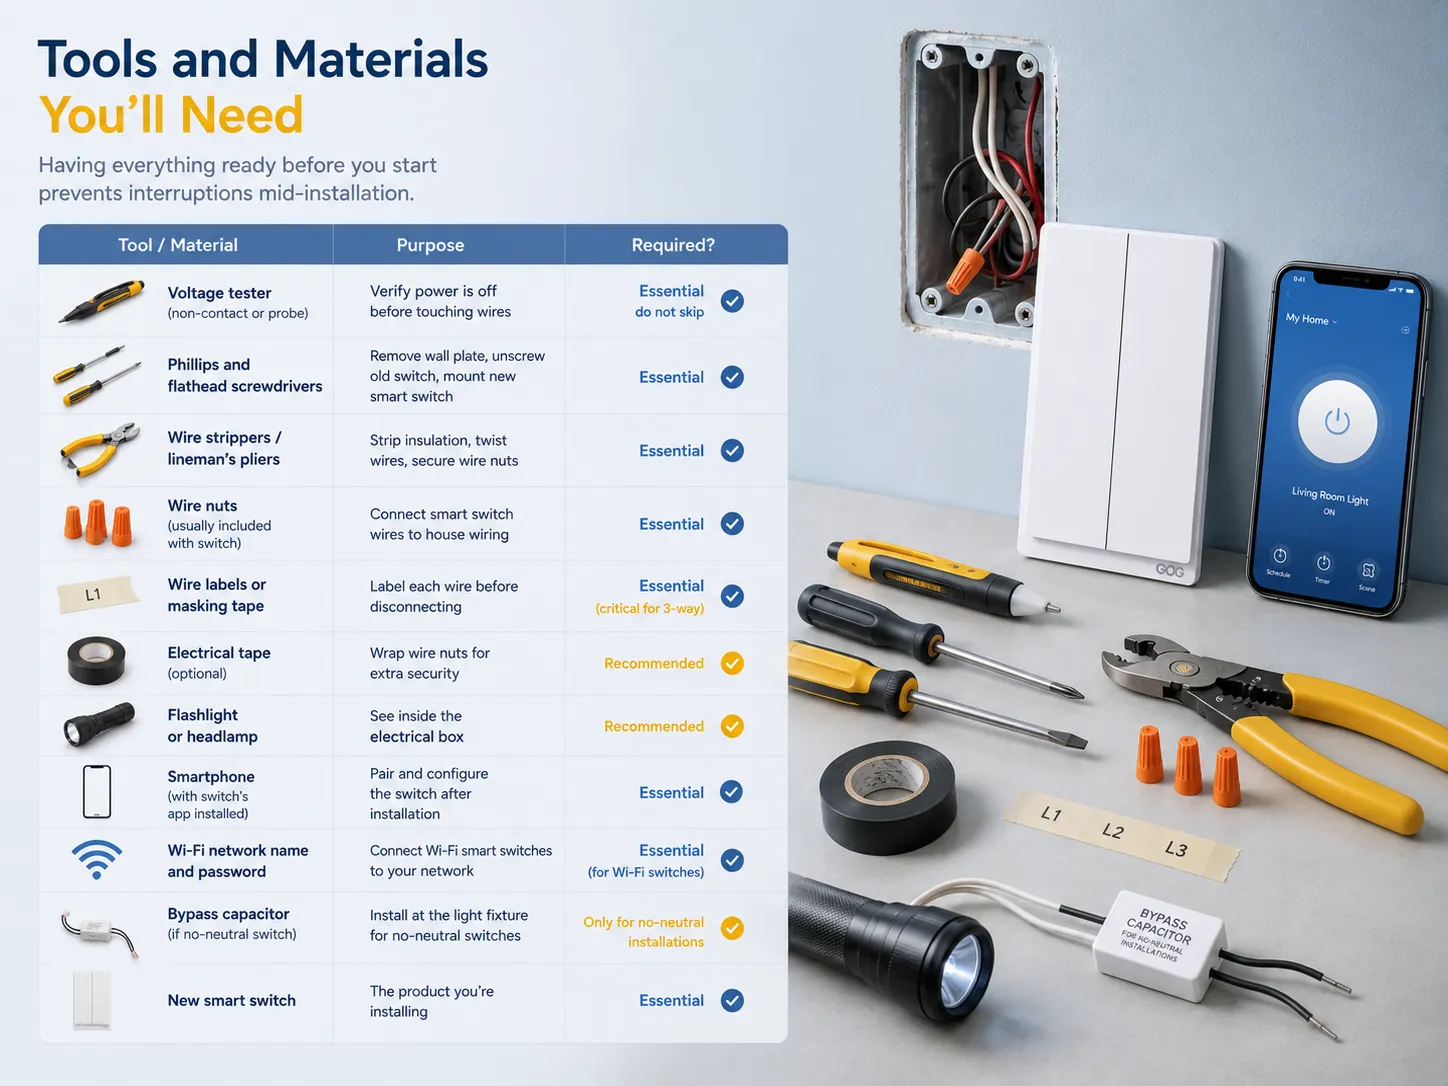
| الأداة / المادة | الغرض | مطلوب؟ |
|---|---|---|
| جهاز اختبار الجهد (غير تلامسي أو بمسبار) | تحقق من إيقاف تشغيل الطاقة قبل لمس الأسلاك | ضروري — لا تتخطى |
| مفكات فيليبس ومسطحة | إزالة لوحة الحائط، فك المفتاح القديم، تركيب المفتاح الذكي الجديد | ضروري |
| قواطع الأسلاك / كماشة الفني الكهربائي | إزالة العزل، لف الأسلاك، تأمين صواميل الأسلاك | ضروري |
| صواميل الأسلاك (عادةً ما تكون مرفقة مع المفتاح) | توصيل أسلاك المفتاح الذكي بأسلاك المنزل | ضروري |
| ملصقات الأسلاك أو شريط لاصق | وضع علامة على كل سلك قبل فصله | ضروري (حاسم للمفتاح ثلاثي الاتجاه) |
| شريط كهربائي (اختياري) | لف صواميل الأسلاك لمزيد من الأمان | موصى به |
| مصباح يدوي أو مصباح رأس | رؤية داخل صندوق الكهرباء | موصى به |
| الهاتف الذكي (مع تثبيت تطبيق المفتاح) | إقران وتكوين المفتاح بعد التثبيت | ضروري |
| اسم شبكة Wi-Fi وكلمة المرور | توصيل مفاتيح Wi-Fi الذكية بشبكتك | أساسي (لمفاتيح Wi-Fi) |
| مكثف تجاوز (إذا كان المفتاح بدون محايد) | التثبيت عند جهاز الإضاءة للمفاتيح بدون محايد | فقط للتركيبات بدون محايد |
| مفتاح ذكي جديد | المنتج الذي تقوم بتركيبه | ضروري |
السلامة: إيقاف تشغيل الطاقة قبل البدء
يجب ألا تحاول أبدًا العمل أو إصلاح المفاتيح الكهربائية عندما تكون الطاقة متصلة. هذه قاعدة لا يمكن التهاون بها. جميع المفاتيح الذكية تحتوي على دوائر حساسة جدًا يمكن أن تتلف بشكل دائم عند مرور التيار، والأهم من ذلك، أن العمل على دائرة كهربائية حية قد يسبب إصابات خطيرة أو قد يؤدي إلى الوفاة.
إجراء إيقاف تشغيل الطاقة
- تحديد موقع لوحة الكهرباء: من المرجح أن تكون موجودة في القبو، أو المرآب، أو غرفة المرافق، أو خزانة في الممر.
- التعرف على المفتاح الكهربائي الصحيح. إذا كانت هناك علامات على اللوحة، فقط ابحث عن العلامة التي تحمل اسم الغرفة. ومع ذلك، إذا لم تكن هناك علامات على اللوحة، يجب تشغيل المفتاح الكهربائي الذي ستستبدل ضوءه ثم قم بإيقاف تشغيل المفاتيح الأخرى حتى ينطفئ الضوء. تأكد من وجود شخص يراقب المفتاح أثناء قيامك بذلك.
- قم بضبط المفتاح على وضع الإيقاف (OFF).
- قم بإجراء اختبار الجهد. عد إلى المفتاح، وأزل غطائه، واستخدم جهاز اختبار الجهد غير التلامسي لفحص الأسلاك. إذا أصدر صفيرًا، فهذا يعني أن هناك طاقة لا تزال تصل إلى المفتاح. في هذه المرحلة، يجب عليك تحديد المفتاح الصحيح لإيقاف تشغيله.
- اختبر المفتاح. قم بتشغيله وإيقافه. إذا لم تضيء المصباح، فقد نجحت في إيقاف تشغيل الطاقة.
- الصق إشعارات تحذيرية لتنبيه أي شخص يحاول تشغيل المفتاح.
⚠ تحذير: على الرغم من أن القاطع مغلق، تحقق باستخدام جهاز اختبار الجهد قبل لمس أي سلك. قد تحتوي المنازل القديمة أحيانًا على أسلاك محايدة مجمعة أو دوائر فرعية تنتج جهدًا في الدائرة التي يُفترض أنها “ميتة”. إذا أشار جهاز اختبار الجهد إلى ذلك، توقف واطلب المساعدة من خبير.
الخطوة 1: إزالة المفتاح العادي القديم
بعد التأكد من إيقاف تشغيل مصدر الطاقة تمامًا، يمكنك البدء في عملية إزالة المفتاح الذي تريد استبداله.
- أزل غطاء اللوحة وقم بفك المسمار الموجود في وسط الغطاء. إذا كان الغطاء مطليًا، قم بعمل قطع حول حواف الغطاء باستخدام سكين للتأكد من كسر الطلاء.
- قم بفك المفتاح من الصندوق. يتم تثبيت المفتاح بمساعدة مسمارين (واحد في الأعلى وآخر في الأسفل). كل ما عليك فعله هو فكهما.
- قم بإحضار المفتاح برفق إلى الأمام لإخراجه من الصندوق، لكن لا تسحب بقوة لأن الأسلاك لا تحتوي على الكثير من المرونة.
- حان الوقت الآن لالتقاط صورة. قبل المتابعة لفصل الأسلاك، التقط صورة للوصلات أولاً لمساعدتك لاحقًا عند إعادة التوصيل.
- قم بعمل علامات للأسلاك. بمجرد فصلها، استخدم شريط لاصق أو ملصقات لتمييز الأسلاك التي قمت بإزالتها، حتى تعرف أي سلك هو أي.
“الخط” يحمل الكهرباء من المصدر
“الحمل” يتجه إلى المصباح الكهربائي
“المحايد” يعني السلك الأبيض داخل الصندوق (إن وجد)
“الأرضي” هو إما السلك النحاسي العاري أو الأخضر
“المسافر” هو السلك الأحمر في وصلات ثلاثية الاتجاه
- افصل الأسلاك. في حالة الوصلات ذات البراغي، كل ما عليك فعله هو فك البراغي وسحب الأسلاك، بينما يمكن إزالة الوصلات ذات الضغط بإدخال مفك براغي وسحب السلك للخارج.
- أخيرًا، افصل سلك الأرضي بفك المسمار الأخضر وإخراجه. يجب أن يكون لديك الآن ما لا يقل عن 2-5 أسلاك مستخرجة من الصندوق الكهربائي.
الخطوة 2: تحديد الأسلاك ووضع العلامات عليها
تحديد كل سلك بشكل صحيح هو الجزء الأهم في هذا المشروع. قد يؤدي الاتصال الخاطئ إلى تلف إلكترونيات المفتاح الذكي أو حدوث دائرة قصر.
الأسلاك القياسية ذات القطب الواحد
| لون السلك | الوظيفة | طرف المفتاح الذكي |
|---|---|---|
| أسود (واحد من الاثنين) | الخط (الساخن) — الطاقة من القاطع | L / خط / مباشر |
| أسود (الآخر) | الحمل — الطاقة إلى جهاز الإضاءة | L1 / تحميل |
| أبيض (إن وجد) | المحايد — مسار العودة لإلكترونيات المفتاح الذكي | N / حياد |
| نحاسي عاري أو أخضر | الأرضي — التأريض الأمني | GND / رمز الأرضي |
كيفية التمييز بين الخط والحمل
يحتوي المفتاح أحادي القطب على سلكين متطابقين في المظهر. ومع ذلك، هناك وسيلة للتمييز بين هذين السلكين: قم بإيقاف قاطع الدائرة الكهربائية وقم بتركيب صواميل الأسلاك على كل من الأسلاك السوداء، واحدة تلو الأخرى. اذهب إلى لوحة الكهرباء وأعد تشغيل قاطع الدائرة. استخدم جهاز اختبار الجهد غير التلامسي لاختبار السلكين. السلك الذي يصدر صوت صفير من الجهاز هو سلك الخط (الحار). السلك الذي لا يعطي قراءة هو سلك الحمل الذي يذهب إلى الضوء. قم بإيقاف قاطع الدائرة قبل التحقق من الجهد على كل من الأسلاك مرة أخرى.
تحقق من وجود سلك محايد
افحص صندوق الكهرباء بحثًا عن مجموعة من الأسلاك البيضاء مربوطة معًا بصمولة أسلاك. إذا كان الأمر كذلك، فهذا يعني أن لديك سلك محايد، مما يعني أنه يمكنك استخدام أي نوع من المفاتيح الذكية. إذا لم ترَ سلكًا أبيض داخل الصندوق، فهذا يعني أن لديك إعداد بدون محايد، حيث ستحتاج إلى استخدام مفتاح ذكي بدون محايد وتركيب المكثف التجاوزي المرفق في جهاز الإضاءة. إذا كنت تفكر أيضًا في استبدال مفاتيح أخرى في منزلك، فإن دليلنا حول كيفية استبدال مفتاح الإضاءة يشرح العملية العامة لاستبدال المفاتيح القياسية.
الخطوة 3: توصيل المفتاح الذكي
عادةً ما يتم تزويد المفاتيح الذكية بأسلاك تم تجريدها. يتم تصنيف الأسلاك إما على الجهاز نفسه أو في دليل المستخدم. يمكنك توصيلها بأسلاك الكهرباء المنزلية كما يلي:
درس توصيل المفتاح الذكي (مع محايد)
- يتم توصيل أسلاك الأرضي. اجمع السلك الأخضر للمفتاح الذكي وسلك الأرضي من صندوق الكهرباء وقم بلف كلا السلكين معًا باستخدام كماشة. يجب لفهما في اتجاه عقارب الساعة.
- توصيل سلك الخط (المعروف أيضًا بالسلك البني). بعد ذلك، اجمع السلك الأسود للمفتاح الذكي وسلك الخط في المنزل ولفهما معًا في اتجاه عقارب الساعة وقم بختم النهايات باستخدام صمولة أسلاك.
- توصيل سلك الحمل. بالمثل، اجمع السلك الأحمر أو السلك الأسود الثاني للمفتاح الذكي وسلك الحمل في المنزل.
- الفرق الحاسم في توصيل السلك المحايد. توجد أسلاك المحايد في حزمة، لذا يجب أولاً إزالة صمولة الأسلاك الموجودة وإضافة السلك الأبيض إلى هذه الحزمة.
- يمكن استخدام شريط كهربائي متوفر لتغليف وصلة الأسلاك.
- من المهم اختبار كل اتصال.
توصيل مفتاح ذكي بدون سلك محايد
في حالة عدم وجود سلك محايد داخل الصندوق، يجب اتباع إجراء مختلف. يجب توصيل أسلاك الأرضي والخط والحمل كما تم في الخطوة السابقة. بدلاً من السلك المحايد، استخدم مكثف تجاوز عند جهاز الإضاءة. يقوم المكثف بإنشاء تدفق تيار صغير عبر طرفي المحايد والحمل.
دليل حجم صمولة الأسلاك
| تركيبة الأسلاك | صمولة الأسلاك الموصى بها | اللون |
|---|---|---|
| سلكان 14 AWG | صغير | أصفر / برتقالي |
| سلكان 12 AWG | متوسط | أحمر |
| ثلاثة أسلاك أو أكثر 14 AWG (مثلاً، حزمة المحايد) | متوسط | أحمر |
| ثلاثة أسلاك أو أكثر 12 AWG | كبير | أزرق / رمادي |
الخطوة 4: التركيب، استعادة الطاقة والاقتران مع التطبيق
تركيب المفتاح الذكي
- ضع الأسلاك في الصندوق. ادفع الأسلاك المتصلة برفق إلى الخلف مع طيات على شكل أكورديون. يجب أن يكون السلك الأول الذي يدخل هو سلك الأرضي (خلف الصندوق)، ثم السلك الثاني هو المحايد، بينما الأسلاك الأخيرة هي الخط والحمل التي تدخل من الأمام. يجب التأكد من عدم وجود سلك نحاسي مكشوف يلامس أي طرف أو الصندوق.
- يجب محاذاة المفتاح مع ثقوب التركيب. يجب أن تكون أذني التركيب للمفتاح مسطحة مقابل أعلى وأسفل الصندوق. ضع وركب المسمارين حتى يصبحا محكمين ولكن دون شد مفرط.
- قم بتركيب لوحة الحائط. تأتي معظم المفاتيح الذكية مع لوحات حائط تتطابق مع المفاتيح، وكخيار احتياطي يمكنك استخدام اللوحة المرفقة مع المفتاح.
استعادة الطاقة
عد إلى لوحة الدائرة وقم بتشغيل قاطع الدائرة. يجب أن يضيء ضوء المفتاح الذكي (غالبًا ما يكون ضوءًا أزرق صغيرًا أو أخضر على اللوحة الأمامية). إذا لم يضيء شيء، قم بإيقاف تشغيل قاطع الدائرة وافحص جميع الاتصالات، لأن السبب الأكثر شيوعًا هو عدم توصيل السلك المحايد بشكل صحيح.
الاقتران مع التطبيق
- قم بتنزيل التطبيق الذي يكمل المفتاح. يجب توصيل مفاتيح Tuya بتطبيق “Smart Life” أو “Tuya”. للعلامات التجارية الأخرى، قم بتثبيت تطبيق الشركة المصنعة المناسب (مثل تطبيق Lutron Caseta، تطبيق TP-Link Kasa، إلخ).
- اضبط المفتاح على وضع الاقتران. كل ما عليك فعله هو الضغط على زر المفتاح مع الاستمرار لمدة 5-10 ثوانٍ حتى يبدأ المصباح في الوميض. يمكنك معرفة المزيد عن العملية من دليل الشركة المصنعة.
- أكمل خطوات إعداد التطبيق. سيرشدك التطبيق حول كيفية إنشاء الاتصال بالمفتاح بمساعدة Wi-Fi أو كيفية اقتران المفتاح مع محور Zigbee/Z-Wave.
- أعطِ المفتاح اسمًا مستعارًا وخصصه لغرفة. على سبيل المثال، يمكن أن يكون اسم المفتاح “ضوء سقف المطبخ” في غرفة “المطبخ” مما يسهل تنفيذ أوامر الصوت.
- اربط مفتاحك بمنصة المنزل الذكي الخاصة بك. في حال استخدام Alexa، يجب تفعيل المفتاح. بالنسبة لـ Google Home، قم بالاتصال عبر التطبيق. إذا كنت تستخدم Apple Homekit، امسح رمز QR المعروض على المفتاح أو في التطبيق.
- اختبار وظيفة كل من التطبيق والتحكم الصوتي. تحقق مما إذا كان الضوء يستجيب للأوامر المعطاة من خلال التطبيق والأوامر الصوتية. بالإضافة إلى ذلك، اختبر ما إذا كان المفتاح اليدوي لا يزال يعمل بغض النظر عن Wi-Fi.
تحويل مفتاح 3-طريق إلى ذكي
عملية تحويل مفاتيح 3-طريق (التي تتكون من مفتاحين يتحكمان في ضوء واحد، مماثلة لتلك الموجودة عند أسفل وقمة الدرج) إلى مفاتيح ذكية أكثر تعقيدًا. الطريقتان لتحقيق ذلك مذكورتان أدناه:
الخيار أ: مفتاح ذكي + مجموعة مفتاح مرافق
يقدم عدد من المنتجين مجموعة تحتوي على مفتاح ذكي ومفتاح مرافق. تحتاج إلى إزالة كلا المفتاحين القديمين وتركيب الجديدين المقدمين في المجموعة. يقوم المفتاح الذكي بالاتصال اللاسلكي بينما ينقل مفتاح المرافق الإشارات عبر سلك المسافر المثبت بالفعل. تضمن هذه الطريقة النظافة لكنها تتطلب استبدال كلا المفتاحين.
الخيار ب: مفتاح ذكي على جانب واحد فقط
يمكنك تركيب مفتاح ذكي في أحد الطرفين، مما يسمح للطرف الآخر بالبقاء كمفتاح تبديل 3-طريق عادي. يتصل المفتاح الذكي بكل من أسلاك الخط والحمل، بالإضافة إلى السلك المحايد، وسلك الأرضي، وسلك المسافر. هذا يعني أن الطرف الآخر سيستمر في العمل بالطريقة التقليدية. ومع ذلك، بينما قد يكون موضع التبديل الفعلي في وضع “الأعلى”، قد يظل المصباح مطفأً فعليًا لأنك قد قمت بإيقاف تشغيله باستخدام التطبيق.
خطوات توصيل مفتاح ذكي 3-طريق
- افصل الكهرباء وتحقق باستخدام جهاز قياس الفولت.
- أخرج كلا مفتاحي 3-طريق السابقين.
- ابحث عن السلك المشترك في كلا الموقعين (الذي يحتوي على المسمار الأسود). السلك المشترك في أحد المفاتيح هو الخط (القادم من القاطع)، بينما السلك المشترك في المفتاح الآخر هو الحمل (المتجه إلى الضوء).
- ضع المفتاح الذكي في موقع سلك الخط. قم بتوصيل الأسود (L) بالخط، الأحمر (L1) بالحمل، الأبيض (N) بالمحايد، الأخضر بالأرضي، وقم بتوصيل سلك المسافر بالطرف الخاص بالمسافر.
- ضع مفتاح المرافق في الموقع الآخر. قم بتوصيل أسلاك المسافر، والمحايد، والأرضي كما هو موضح في الرسم البياني المقدم من الشركة المصنعة.
- ثبت كلا المفتاحين وشغل الطاقة. قم بإقران المفتاح الذكي مع التطبيق المناسب.
- تحقق من عمل كلا المفتاحين الفيزيائيين والتطبيق.
تركيب مفتاح ذكي بدون سلك محايد
إذا تم بناء منزلك قبل عام 1985، فمن غير المحتمل أن يحتوي صندوق المفتاح على سلك محايد. بعد فحص الصندوق والتأكد من غياب الأسلاك البيضاء اللون، تابع القراءة لاستكشاف خياراتك.
مفاتيح ذكية بدون سلك محايد
تقدم بعض الشركات مفاتيح ذكية مصممة للاستخدام في الحالات التي لا يوجد فيها سلك محايد. يعمل هذا التصميم باستخدام مكثف تجاوز، يتم وضعه في تركيبة الضوء وليس في مفتاح التبديل نفسه. بمساعدة هذا المكثف، يستطيع المفتاح سحب كمية صغيرة من الطاقة في جميع الأوقات لتشغيل إلكترونياته.
تركيب مكثف التجاوز
- قم بإيقاف تشغيل مصدر الطاقة عند قاطع الدائرة وتأكد باستخدام جهاز اختبار الجهد.
- انتقل إلى منطقة المصباح التي يتحكم بها المفتاح.
- أخرج المصباح لأنه من الضروري الوصول إلى الأسلاك.
- قم بتوصيل المكثف المتجاوز بالسلك القادم من الحمل المتجه إلى المفتاح والسلك المحايد المتجه إلى قاطع الدائرة؛ لأن المكثف يأتي بسلكين، يجب توصيل أحدهما بالحمل والآخر بالسلك المحايد.
- قم بتركيب جهاز الإضاءة.
- عد إلى صندوق المفتاح وقم بتوصيل المفتاح الذكي بدون سلك محايد، موصلًا الخط إلى L، والحمل إلى L1، وسلك الأرضي إلى GND نظرًا لعدم وجود سلك محايد في هذه الحالة.
- ثبت المفتاح الجديد في مكانه، أعد تشغيل الطاقة، وقم بتكوين تطبيقك.
⚠ هام: عادةً ما تأتي المفاتيح الذكية بدون محايد بمتطلبات حد أدنى للحمل، والذي يكون عادة حوالي 10 واط أو أكثر. إذا كان جهاز الإضاءة يستخدم مصابيح LED منخفضة الطاقة (أقل من 10 واط) فقد لا يتمكن مكثف التجاوز من توفير طاقة كافية للمفتاح الذكي وقد يكون بدون طاقة أو قد تومض الأضواء. في هذه الحالة، يمكنك إما تركيب مصابيح ذات واطية أعلى في الجهاز أو الحصول على مكثف تجاوز يمكنه التعامل مع أحمال طاقة أكبر.
احتياطات هامة وأخطاء شائعة
قد يفشل تركيب مفتاح ذكي بسيط بسبب إغفالات بسيطة. في معظم الحالات، يمكن تجنب ذلك باتخاذ الاحتياطات التالية:
عدم التحقق من انقطاع التيار الكهربائي
الخطأ: افتراض أن التيار مقطوع لأن قاطع الدائرة الصحيح تم إيقافه. قد تكون الدوائر مسماة بشكل خاطئ، وقد يمر التيار عبر دائرة بديلة.
الحل: استخدم جهاز اختبار الجهد على كل سلك قبل محاولة العمل عليه. إذا أشار جهاز اختبار الجهد إلى وجود جهد، قم بإيقاف قاطع الدائرة فورًا.
عكس خط التيار والحمل
الخطأ: توصيل أسلاك الخط عن طريق الخطأ بأطراف الحمل. ونتيجة لذلك، قد لا يعمل الجهاز كما ينبغي.
الحل: باستخدام جهاز اختبار الجهد، حدد أي سلك هو أي. قم بوضع علامات على جميع الأسلاك.
نسيان سلك المحايد
الخطأ: محاولة توصيل مفتاح ذكي يتطلب سلك محايد في مكان لا يحتوي على أي أسلاك محايدة. في هذه الحالة، لن يعمل التركيب على الإطلاق.
الحل: إذا لم يكن هناك سلك محايد في الصندوق، اشترِ محولًا لمفتاحك الذكي. لا تستخدم أبدًا أسلاكًا من دائرة مختلفة؛ فهذا غير آمن ومخالف للقانون.
عدم إحكام نهايات الأسلاك بشكل صحيح
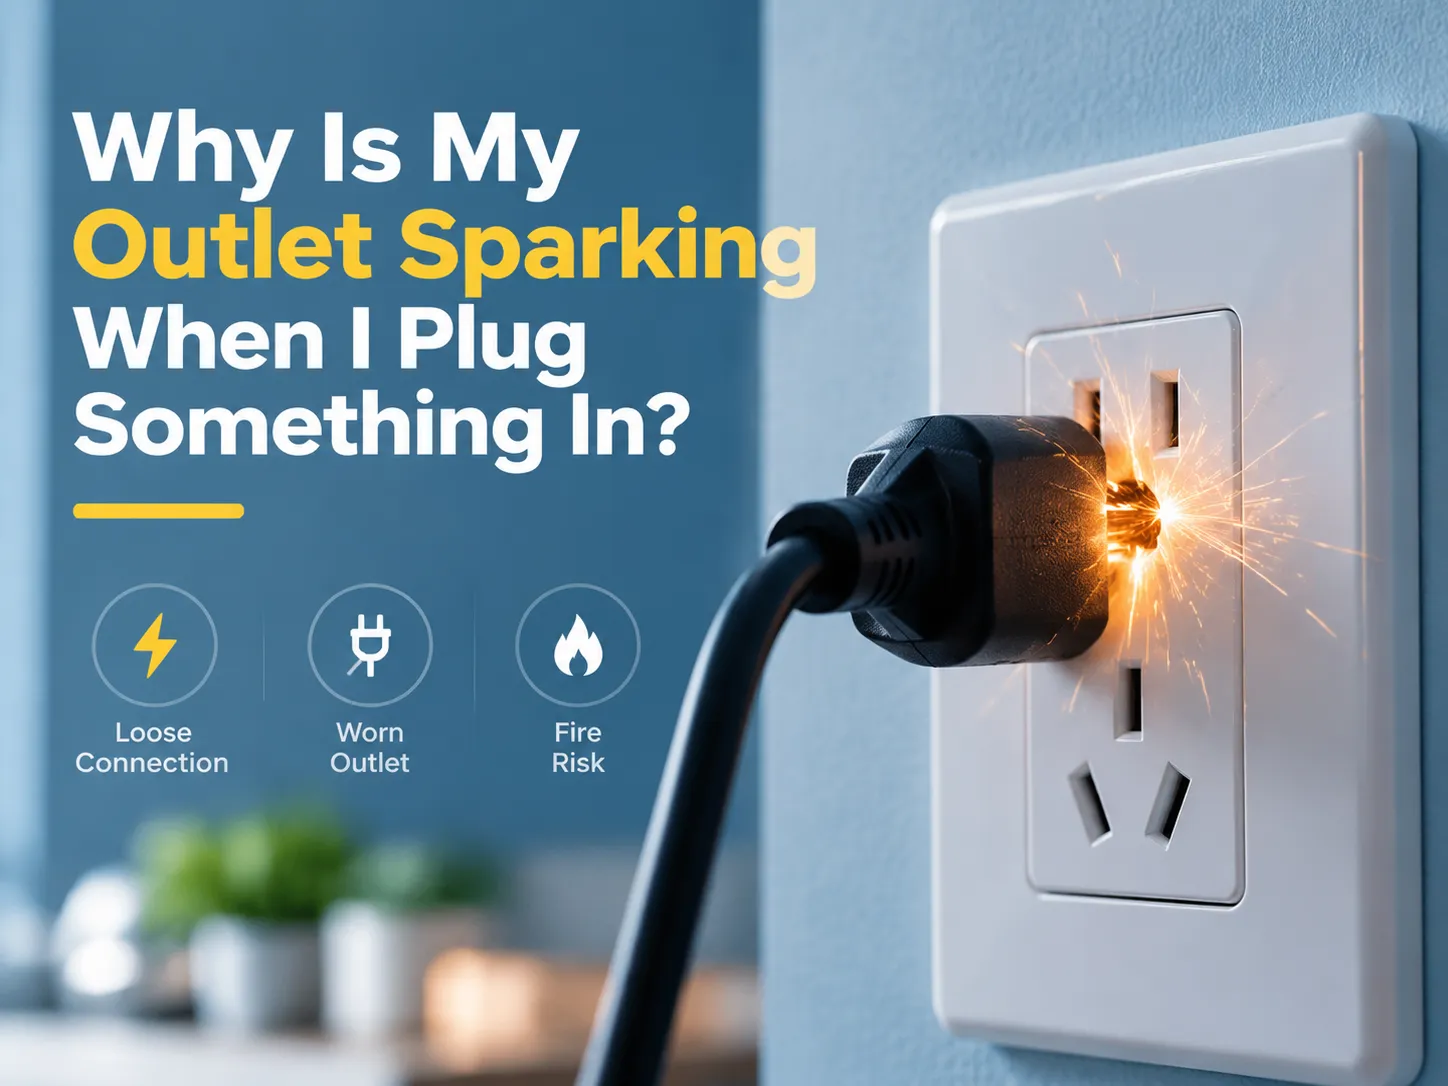
الخطأ: عدم لف الأسلاك بشكل صحيح واستخدام نهاية سلك خاطئة. قد لا تعمل الاتصالات الفضفاضة بشكل صحيح، مما يؤدي إلى وميض الأضواء وحدوث شرر (خطر حريق).
الحل: استخدم كماشة لالتواء الأسلاك في نهاياتها قبل وضع غطاء السلك. تحقق من كل اتصال بعد إتمامه، وأعد العمل إذا فشل بشكل واضح.
تحميل المفتاح الذكي فوق طاقته
الخطأ: محاولة إضافة شيء يتطلب واطية أكثر مما يسمح به المفتاح الذكي. ونتيجة لذلك، قد يفشل المرحل أو قد يبدأ حريق.
الحل: احسب إجمالي استهلاك الواط لجميع المصابيح في الدائرة، وتأكد من أنه لا يتجاوز 80% من الحد الأقصى.
عدم التحقق من عمل الزر الفيزيائي
الخطأ: الاعتقاد بأن المفتاح يعمل فقط لأنه متصل بالتطبيق دون اختبار الزر الفيزيائي.
الحل: تحقق دائمًا من عمل الزر الخارجي بعد التركيب. يجب أن يعمل حتى إذا انقطع اتصال الواي فاي.
خلط المفاتيح الذكية في دائرة واحدة
خطأ: تركيب مفتاح بدون سلك محايد ومفتاح محايد معًا على دائرة إضاءة واحدة. يحتوي الأخير على مكثف تجاوز قد يعطل عمل المفتاح المحايد.
الحل: تأكد من تركيب أسلاك بدون محايد على دائرة إضاءة واحدة أو فصل المفاتيح الذكية على دوائر مختلفة.
الأسئلة المتكررة
هل يمكنني تحويل مفتاح عادي إلى مفتاح ذكي؟
في الغالب، يمكنك تحويل مفتاح عادي إلى مفتاح ذكي. يتم ذلك بإزالة المفتاح الميكانيكي الحالي من صندوق الحائط وتركيب مفتاح ذكي يتصل بشبكة Wi-Fi أو مركز المنزل الذكي. للقيام بذلك، تأكد من (1) وجود سلك محايد في الأسلاك؛ إذا كان موجودًا، اشترِ أي مفتاح ذكي. إذا لم يكن هناك سلك محايد، تحتاج إلى شراء مفتاح ذكي بدون محايد يحتوي على مكثف تجاوز، (2) ما إذا كان المفتاح الحالي مفتاح قطب واحد أو مفتاح ثلاثي الاتجاهات. اشترِ المفتاح الذكي المناسب، (3) أوقف التيار الكهربائي عند القاطع وتحقق باستخدام جهاز اختبار كهربائي، (4) وصل أسلاك الخط، الحمل، المحايد (إذا كان موجودًا)، والأرضي بالأطراف المناسبة للمفتاح الذكي و(5) قم بتركيبه، شغّل التيار وزامنه مع تطبيق المنزل الذكي. تستغرق العملية بأكملها حوالي 20-40 دقيقة لمفتاح قطب واحد. إذا كانت الأسلاك من الألمنيوم أو أسلاك مقبض وأنبوب أو لم تكن مرتاحًا للعمل مع الأسلاك، اطلب مساعدة كهربائي مرخص.
هل يمكنك جعل المفتاح ذكيًا؟
هناك العديد من الطرق التي تسمح لك بتحويل مفتاح عادي إلى مفتاح ذكي—كل ذلك دون الحاجة إلى استبداله بالكامل. أسهل وأكثر الطرق شيوعًا هو استبداله بمفتاح ذكي. تأتي المفاتيح الذكية مع جميع الميزات التي قد تبحث عنها—الوصول عبر التطبيق، التحكم الصوتي، الجدولة، الأتمتة، إلخ. طريقة أخرى لجعل المفتاح العادي ذكيًا هي تركيب مرحل مفتاح (يسمى أيضًا وحدة مفتاح ذكي) خلف المفتاح الحالي في صندوق الحائط. بهذه الطريقة يمكنك الحفاظ على المظهر البصري لمفتاح التبديل/الروكر مع جعله ذكيًا. طريقة أخرى لاستخدام المفتاح العادي هي استخدام لمبة ذكية—في هذه الحالة، الشرط الوحيد هو إبقاء المفتاح في وضع “تشغيل” طوال الوقت. ومع ذلك، فإن أفضل وأسهل طريقة للحصول على مجموعة شاملة من الميزات وضمان موثوقية التجربة هي استبدال المفتاح الحالي بواحد ذكي.
هل تحتاج المفاتيح الذكية إلى أسلاك خاصة؟
لا تستخدم المفاتيح الميكانيكية القياسية سلكًا محايدًا، لكن معظم المفاتيح الذكية تستخدمه. يوفر السلك المحايد للمفتاح الذكي القدرة على تشغيل وحدة الراديو اللاسلكية، حتى إذا كان الضوء مطفأً. عادةً ما تحتوي المنازل المبنية بعد عام 1985 على أسلاك محايدة في صناديق المفاتيح الكهربائية. إذا كنت تعيش في منزل بُني قبل عام 1985 ولا توجد أسلاك محايدة في صندوق المفتاح نفسه، يمكنك تركيب مفتاح ذكي بدون سلك محايد يحتوي على مكثف تجاوز يتم تركيبه على المصباح. بخلاف ذلك، تعمل المفاتيح الذكية تمامًا مثل المفاتيح التقليدية: بما في ذلك نفس الأسلاك القياسية.
ما الفرق بين المفتاح الذكي والمفتاح القياسي؟
يعمل المفتاح التقليدي ميكانيكيًا فقط، حيث يحدث فتح أو إغلاق الدائرة كهربائيًا عند تحريك مفتاح التبديل. لا تحتاج المفاتيح التقليدية إلى مصدر طاقة للعمل، ولا تحتوي على أي ميزة لاسلكية، ويمكن تشغيلها يدويًا فقط. على العكس من ذلك، يحتوي المفتاح الذكي على إلكترونيات مدمجة مع دائرة راديو (Wi-Fi، Zigbee، Z-Wave)، والتي تتطلب دائمًا مصدر طاقة. هذا يعني أنه يمكن التحكم في الإضاءة باستخدام التطبيقات على الهاتف، ومساعدي الصوت، والجدولة، وأدوات أخرى، بالإضافة إلى تشغيل المفتاح يدويًا، مما يوفر الكهرباء. تحتاج المفاتيح العادية إلى سلك محايد للإلكترونيات لأن المفاتيح الذكية تكلف أكثر من المفاتيح العادية ($15-$60 مقابل $2-$8). في الوقت نفسه، يؤدي استخدام المكونات الإلكترونية إلى تقليل عمر المفاتيح الذكية مقارنة بالمفاتيح العادية. للحصول على نظرة شاملة حول ما يمكن أن تفعله المفاتيح الذكية، C-02 مفتاح إضاءة ذكي تويا Zigbee هو مثال جيد على مفتاح ذكي حديث يدعم بروتوكولات متعددة.
المراجع
- NFPA (الجمعية الوطنية للحماية من الحرائق) — إرشادات الكود الكهربائي الوطني (NEC) للأسلاك السكنية، ومتطلبات صناديق المفاتيح، ومعايير الأسلاك المحايدة.
- مختبرات Underwriters (UL) — معيار UL 20 للمفاتيح القابلة للتركيب العام وUL 60669-2-1 لشهادة المفتاح الذكي.
- NEMA (الجمعية الوطنية لمصنعي المعدات الكهربائية) — معايير أجهزة الأسلاك وتوافقية المفاتيح الذكية.
- لجنة سلامة المنتجات الاستهلاكية الأمريكية (CPSC) — إرشادات السلامة الكهربائية المنزلية وتنبيهات مخاطر الأسلاك الألومنيوم المتعلقة بتركيبات المفاتيح الذكية.
- نجمة الطاقة — بيانات كفاءة الطاقة للإضاءة الذكية ومواصفات منتجات الإضاءة المتصلة.
- تحالف معايير الاتصال (Zigbee) — مواصفات بروتوكول Zigbee لتواصل أجهزة المنزل الذكي وشبكات الميش.
- أمازون أليكسا المنزل الذكي — وثائق المطورين لتكامل المفتاح الذكي المتوافق مع Alexa والتحكم الصوتي.
تحويل المفتاح العادي إلى مفتاح ذكي هو أحد الترقيات الأكثر فائدة للمنزل الذكي.
هناك معياران رئيسيان للتحويل الناجح: أولاً، يجب أن يكون التوصيل الكهربائي الخاص بك متوافقًا مع المفتاح الجديد ويجب أن يكون هناك سلك محايد، وثانيًا، التعرف الصحيح على الأسلاك. بمجرد أن تقوم بذلك بشكل صحيح، تحتاج إلى اختيار المفتاح المناسب لتطبيقك وسيكون التحويل ناجحًا من البداية وسيتم توصيل نظام الإضاءة بالكامل. لا تتردد في الاتصال بفني كهربائي مرخص إذا كنت تشك في نوع التوصيل الكهربائي في منزلك أو ترغب في تجنب العمل مع الأسلاك الألومنيوم.