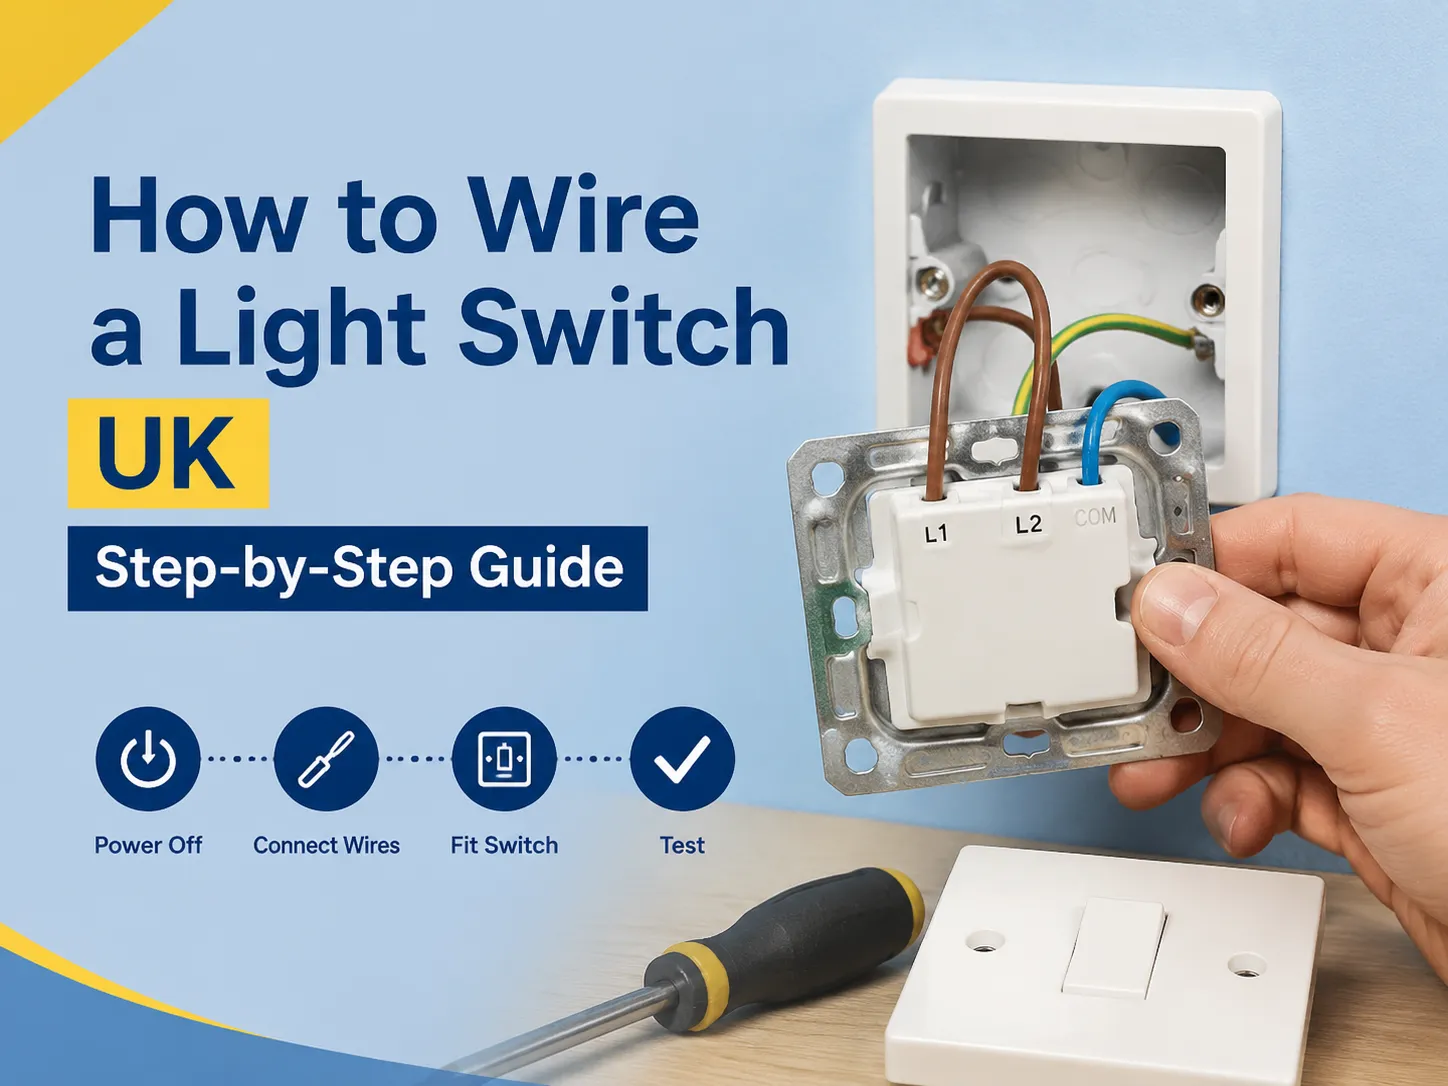
لقد حصلت على مفتاح إضاءة جديد—ربما مفتاح روكر من الفولاذ المصقول سيحل محل مفتاحك البلاستيكي القديم الضخم في ممر منزلك. تأخذ مفك البراغي وتزيل لوحة الوجه وكل ما تراه بالداخل هو مجموعة من الأسلاك البنية والزرقاء والخضراء-الصفراء، التي لا تشبه حتى عن قرب الأسلاك التي شاهدتها في الفيديوهات التي تابعتها في أمريكا. حدث هذا لأن التوصيلات الكهربائية في المملكة المتحدة تخضع لقواعدها الخاصة، على عكس أمريكا.
في هذا الدليل ستتعرف على كل شيء عن توصيل مفاتيح الإضاءة في المملكة المتحدة بما في ذلك رموز الألوان (القديمة والجديدة)، ومعنى الأطراف المختلفة، وتوصيل مفتاح اتجاه واحد، وتوصيل زوج من مفاتيح الاتجاهين، وتوصيل مفتاح وسيط. ستجد إجراءات السلامة التي يجب اتخاذها قبل القيام بأي شيء وستعرف متى يكون من الأفضل استدعاء كهربائي متخصص للقيام بالعمل نيابة عنك.
إجابة سريعة: تم إدخال ألوان حديثة في مفاتيح الإضاءة في المملكة المتحدة، وتتبع المعيار BS 7671: البني = الخط الحي، الأزرق = الخط المحايد، والأخضر/الأصفر = الأرضي. في مفتاح اتجاه واحد، يتم توصيل السلك الحي الدائم (البني) بالطرف COM، بينما يتم توصيل السلك الحي (الذي يؤدي إلى الضوء) بالطرف L1. يجب توصيل سلك الأرضي بالطرف الأرضي (إذا كان متاحًا)، ويجب تأريض لوحة الوجه المعدنية أيضًا. قم دائمًا بعزل الدائرة من وحدة المستهلك وتأكد من أن الدائرة ميتة باستخدام جهاز اختبار الجهد قبل لمسها – لا تعتمد على كون المفتاح “مطفأ”. في حالة مفتاح الاتجاهين، سيتم إضافة طرف L2 مع سلك ربط بين المفتاحين. إذا كان مفتاحًا وسيطًا، فهناك طرف ثالث أيضًا. نظرًا لأن استبدال مفتاح الإضاءة لا يعتبر من الأعمال التي يجب الإبلاغ عنها بموجب الجزء P، يجب مراعاة جميع التعليمات الأخرى أثناء اتباع المعيار BS 7671.
السلامة أولاً: العزل والتأكد من انعدام التيار
قبل اتخاذ أي إجراء، تأكد أولاً من سلامة الدائرة. هذا ليس خيارًا فقط، بل (السلامة) تفرق بين مهمة بسيطة ورحلة إلى المستشفى.
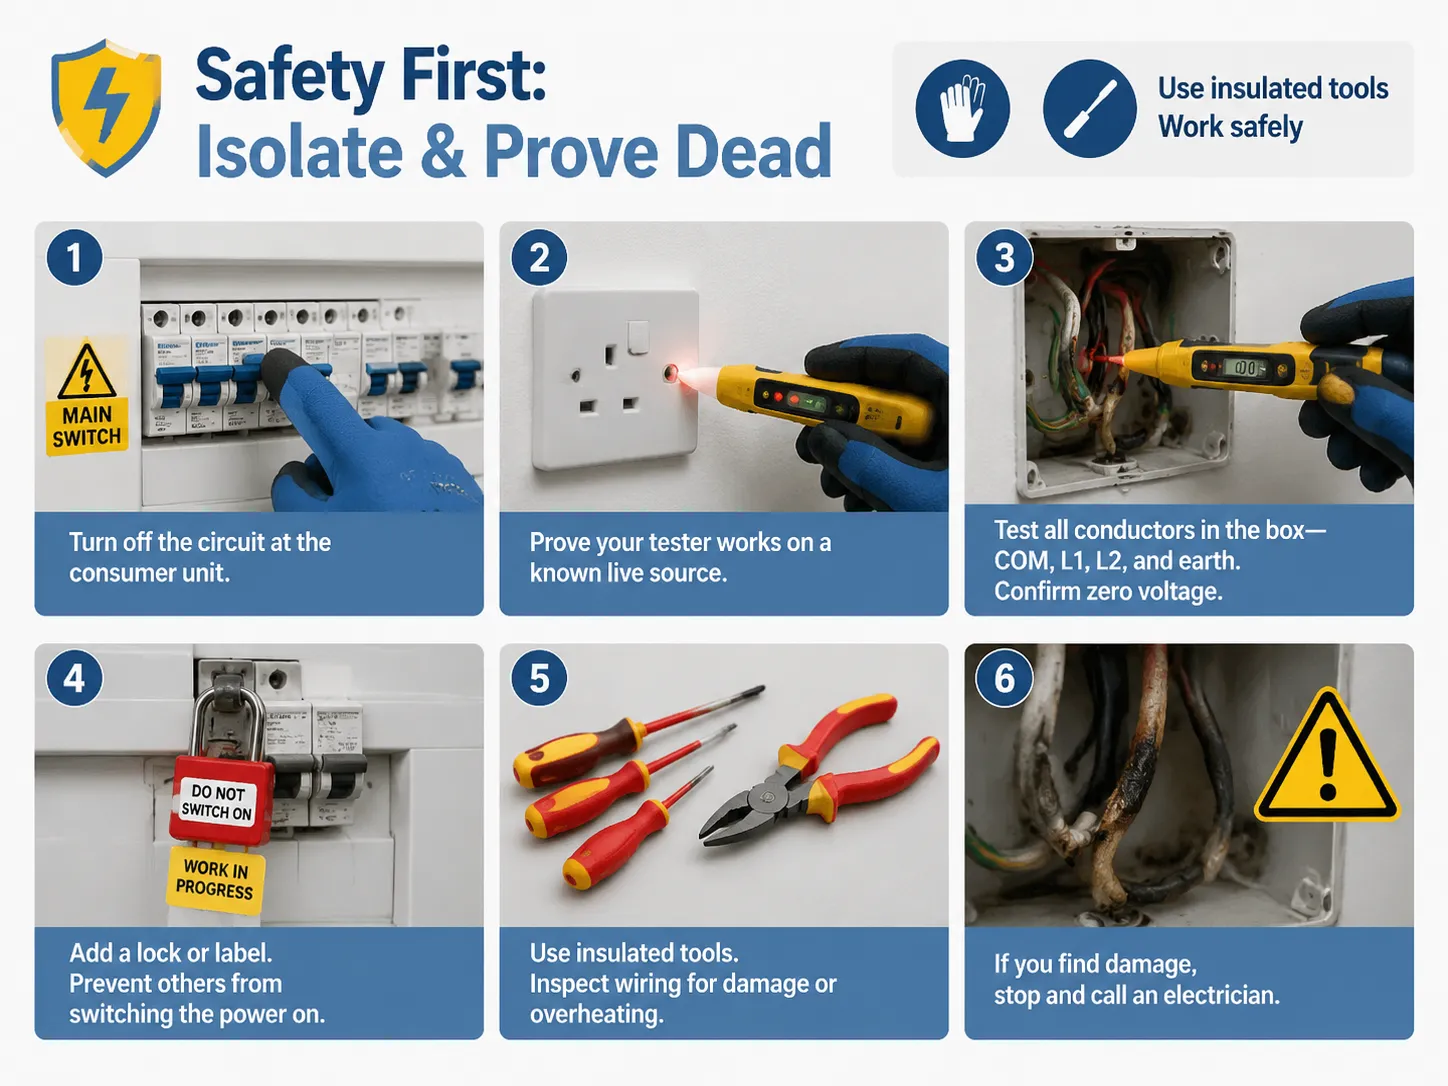
- أوقف الدائرة في صندوق الفيوزات. ابحث عن قاطع الدائرة المناسب أو الفيوز الذي يتوافق مع الدائرة المعطلة، أو إذا كنت في شك، قم بإيقاف المفتاح الرئيسي.
- تأكد من أن جهاز اختبار الجهد يعمل. قبل أن تبدأ في اختبار الدائرة التي تم فصل التيار عنها، تأكد من أن الجهاز يعمل عن طريق تطبيقه على مصدر طاقة معروف بأنه حي.
- اختبر جميع الموصلات في صندوق المفتاح. استخدم الجهاز على جميع الأطراف المتصلة، بما في ذلك COM، L1، L2، والطرف الأرضي، وتأكد من أن جميعها تظهر صفر فولت.
قم بتركيب قفل أو ملصق. ضع ملاحظة على قاطع الدائرة تشير إلى أنك ستعمل على الدائرة حتى لا يقوم أحد بإعادة تشغيلها أثناء عملك_ استخدم الأدوات الكهربائية بطريقة صحيحة، وإذا كنت تغير التوصيلات في أي مكان، استغل هذه الفرصة لفحص ما إذا كانت هناك أي كابلات محترقة.
الأدوات والمواد التي تحتاجها
| الأداة / المادة | سبب الحاجة إليها |
|---|---|
| جهاز اختبار الجهد (جهاز اختبار ذو قطبين أو مقياس متعدد) | لإثبات أن الدائرة ميتة قبل لمس الأسلاك |
| مفكات معزولة (رأس مسطح + فيليبس) | لبراغي الأطراف وبراغي لوحة الوجه |
| قواطع الأسلاك | لتجريد 10–12 مم من العزل من الموصلات |
| شريط / غلاف عازل من PVC بني | لتغليف أي موصل غير بني يُستخدم كـ (مفتاح) مباشر |
| ميزان روح | لكي تجلس لوحة الوجه الجديدة بشكل مستقيم |
| مفتاح بديل | مصنف للدائرة (عادة 10A أو 16A للإضاءة) |
| مصباح يدوي / مصباح رأس | صناديق المفاتيح نادراً ما تكون مضاءة جيداً |
ألوان الأسلاك في المملكة المتحدة: الجديد مقابل القديم
في عام 2004، قامت المملكة المتحدة بتوحيد ألوان الأسلاك مع أوروبا، مما يعني أن جميع التركيبات الجديدة يجب أن تستخدم الألوان الجديدة بدءاً من عام 2006. لذلك إذا كان منزلك موصولاً قبل هذا العام، يمكنك توقع العثور على الألوان القديمة.
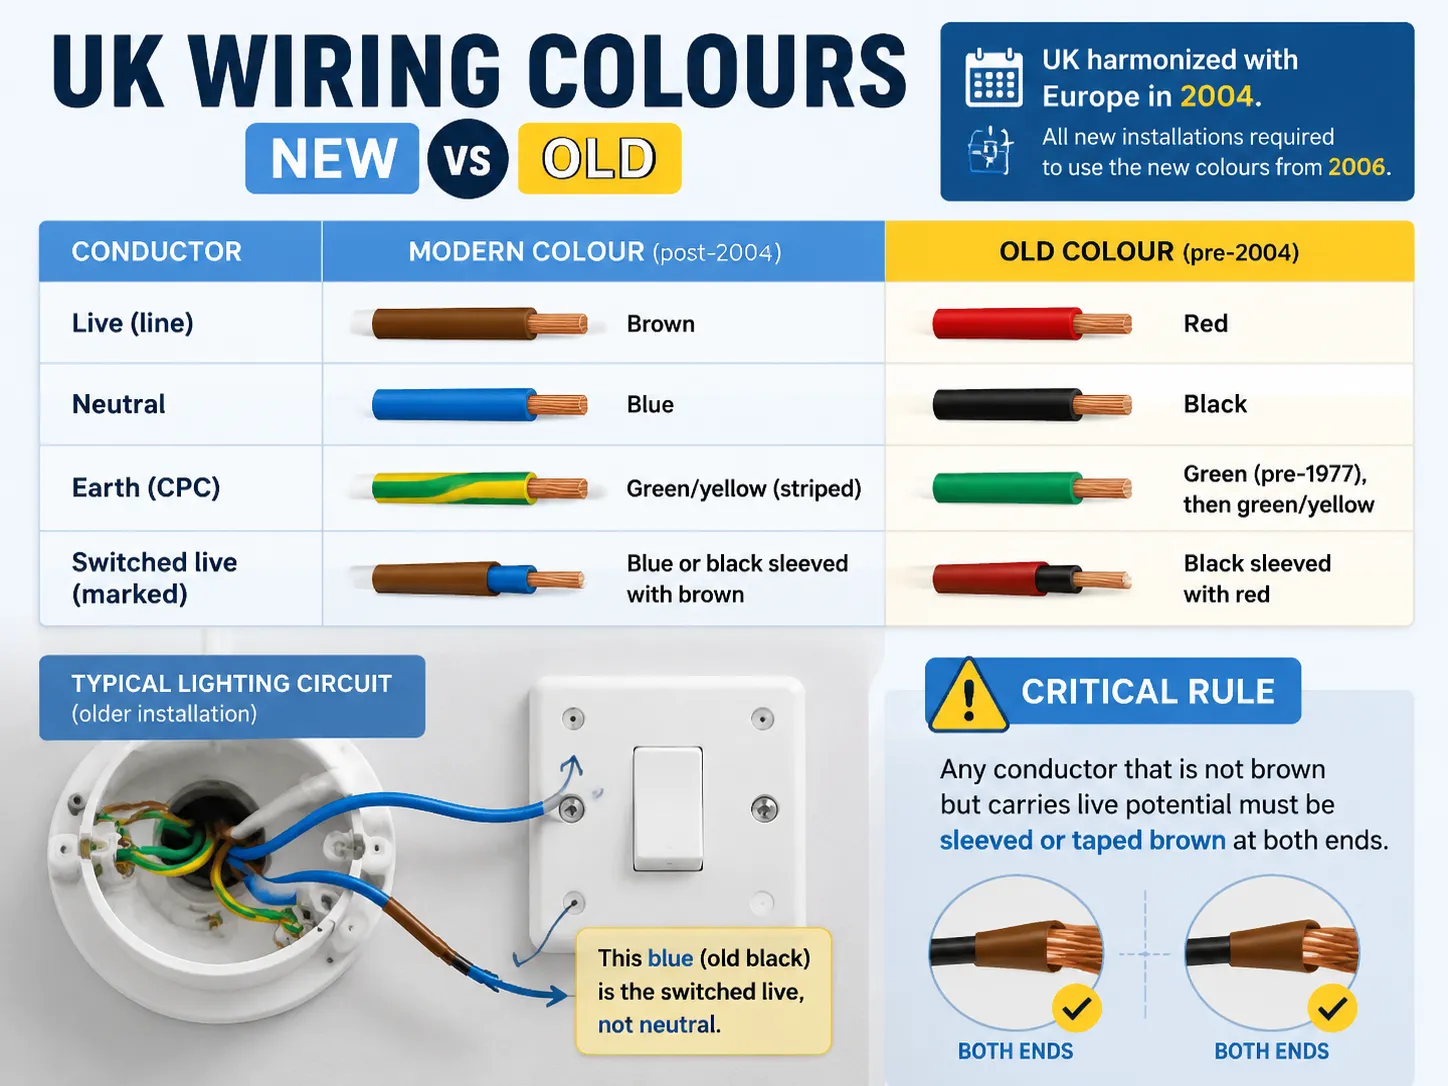
| الموصل | اللون الحديث (بعد 2004) | اللون القديم (قبل 2004) |
|---|---|---|
| مباشر (خط) | البني | أحمر |
| المحايد | الأزرق | أسود |
| الأرضي (CPC) | أخضر/أصفر (مخطط) | أخضر (قبل 1977)، ثم أخضر/أصفر |
| مباشر متحكم به (موسوم) | أزرق أو أسود مغلف بالبني | أسود مغلف بالأحمر |
أهم قاعدة هي: أي سلك ليس لونه بني ولكنه يحمل جهد مباشر يجب تغطيته أو لصقه بشريط بني على كلا طرفيه. في أنظمة الإضاءة في المملكة المتحدة، الخط القادم من الكابل إلى المفتاح يحتوي على سلك أزرق (الأسود القديم)، وهو مفتوح؛ مما يعني أنه ليس سلكاً محايداً. لمزيد من التفاصيل حول نظام الألوان الكامل، دليلنا ألوان الأسلاك الكهربائية في المملكة المتحدة يغطي كل موصل والانتقال من القديم إلى الجديد بالتفصيل.
فهم أطراف المفتاح: COM، L1، L2
COM (مشترك): مدخل الطاقة. السلك المباشر المستمر (بني) متصل بهذا الطرف وهو دائماً نشط عندما يكون قاطع الدائرة نشطاً.
- L1: مخرج الضوء المتحكم به. ينشط فقط عندما يكون المفتاح في وضع التشغيل. عادةً، في التركيبات ذات المفتاح الواحد، هذا هو المخرج الوحيد المستخدم.
- L2: المخرج الثاني المستخدم في أنظمة التبديل المتقدمة مثل الأنظمة ذات الاتجاهين أو الأنظمة الوسيطة. في التركيبات ذات المفتاح الواحد، يبقى غير مستخدم.
كن على علم بأن المصنعين المختلفين يوسمون الأطراف بشكل مختلف، على سبيل المثال بعضهم يستخدم C بدلاً من COM أو L1/L2/L3 لمفتاحهم الوسيط. لكن المبدأ الأساسي دائماً هو نفسه: COM/C هو مدخل الطاقة، بينما أطراف L هي مخارج متحكم بها. دائماً راجع مخطط الأسلاك قبل التركيب. إذا تساءلت يوماً عن معنى تلك العلامات، شرحنا لـ ما يعنيه “مشترك” على مفتاح الضوء يشرح COM/L1/L2 مع الرسوم التوضيحية.
كيفية توصيل مفتاح ضوء باتجاه واحد
يتحكم مفتاح ذو اتجاه واحد في ضوء واحد من موقع واحد — وهو الإعداد الأكثر شيوعًا في منازل المملكة المتحدة. إليك الخطوات الكاملة خطوة بخطوة:
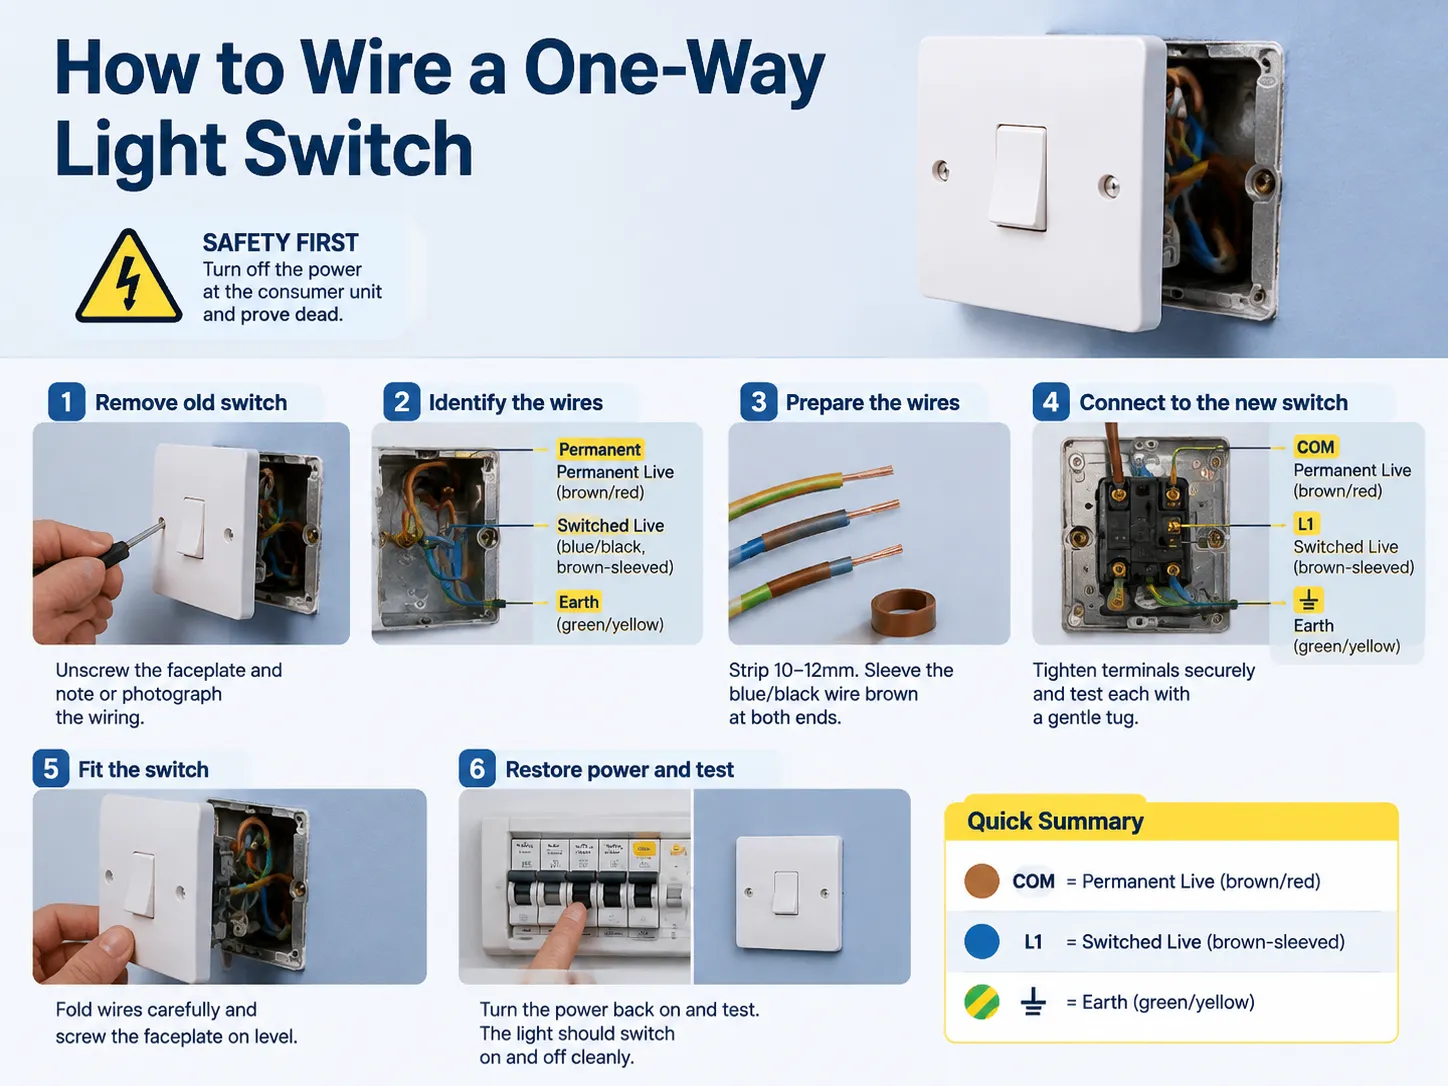
- عزل الدائرة والتأكد من أنها أصبحت بالفعل غير نشطة (راجع السلامة أولاً أعلاه).
- فك المفتاح القديم وسحبه بحذر بعيدًا عن الحائط. تأكد من التقاط صورة أو تدوين مكان كل سلك بدقة قبل فصل أي شيء.
- تحديد الأسلاك. في دائرة سقف قياسية بنظام اللوب-إن في المملكة المتحدة، ستواجه:
الخط الحي الدائم — بني (أحدث) أو أحمر (أقدم) مصدر التيار
الخط الحي المتحكم به — أزرق (أو أسود قديم) مغلف بالبني، يتجه إلى تركيبة الضوء
الأرضي — أخضر/أصفر؛ هذا موجود في الصناديق المعدنية ولوحات الوجه المعدنية - تجهيز الأسلاك. قم بنزع حوالي 10 مم إلى 12 مم من العزل من نهايات كل موصل. إذا لم يكن الخط الحي المتحكم به الأزرق/الأسود مغلفًا بالبني بالفعل، أضف غلافًا بنيًا أو شريطًا على كلا الطرفين في هذه المرحلة.
- قم بتوصيلها بالمفتاح الجديد كما يلي:
الخط الحي الدائم (بني/أحمر) → طرف COM
الخط الحي المتحكم به (أزرق/أسود، مغلف بني) → طرف L1
الأرضي (أخضر/أصفر) → طرف الأرضي (إلزامي للوح الوجه المعدني؛ قم أيضًا بتوصيله في الصناديق البلاستيكية إذا كان موجودًا) - شد كل طرف، ثم اختبر كل واحد بلطف بنفسك — الاتصالات الفضفاضة هي من الأسباب الرئيسية للقوس الكهربائي، الذي يذيب المفتاح أو يسبب وميضًا.
- قم بترتيب الأسلاك بعناية بطريقة متعرجة، حتى لا تضغط على الصندوق الخلفي، وقم بتركيب لوحة الوجه عندما تكون مستوية.
- استعد التيار وتحقق. يجب أن يعمل الضوء، دون أي مشكلة، بالتشغيل والإيقاف. إذا فشل أو تسبب في فصل الدائرة، قم بالعزل مرة أخرى وأعد فحص توصيلاتك.
كيفية توصيل مفتاحين بنظام التبديل الثنائي
في دوائر التبديل الثنائي، يتحكم مفتاح واحد في ضوء واحد من موقعين مختلفين، مثل أعلى وأسفل درج. يستخدم هذا الترتيب مفتاحين ثنائيي الاتجاه، يحتوي كل منهما على أطراف COM و L1 و L2، متصلين عبر كابل ثلاثي النوى مع الأرضي، والذي يتكون من سلكين “رابطة” وسلك الأرضي.
- التوصيلات في المفتاح 1 هي الخط الحي الدائم (بني/أحمر) متصل بـ COM مع سلكي رابطة، عادة بني ورمادي من كابل الثلاثة نوى، متصلين بـ L1 و L2 على التوالي. يربط السلكان الرابطان بين L1 و L2 في المفتاح 1 و L1 و L2 في المفتاح 2 على التوالي.
- يحتوي المفتاح 2 على الخط الحي المتحكم به الخارج (المتجه إلى تركيبة الضوء) متصل بـ COM والسلكان الرابطان متصلان بـ L1 و L2 على التوالي.
تأكد من أن أي سلك رابطة ليس بنيًا مغلف بالبني للدلالة على أنه يحمل جهدًا حيًا. من السهل تذكر أن الكهرباء تدخل المفتاح 1 عند COM، ويتم إيقافها في المفتاح 1، وتسافر بين أزواج L1 و L2، المتصلة معًا في المفتاح 1 والمفتاح 2 على التوالي.
التبديل الوسيط (ثلاثة مواقع أو أكثر)
يقدم المفتاح الوسيط مفتاحًا ثالثًا (أو ربما رابعًا)، بما في ذلك مفتاح يتحكم في ضوء الهبوط من الردهة والطابق الأرضي والطابق العلوي. يتم ترتيب ذلك كما يلي:
يتم إعداد مفتاحين ثنائيي الاتجاه (موصلين بنفس الطريقة كما في السابق)؛ يتم تضمين مفتاح أو أكثر متوسط في الترتيب؛ يأتي المفتاح المتوسط بأربعة أطراف (مخصصة إما كـ L1 و L2 أو L3 و L4 أو بعض التوأمة) ويعمل كنقطة تقاطع لسلكي المسافر اللذين يأتيان من المفتاح الأول ويصلان إلى المفتاح الثاني بعد المرور عبر المفتاح المتوسط.
على عكس مفاتيح الاتجاهين، لا علاقة للمفتاح المتوسط بمصدر الطاقة أو الضوء المتحكم به. التوصيل المتوسط هو أحد الخطوات في العملية التي يجدها العديد من هواة الأعمال اليدوية صعبة التحقيق. إذا لم يتطابق المخطط داخل المفتاح مع ما تراه في صندوق المفتاح، فمن الأفضل طلب المساعدة من كهربائي لأن هذه المهمة بسيطة نسبيًا له ومعقدة للغاية للهواة. أيضًا، من المهم معرفة نوع المفتاح الذي تعمل به. دليلنا لـ أنواع مفاتيح الإضاءة يوضح كيف تختلف مفاتيح الاتجاه الواحد، والاتجاهين، والمتوسطة في المظهر وتخطيط الأطراف.
السيناريوهات الشائعة وما ستراه في الصندوق
| السيناريو | ما هو محتمل في الصندوق | ما يجب فعله |
|---|---|---|
| مفتاح واحد، كابل واحد | بني (تيار دائم) + أزرق/أسود مغلف بالبني (تيار متحكم) + أرضي | توصيل اتجاه واحد: التيار → COM، التيار المتحكم → L1 |
| مفتاح واحد، كابلان | دائرة التوصيل المتسلسل: مصدر وارد + كابل صادر إلى الضوء التالي | سلكان تيار متصلان (موصل) أو إلى COM؛ التيار المتحكم → L1. غالبًا ما يحتاج إلى كتلة موصلات للنيوترالات |
| مفتاحان لضوء واحد | مفتاحان ثنائيي الاتجاه مع أسلاك ربط | توصيل اتجاهين كما هو مذكور أعلاه |
| ثلاثة مفاتيح أو أكثر | نهايات اتجاهين + مفتاح متوسط في الوسط | توصيل متوسط كما هو مذكور أعلاه |
| توصيل قديم أحمر/أسود | أحمر (تيار)، أسود (نيوترال/تيار متحكم)، أخضر/أصفر (أرضي) | تعامل مع الأحمر كبني؛ غلف الأسود المستخدم كتيار بشريط أحمر؛ تحقق باستخدام جهاز اختبار |
أخطاء التوصيل التي يجب تجنبها
- الخلط بين التيار المتحكم والسلك النيوترال. عمومًا، السلك الأزرق الموجود في الصندوق هو التيار المتحكم والسلك النيوترال. توصيل الأول كنيوترال أو العكس يسبب دوائر قصر أو أضواء قد لا تعمل.
- عدم استخدام غلاف لتغطية السلك البني المتحكم. هذه مسألة أمان وستساعد المستخدمين المستقبليين للدائرة.
- كشف كمية كبيرة من سلك النحاس. قم فقط بتجريد كمية كافية لتشكيل الاتصال (10-12 سم تكفي)؛ الأسلاك النحاسية المكشوفة يمكن أن تسبب دوائر قصر عند ملامستها لأطراف أخرى.
- الاتصالات الفضفاضة. تأكد من اختبار الشد لكل اتصال. قد تسبب الاتصالات الشرر والاحتراق.
- لوحة غير مؤرضة. إذا لم يكن لديك سلك أرضي في صندوق التوصيل وقمت بتوصيل لوحة وجه معدنية، فقد يؤدي ذلك إلى صدمات كهربائية.
- العمل على دائرة نشطة. لا تعمل مع تشغيل الطاقة؛ اتخذ مسارًا أكثر أمانًا.
متى تتصل بفني كهربائي محترف
غالبًا ما يُنظر إلى استبدال مفتاح الإضاءة كمهمة يمكن القيام بها بنفسك، ولكن يجب عليك التوقف والاتصال بفني كهربائي مرخص في السيناريوهات التالية:
- تفتح صندوق التوصيل وليس لديك فكرة عما تنظر إليه
- تجد تلفًا في العزل أو دليلًا على ارتفاع درجة الحرارة
- لديك صندوق توصيل معدني أو لوحة وجه ولكن لا يوجد سلك أرضي
- تحتاج إلى تركيب أسلاك جديدة، تعديل مفتاح موجود، أو إضافة نقاط جديدة
- لديك مفتاح تعتيم، أو مفتاح ذكي ولا تعرف عن توافقه أو وظيفته
- قاطع الدائرة الخاص بك يستمر في الفصل أثناء عملك عليه
- تريد شهادة تركيب كهربائي
سيقوم الفني الكهربائي بتحصيل رسوم تتراوح بين 50 إلى 90 جنيهًا إسترلينيًا في الساعة لإصلاح الأعمال الصغيرة، واستبدال مفتاح الإضاءة عادة ما يكون استدعاءً سريعًا، وهو في الأساس تأمين رخيص مقارنة بعواقب الحريق أو الإصابة.
اللوائح البريطانية: الجزء P، BS 7671 والاختبار
يجب أن تتوافق جميع أعمال التركيب الكهربائي في إنجلترا وويلز مع الجزء P من لوائح البناء، بالإضافة إلى متطلبات البناء والتركيب في BS 7671 (لوائح الأسلاك الخاصة بـ IET). الخبر السار لأولئك الذين يقومون بالأعمال الكهربائية بأنفسهم هو أن استبدال مفتاح الإضاءة يُعتبر عملاً بسيطًا وبالتالي لا يحتاج إلى الإبلاغ عنه للسلطة المحلية – على الرغم من أنه يجب أن يظل متوافقًا مع BS 7671، ويجب توقيع العمل. إذا رغبت يومًا في بيع أو تأجير العقار، فإن وجود شهادة العمل يساعد في تجنب التعقيدات في المستقبل.
الأسئلة المتكررة
أي الأسلاك توصل إلى أين في مفتاح الإضاءة؟
توصيل الأسلاك في مفتاح إضاءة فردي في المملكة المتحدة هو أمر بسيط نسبيًا. يجب توصيل السلك الحي في اتصال المفتاح الفردي بالطرف COM، بينما يتم توصيل السلك الحي المتحكم به إلى L1. يجب أيضًا توصيل السلك الأرضي بالطرف الأرضي إذا كانت لوحة الوجه أو الصندوق معدنيًا. في اتصال مفتاح ذو اتجاهين، يحمل الطرف COM السلك الحي في أحد الطرفين والسلك الحي المتحكم به الصحيح في الطرف الآخر، بينما يتم توصيل الموصلين L1 و L2 عبر أسلاك الربط. لا تنسَ التحقق من الرسم البياني على المفتاح قبل التوصيل وتشغيل الدائرة.
هل يهم أي الأسلاك توصل إلى أين في مفتاح الإضاءة؟
نعم، هذا مهم. يجب أن يذهب السلك الحي الدائم إلى الطرف COM/المشترك، والسلك الحي المتحكم به إلى L1 (قطب واحد). إذا تم تبديل الاثنين، يبدو أن المفتاح يعمل، لكن جانب الضوء يظل حيًا حتى عندما يكون المفتاح مغلقًا—مما يخلق خطر صدمة كهربائية للشخص الذي يغير المصباح. إذا كانت الأسلاك المتنقلة في الموصلات الخاطئة في دوائر الاتجاهين والمتوسطة، فإن الضوء سيعمل فقط عندما يكون كلا المفتاحين في وضع معين. التصرف كما لو أن السلك الأزرق الحي المتحكم به هو السلك المحايد سينتج دائرة قصر إذا تم تشغيل الدائرة. إذا كنت في شك بشأن أي سلك هو أي، لا تتردد في الاتصال بالفني الكهربائي.
ماذا يحدث إذا قمت بتوصيل مفتاح الإضاءة بطريقة خاطئة؟
يتعلق الأمر بالتعقيد المتضمن. أسهل حالة هي عندما يعمل المفتاح لكنه يترك الدائرة “مفعلة” في جميع الأوقات. هذا خطير عند محاولة تغيير المصباح. قد يكون الأمر أكثر خطورة عند توصيل سلك ساخن بالمقبس المحايد، أو توصيل الأسلاك بشكل غير صحيح، مما يؤدي إلى دائرة قصر قد تسبب فصل قاطع الدائرة الكهربائية عن التيار — وإذا لم تعمل الحماية أو إذا كان الكابل تالفًا، فقد يؤدي ذلك إلى حدوث شرر وارتفاع درجة الحرارة، بالإضافة إلى نشوب حريق. قد يسبب الاتصال غير الصحيح أيضًا وميض المفتاح، أو إصدار صوت طنين، وارتفاع درجة حرارته.
المراجع
- IET — Wiring Matters: إرشادات BS 7671 وموارد تنظيمات الأسلاك
- GOV.UK — الجزء P من لوائح البناء (إنجلترا وويلز)
- NICEIC — برامج الأشخاص المؤهلين وإرشادات السلامة الكهربائية
- EngineerFix — مخطط توصيل مفتاح الإضاءة في المملكة المتحدة ودليل خطوة بخطوة
- Easy Home Improvement — كيف يجب توصيل مفتاح الإضاءة في المملكة المتحدة؟
- Homebuilding & Renovating — كيفية توصيل مفتاح الإضاءة
- Which? — العثور على كهربائي مؤهل ونصائح سلامة المستهلك
الخاتمة
توصيل مفتاح الإضاءة في المملكة المتحدة هو أمر يمكن القيام به بسهولة دون مخاطر كبيرة إذا اتبعت بعض القواعد: إيقاف تشغيل الدائرة في صندوق التوزيع، التحقق من أنها مغلقة باستخدام جهاز اختبار الجهد، تعلم رموز ألوان الأسلاك: البني للسلك الحي، الأزرق للسلك المحايد، الأخضر/الأصفر للأرضي (وأيضًا، من المهم تذكر السلك الحي المتحول).
أفضل خيار لك في التوصيل هو الحفاظ على البساطة، والتقاط صورة للتوصيل القديم قبل أن تبدأ بفك أي شيء، إجراء اختبار سحب على الموصلات، تأريض لوحة الوجه المعدنية، وعدم محاولة العمل على دائرة ميتة! إذا واجهت أي مشاكل مثل أن التوصيل أقدم مما هو مذكور في أي كتب توصيل، أو الألوان ليست كما يجب أن تكون، أو نقص التأريض، أو تلف الأسلاك، أو أي شيء آخر لا يتطابق مع كتاب التوصيل، يجب عليك بالتأكيد الاتصال بكهربائي محترف!