A homeowner in Manchester wanted to change the bright fluorescent overhead light in her dining room for a dimmer switch instead. A rotary dimmer was purchased after watching a five minute video demonstrating how to install one, and within 1 hour, after removing the previous switch plate, she experienced flickering of the light beneath 50% brightness and a dimmer switch that was too hot to touch. The problem was not the dimmer or bulb, but there was no neutral wire in the switch box due to the electrical code changes since the time the house was built (1978). She placed the electrical line and load correctly according to the dimmer switch’s instructions but the design of this dimmer needed a neutral wire as well. The homeowner simply changed to a non-neutral switch and corrected the problems; no more flickering light. Learning to install a dimmer light takes a great deal of organisation. The actual physical work will take less than 30 minutes to complete; however the preparation for a successful outcome – identifying the wiring, selecting the appropriate dimmer and matching it to the light bulbs – will make a difference in whether your room glows or buzzes when you finish the project.
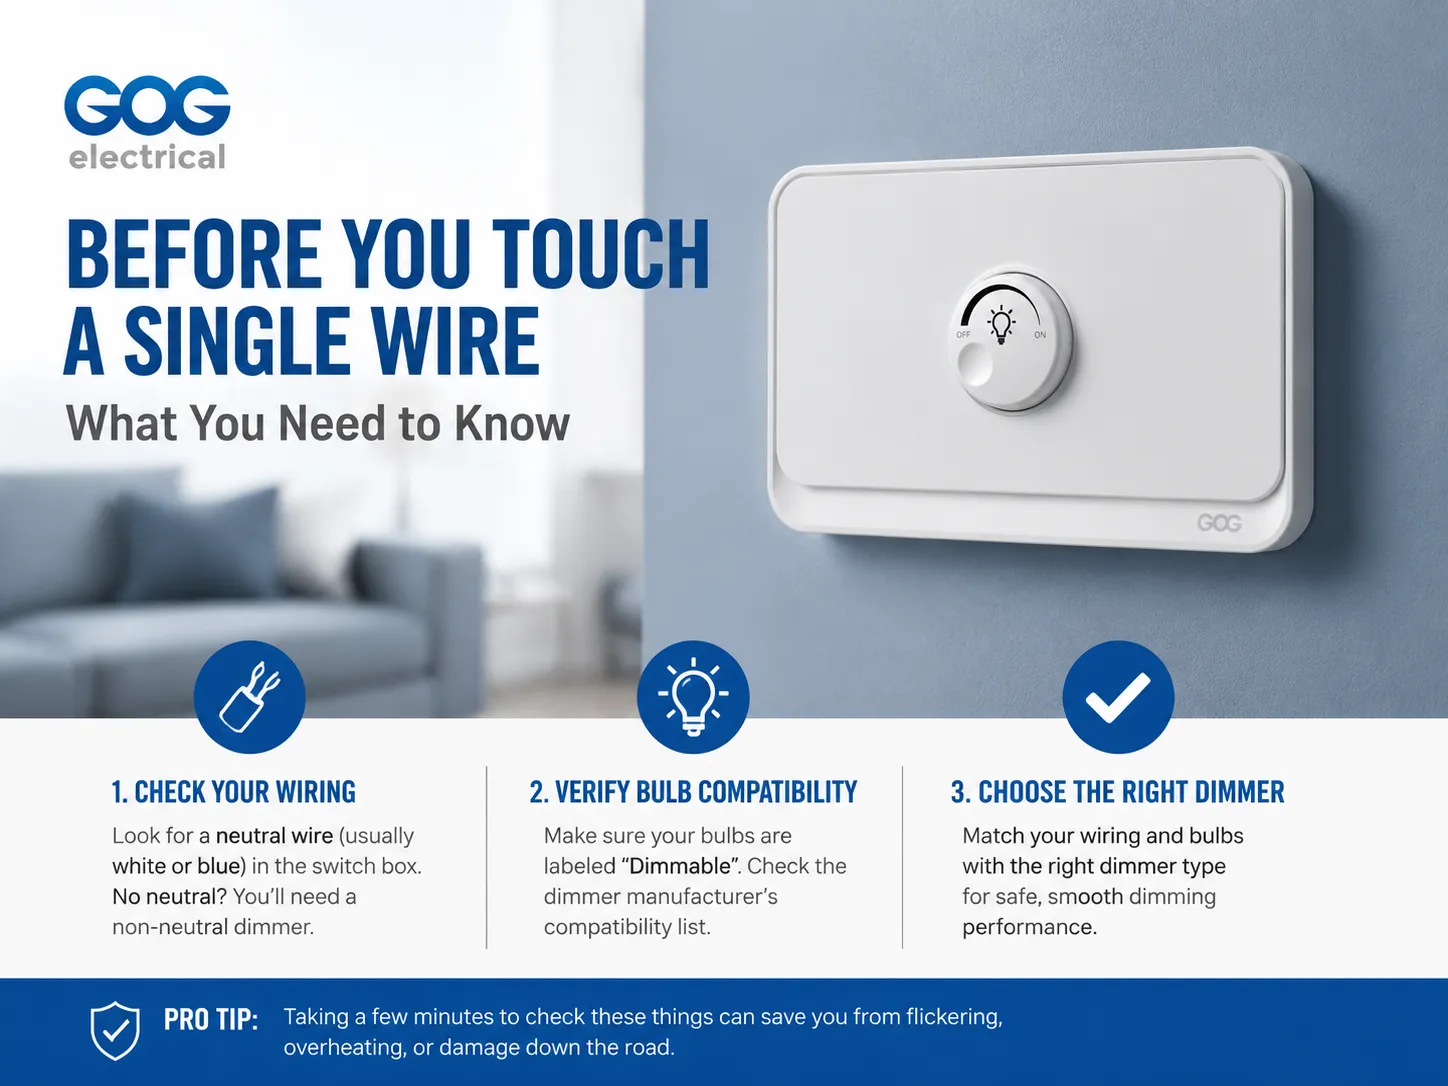
Before You Touch a Single Wire: What You Need to Know
Dimmer switches are different from standard toggle switches. A dimmer switch has circuitry inside (a triac or MOSFET that cuts the AC wave) which requires power from somewhere to function properly. Some dimmers take power via the line/load, whereas other dimmers require a neutral. Thus, the first/most significant thing to know is what type of wiring configuration you have and what type of dimmer will work with it.
The switch box for the typical house constructed in accordance with the most current wiring standard will have a neutral wire inside — usually a set of two or more white wires or two or more blue wires (depending upon local codes) that are tied together in the back of the switch box. This is perfect since you may use any kind of dimmer switch, including smart and wifi enabled dimmers. If your home was built prior to the last 30 years and does not contain a neutral wire in the switch box, then it has what is referred to as a switch loop, which has been an accepted practice for decades. In that case, you must use a non-neutral dimmer switch, which obtains its current for operation through the light bulb instead of the neutral wire. Our guide on neutral vs non‑neutral smart switches explains this distinction in detail and how to identify which wiring you have.
Prior to purchasing a dimmer switch, you should also verify whether the circuit’s bulbs are compatible with dimmers or not. If a dimmable LED light bulb is operated on a dimmer switch, it can potentially flicker, overheat or burn out prematurely. Make sure the word “dimmable” appears on the bulb’s packaging; then check with the manufacturer of the dimmer to see if it has been tested for use with the specific dimmer/bulb combination being used. The companies Lutron, Leviton and GOG Electric all provide lists that show the lamp/string/fixture combinations for which they have compatibility tested some of their products. Performing this quick five-minute step prior to installation can eliminate the most frequent cause of flickering lights after they have been installed.
Tools and Materials You Will Need
- Flathead and Phillips screwdrivers
- Non‑contact voltage tester (essential — never rely on the light being off)
- Needle‑nose pliers
- Wire strippers (if you need to trim or re‑strip conductors)
- New dimmer switch (matched to the wiring configuration and the bulb type)
- Wire nuts or Wago connectors (if the dimmer uses flying leads rather than screw terminals)
- Electrical tape (optional, for wrapping around terminal screws)
Step‑by‑Step: Installing a Dimmer Switch
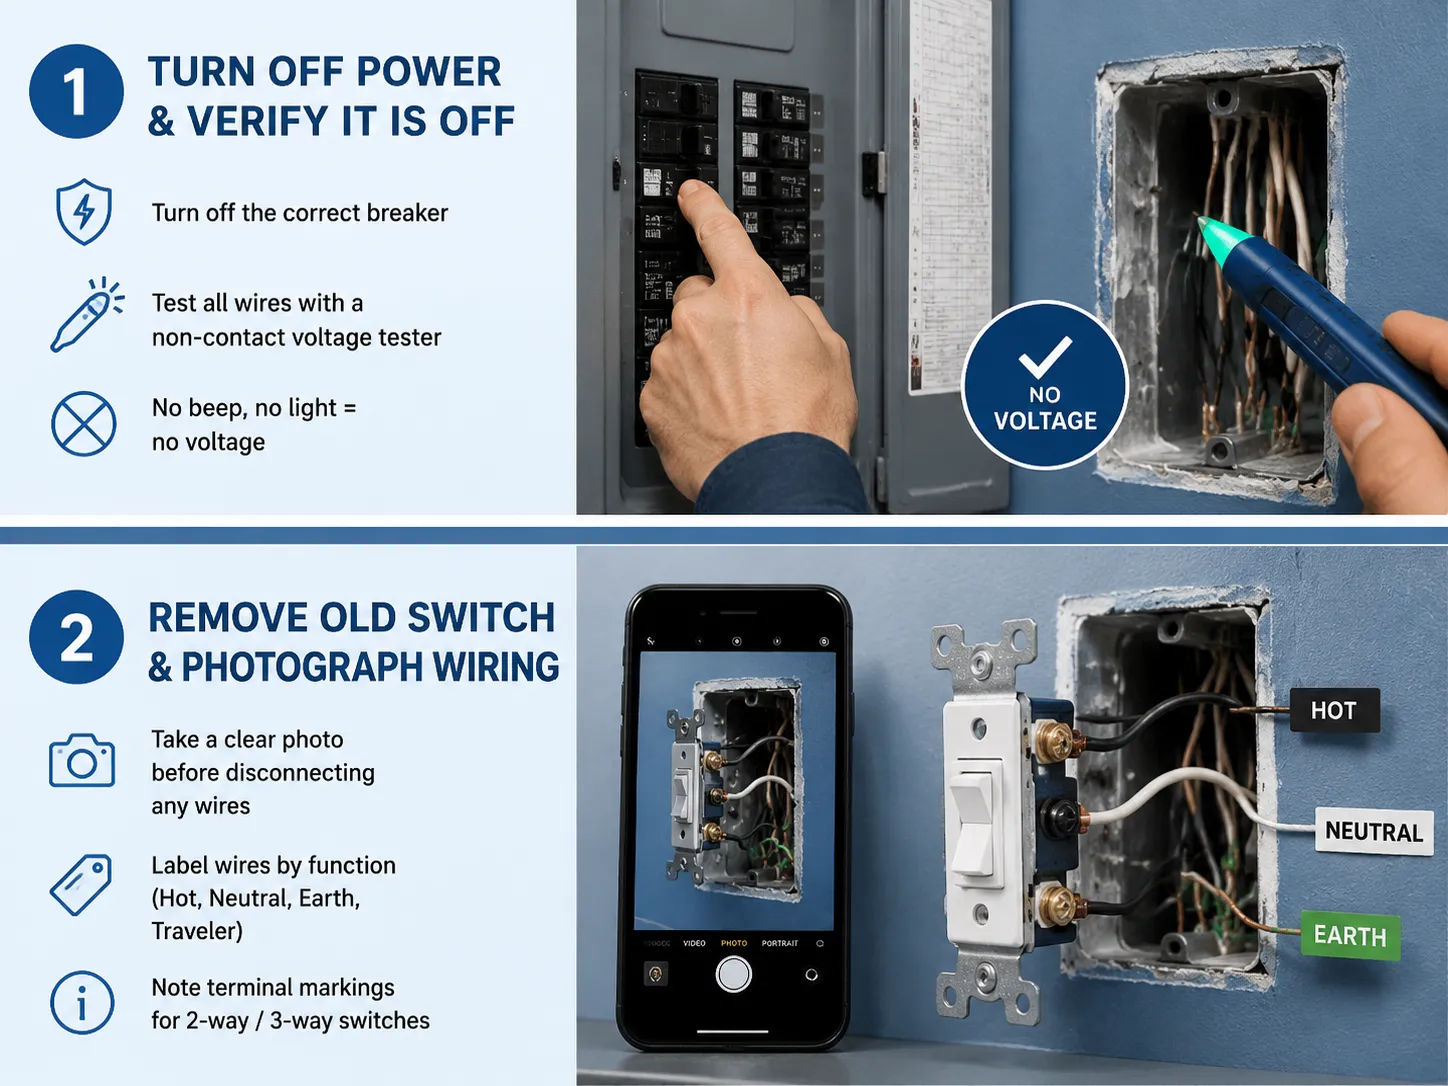
1. Turn Off the Power and Verify It Is Off
Locate the circuit breaker or consumer unit and find the breaker that controls the lights that you will be using. If there are no labels on the breakers, turn on the lights, turn off each breaker one at a time until the lights go out. Mark that breaker for future reference. Once the lights are off, remove the switching cover and test each terminal and the wires in the box with a non-contact voltage tester (the tester should not beep or illuminate when it is in contact with any of the conductors). You need to test the tester with a known live circuit before testing it with the non-contact voltage tester to ensure that it is operational. If you have verified that you have no voltage on each conductor, you can continue.
2. Remove the Old Switch and Photograph the Wiring
Remove an old toggle switch from the wall box. Remove it from the wall box by gently pulling on it until the switch is fully out of the box. Be sure to take a good quality photo with your phone so that you have a reference for when you are disconnecting each of the wires from the lugs of the old switch. Wires should be labeled according to what they are connected to (hot is usually brown/black, neutral is usually brown with colored sleeve/black and earth is usually green/yellow or bare). If the switch is two-way (3-way in USA), there will typically be 3 terminals plus the earth terminal and the wiring is more complicated (pay close attention to markings on terminals for 3-way).
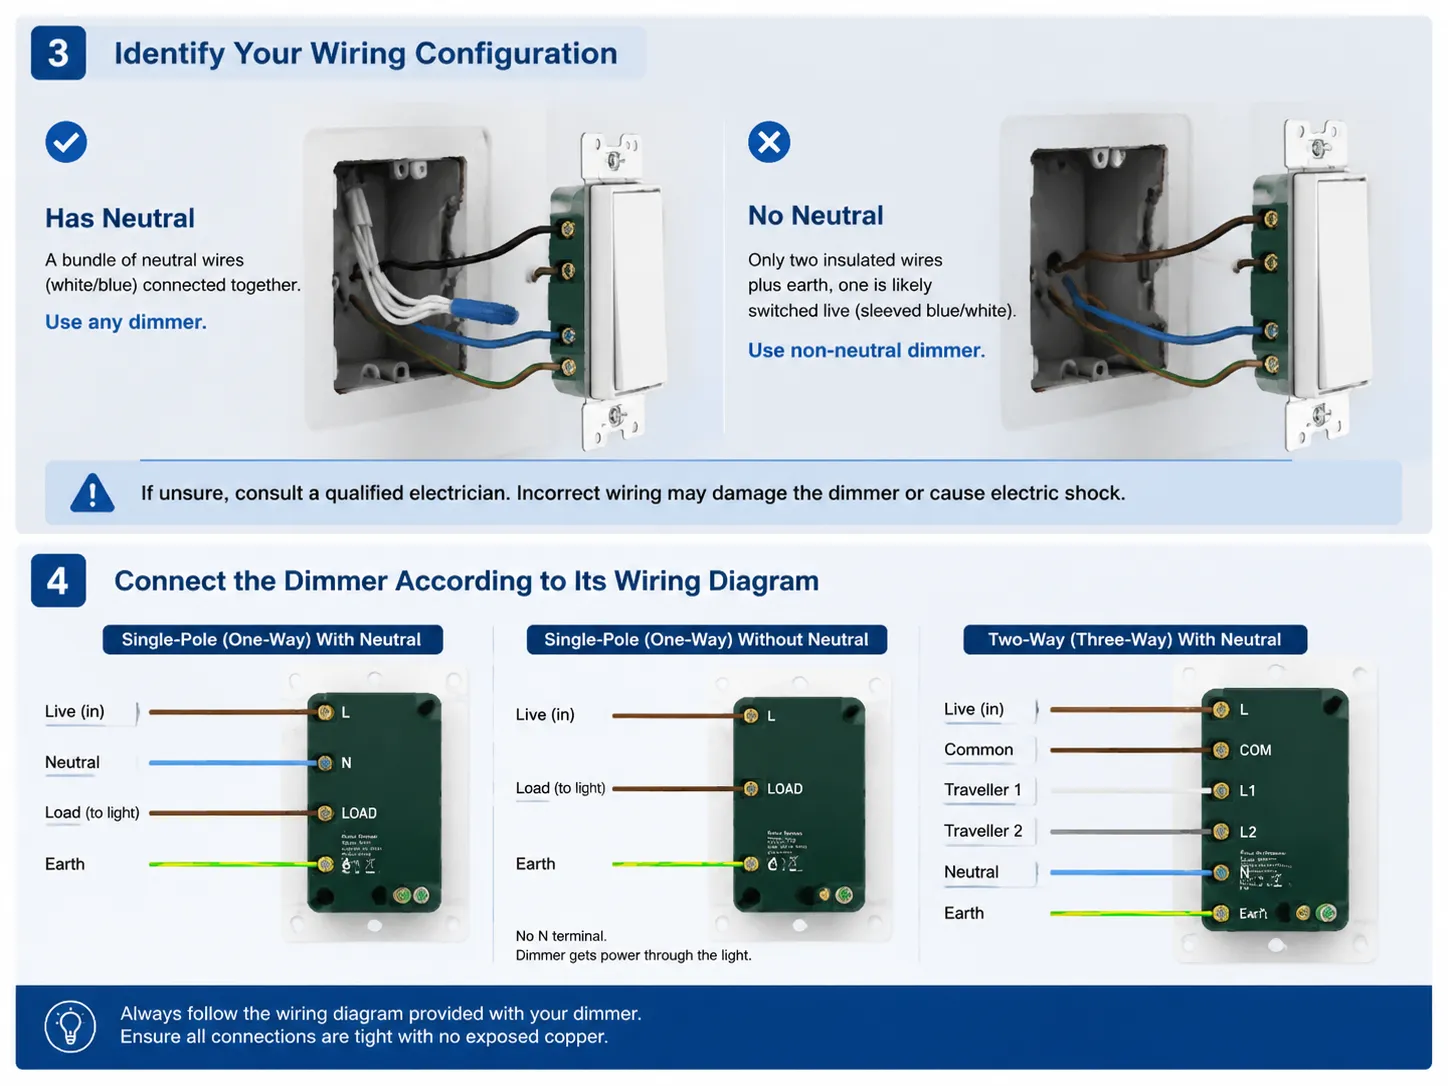
3. Identify Your Wiring Configuration
Open the wall box. If there is a bundle of neutral wires (blue in the UK, white in North America) connected to one another, then there is a neutral, and you can install any type of dimmer. If there are only two insulated wires plus an earth, and one of these wires is a blue or white conductor covered by brown or black insulation, then it is very likely that you are using a switch loop and have no neutral in this setup. Therefore, you will need to use a non-neutral dimmer in this scenario. If you are unsure whether your installation meets the above description, please consult with a qualified electrician as any error may cause damage to the dimmer or pose an electrical shock to someone.
4. Connect the Dimmer According to Its Wiring Diagram
A wiring diagram is included with every dimmer; therefore, it is essential to read it. The terminal configurations for this dimmer may not match your old switch; here are the common configurations.
- Single‑pole (one‑way) with neutral: You’re required to attach the incoming live wire to the dimmer’s L or COM terminal, and then attach the outgoing live wire (which goes to the light fixture) to the dimmer’s LOAD terminal. The neutral wire will connect to the N terminal on the dimmer, while the ground wire will be attached either to the earth terminal on the dimmer or directly to the metal box at the back of the dimmer if it doesn’t have an earth terminal.
- Single‑pole (one‑way) without neutral: Incoming live&Switched live/Wiring to L/LOAD/Earth: No Neutral terminal. You will connect to the Earth. Your dimmer will get its operational current through the light bulb.
- Two‑way (three‑way) with neutral: This dimmer switch is wired the same as a standard 2-way switch with the addition of a neutral wire. The traveller wires will connect to their respective traveller terminals, the common terminal will connect to the COM terminal, and the neutral will connect to the N terminal.
A clear labeling of the terminal connections will be marked by ‘L’, ‘N’, and ‘LOAD.’ The wiring diagram will be printed on both the instruction sheet and on the face of the dimmer. Connect each wire securely and gently so that no bare copper wire is visible outside the terminal. If the dimmer has flying leads instead of screw terminals, refer to the accessories supplied with the dimmer to attach the flying leads to each terminal and confirm tight and secure connections.
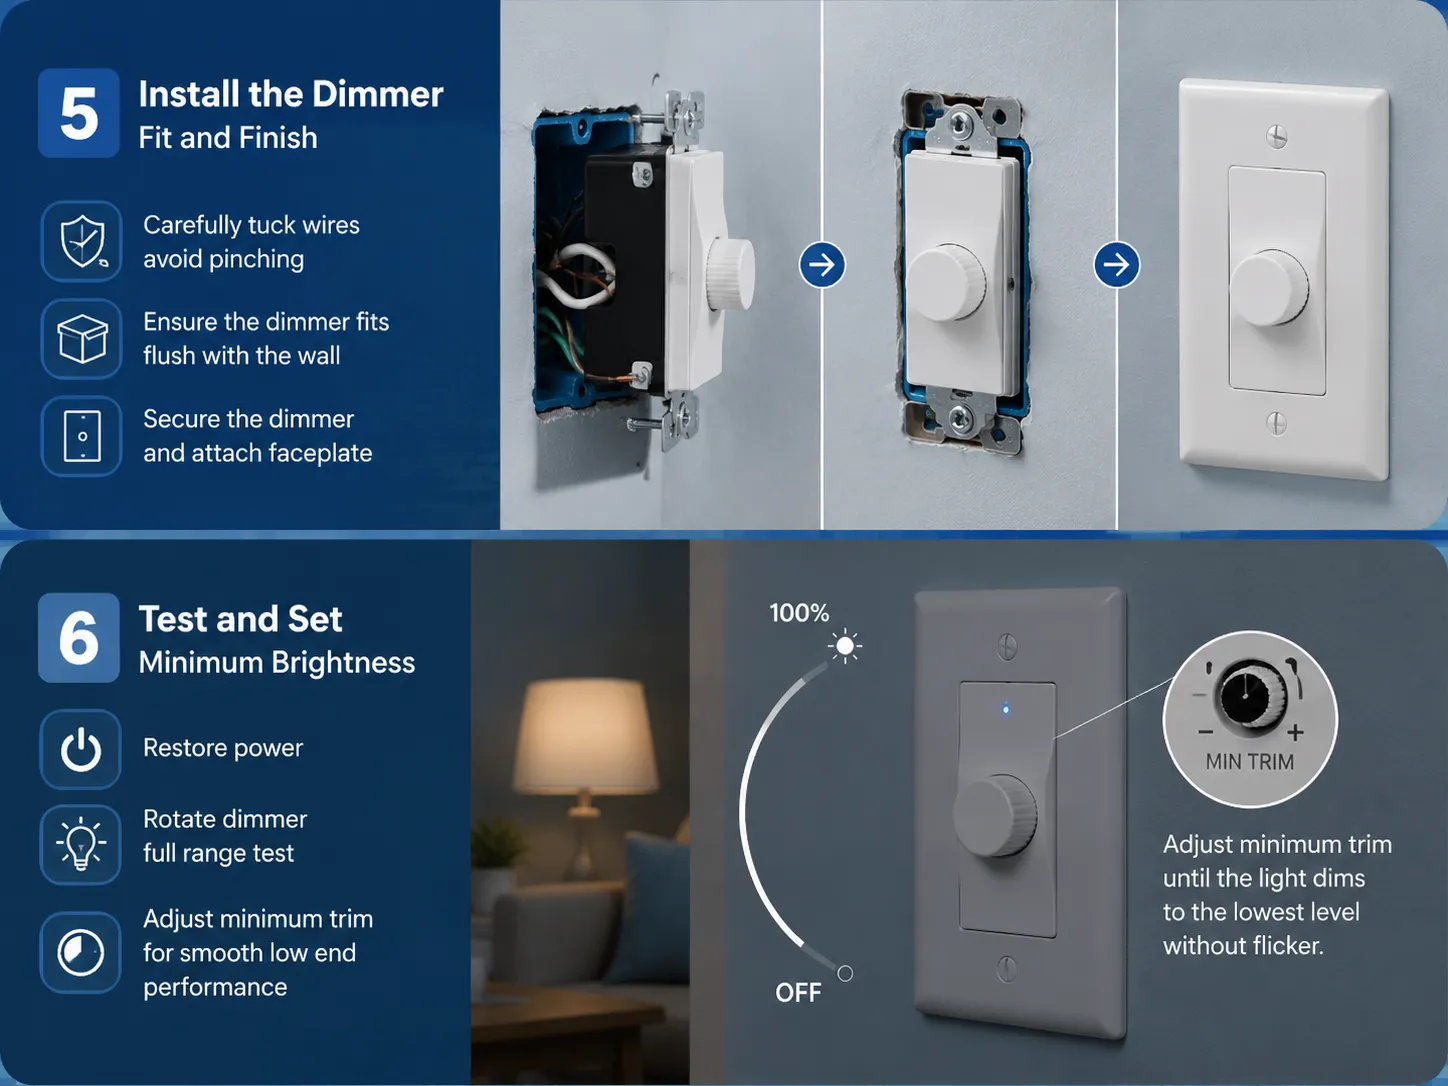
5. Fit the Dimmer into the Wall Box and Attach the Faceplate
Dimmers can be thicker than a regular toggle or rock switch because there is additional circuitry. When pushing the wires into the box, take care to ensure they are not pinched or crimped in the box. You should just be able to push the dimmer into the box without forcing it into place. If the dimmer will not go all the way into the box it is likely that the box is too shallow (common in older homes) and will need to be changed to a deeper style. This is something your electrician will be able to help with. After ensuring that the dimmer is installed flush with the wall surface, you will want to secure the dimmer to the box and then put on the faceplate.
6. Restore Power, Test, and Set the Minimum Brightness
Once the power is turned back on, you should see an illuminated lighted indicator on the dimmer (if it is equipped). Turn your dimmer through its total rotation — the light will go down smoothly from full to off without flickering, buzzing, or dropping off. If your light cuts off before you reach your dimmer’s minimum setting, you may need to make an adjustment to the minimum trim setting (a small knurled knob or dial located on either the interior or exterior face of the unit) until your light goes down to the lowest brightness possible without flickering. GOG Electric dimmer switches have trim adjustments to ensure that you can match the minimum setting to the burn out point of your specific bulb.
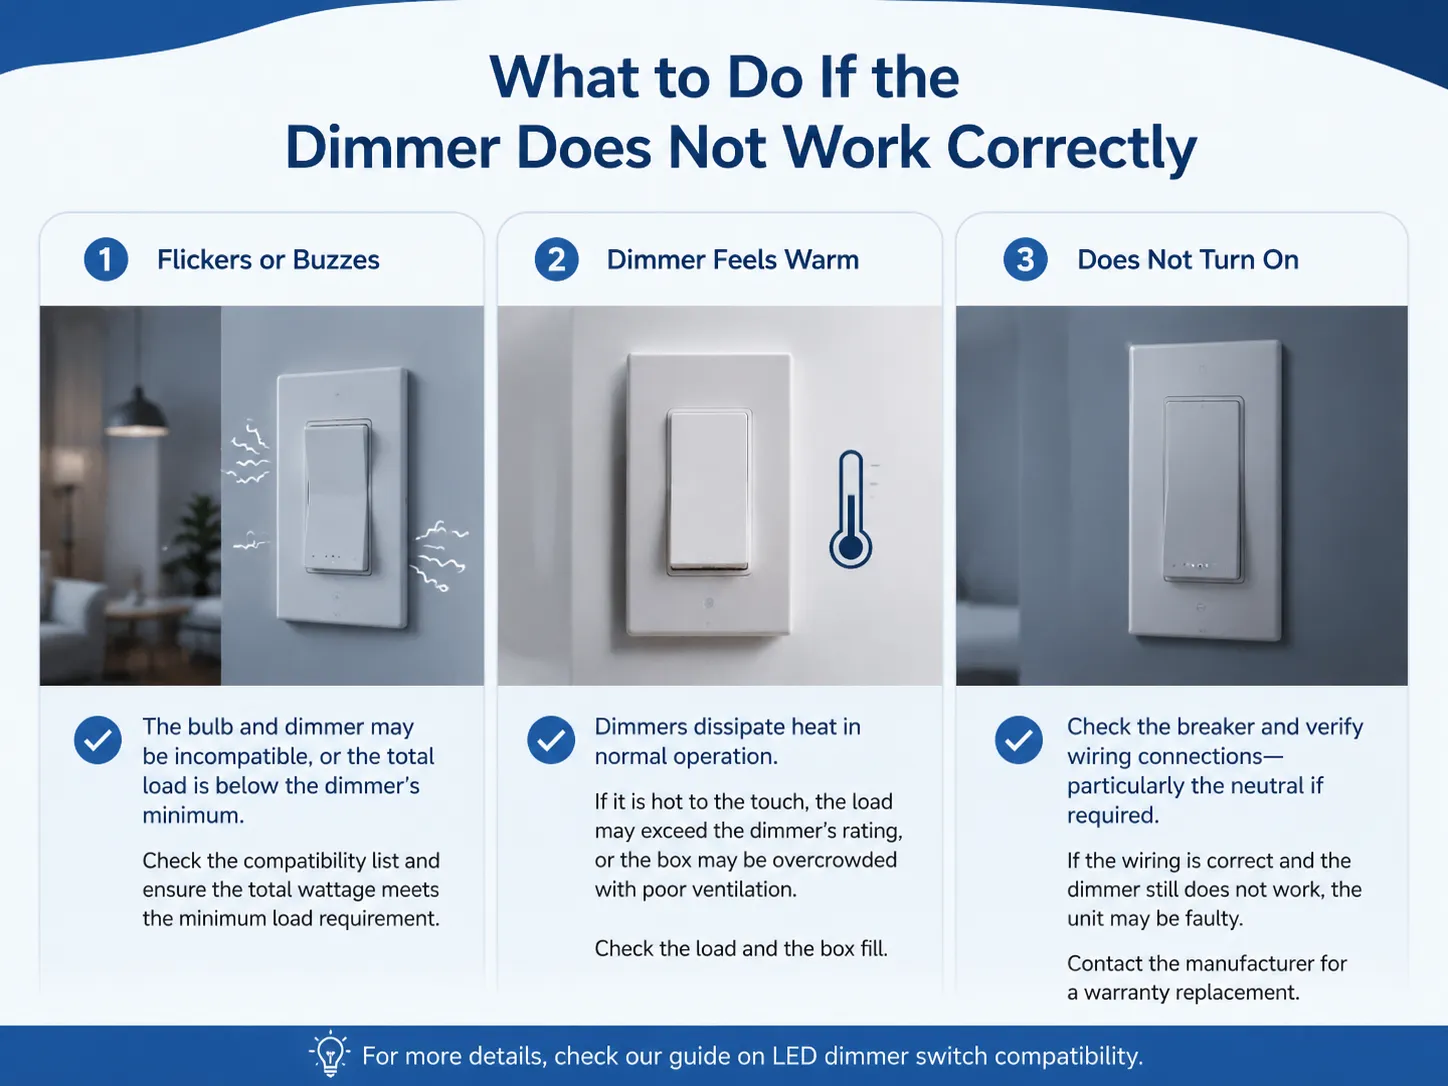
What to Do If the Dimmer Does Not Work Correctly
- The bulb flickers or buzzes. The bulb and dimmer are incompatible, or the total load on the dimmer is below its minimum. Check the manufacturer’s compatibility list, and ensure the total wattage of all bulbs on the circuit meets the dimmer’s minimum load requirement. Our guide on LED dimmer switch compatibility explains how to resolve this.
- The dimmer feels warm. Dimmers dissipate a small amount of heat in normal operation. A dimmer running at full load (typically 150W LED or 600W incandescent) will feel noticeably warm. If it is hot to the touch, the load may exceed the dimmer’s rating, or the dimmer may be installed in an overcrowded box with insufficient ventilation. Check the load and the box fill.
- The dimmer does not turn on at all. Check the breaker. Verify the wiring connections — particularly the neutral if the dimmer requires one. If the wiring is correct and the dimmer does not function, the unit may be faulty. Contact the manufacturer for a warranty replacement.
Maintenance and Long‑Term Reliability
The simplest of all electrical loads is a dimmer, and as such it requires only minimal maintenance. All of the dimmer’s electronics use solid-state technology, and therefore contain no mechanical components that could wear out over time. The most common long-term issue with dimmers is the potential for their terminal connections (i.e. the screws that hold the electrical connection) to loosen over time due to thermal cycles; this can lead to flickering or sporadic operation from the dimmer. If you have been using your dimmer reliably for several years, and suddenly find the dimmer is flickering, simply turn off the circuit breaker and check how tight the terminal connections are. The dimmer will be good for at least 10 years, and should not require additional attention beyond the issues stated herein.
Can You Install a Dimmer Switch Yourself?
Definitely, if you have a modern copper wire installation, a deep enough electrical box, and perform the safe isolation procedure outlined above, replacing a standard switch with a dimmer is a do-it-yourself project that is easy to accomplish for most carefull individual. If you have aluminum wire, insulated wire with cloth insulation, or have any indication of hot spots on the wiring, you should stop immediately and contact a licensed electrician. If you have insufficient depth in your box (for example, if the dimmer body will not fit in the box) or you’re uncomfortable working on live current, an electrician can install your dimmer in less than 1 hour. The cost of hiring an electrician, typically between $80 and $150, is insignificant when compared to the possibility of making an electrical wiring error during installation.
Frequently Asked Questions
Can you install a dimmer switch yourself?
It is quite possible to change out a standard switch for a dimmer switch as a do-it-yourself (DIY) job – as long as you follow the appropriate procedure for working with electrical circuits: First, turn off the circuit breaker before starting; then use a voltmeter to ensure there is no voltage at the circuit; then ensure the new dimmer is compatible with your current wiring and light bulbs; finally, connect the wires as per the manufacturer’s wiring diagram. If your existing wiring is very old, damaged, or confusing to you, please contact a licensed electrician instead.
What wire goes where on a dimmer switch?
In most cases, your dimmer will connect to the house electrical system with three wires: The incoming (live) wire connects at either of two locations on the dimmer; the switch (to control the electrical current to your fixture or lamp) connects to the “LOAD” and “N” terminals, and if applicable, the earth wire connects to the “E” terminal. Once again, always refer to the diagram or instructions supplied with the dimmer; the location and configuration of these terminals can vary between manufacturers.
Can I install a dimmer switch on a regular switch?
Provided that the electrical box is deep enough in depth, the existing wiring is suitable for dimming, and that all the bulbs in the system can be dimmed, you can replace a standard wall-mounted (on), and off) switch with a dimmer switch. If you currently have a 2-way (or 3-way) switch, then purchase a compatible dimmer switch for a 2-way circuit.
Do I need an electrician to install a dimmer switch?
If you need to replace an existing light fixture in a modern, well-wired home it is not necessary to hire an electrician. However, if your home contains old wiring, aluminum wiring, no ground wire, shallow electrical box or if you are troubled working with electric wiring, then it would be wise to hire a qualified licensed electrician due to safety reasons.
References
- Lutron Electronics — Dimmer Installation Guides and Compatibility Lists — Manufacturer technical documentation and LED compatibility resources.
- Leviton — Dimmer Switch Installation and Compatibility — Product guides and wiring diagrams for residential dimmers.
- Family Handyman — How to Install a Dimmer Switch — Practical homeowner guidance with step‑by‑step instructions.
- This Old House — Dimmer Switch Installation and Troubleshooting — Guidance on dimmer selection, installation, and resolving common issues.
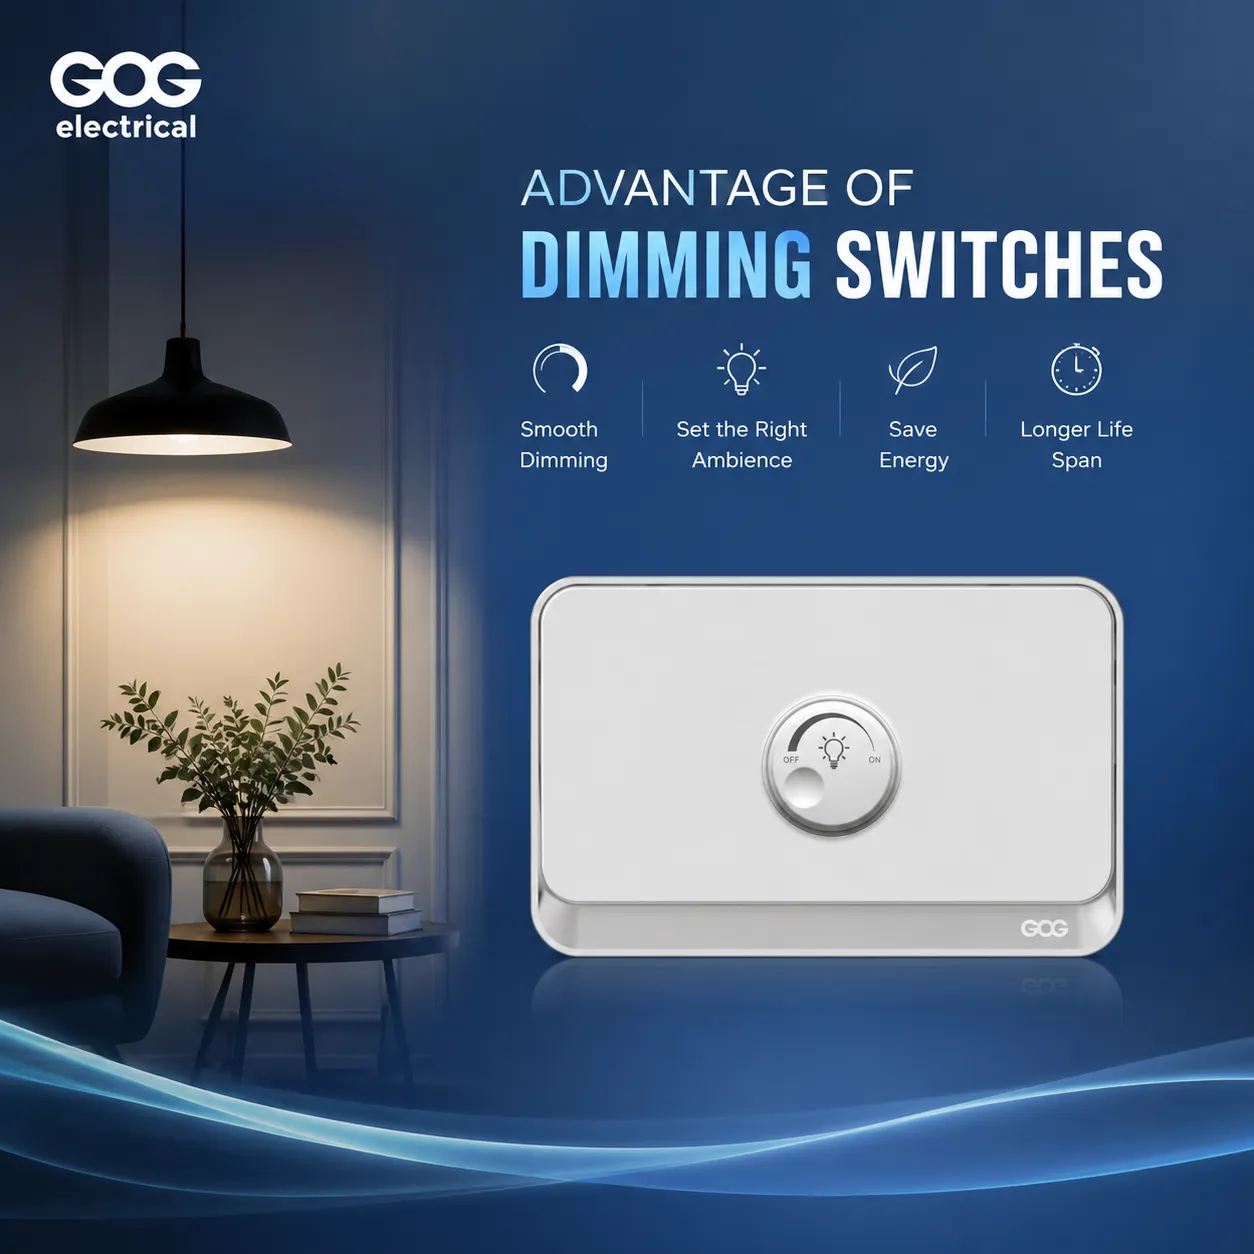
Installing a dimmer switch is one of the most satisfying electrical upgrades a homeowner can make. It replaces a binary on‑off decision with a gradient of light that can change the mood of a room as easily as it saves energy and extends bulb life. The installation itself is methodical: identify the wiring, select the right dimmer, connect the terminals correctly, and test. GOG Electric’s dimmer switches are built for that simplicity — clearly labelled terminals, an adjustable minimum brightness trim, and a compatibility guide that takes the guesswork out of matching dimmer to bulb. When the faceplate is back on and the light fades smoothly to a warm glow, the work is done, and it will be enjoyed every evening.