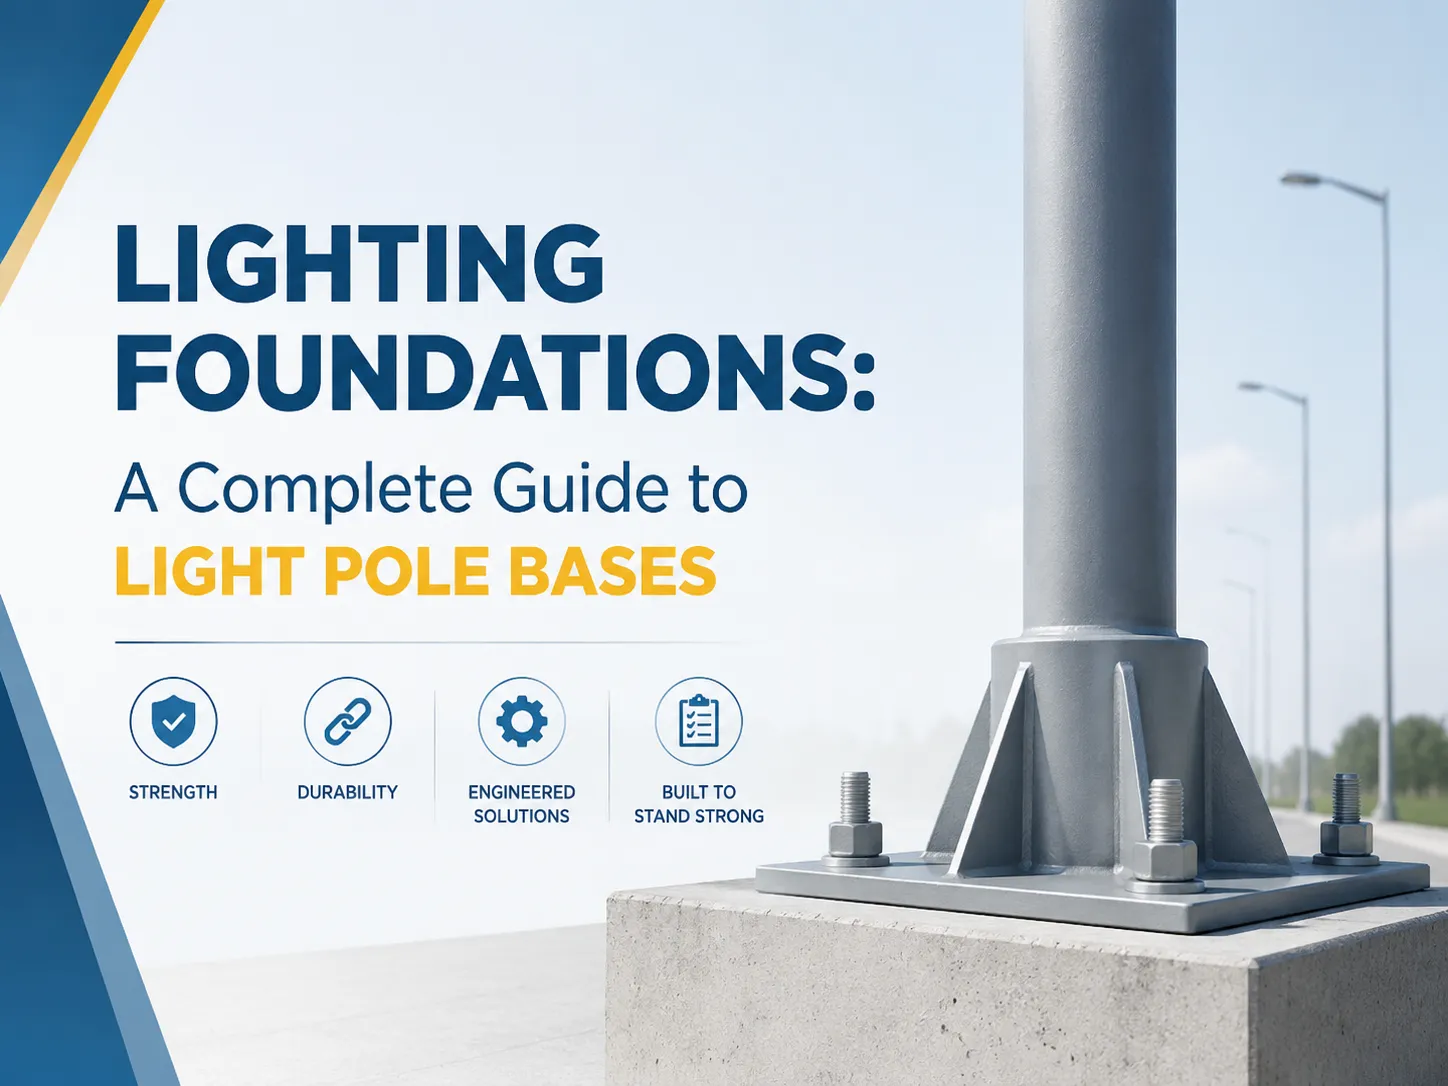
Usted compró un excelente poste de luz y conjunto de iluminación: un poste de 25 pies de altura hecho de acero para su estacionamiento con cuatro luces LED. Sin embargo, el poste no cumple su función adecuada. Cuando el poste está instalado al aire libre, actúa como una palanca grande y experimenta fuerza debido al movimiento del viento. La base del poste de luz (que es una construcción de concreto incrustada en el suelo) está diseñada para combatir esta fuerza, y en caso de que la base no esté bien hecha, el poste se inclina.
El artículo que está a punto de leer será de gran utilidad para contratistas, gerentes de instalaciones y propietarios cuando se trate de cimientos para postes de luz: qué son, qué tipos de cimientos existen, qué profundidad debe tener la instalación, diseño de ingeniería de las instalaciones, cuáles son los costos y el proceso de instalación.
Resumen breve: Un cimiento de iluminación (base del poste de luz) es un pilar de concreto reforzado que facilita el montaje de una luz de calle exterior. Existe una regla de oro: la profundidad debe ser al menos de 3 pies con un ancho de 2 pies en el caso de postes de hasta 18 pies de altura, con profundidades adicionales de 1 pie por cada 5 pies de altura.
¿Qué es un cimiento de iluminación?
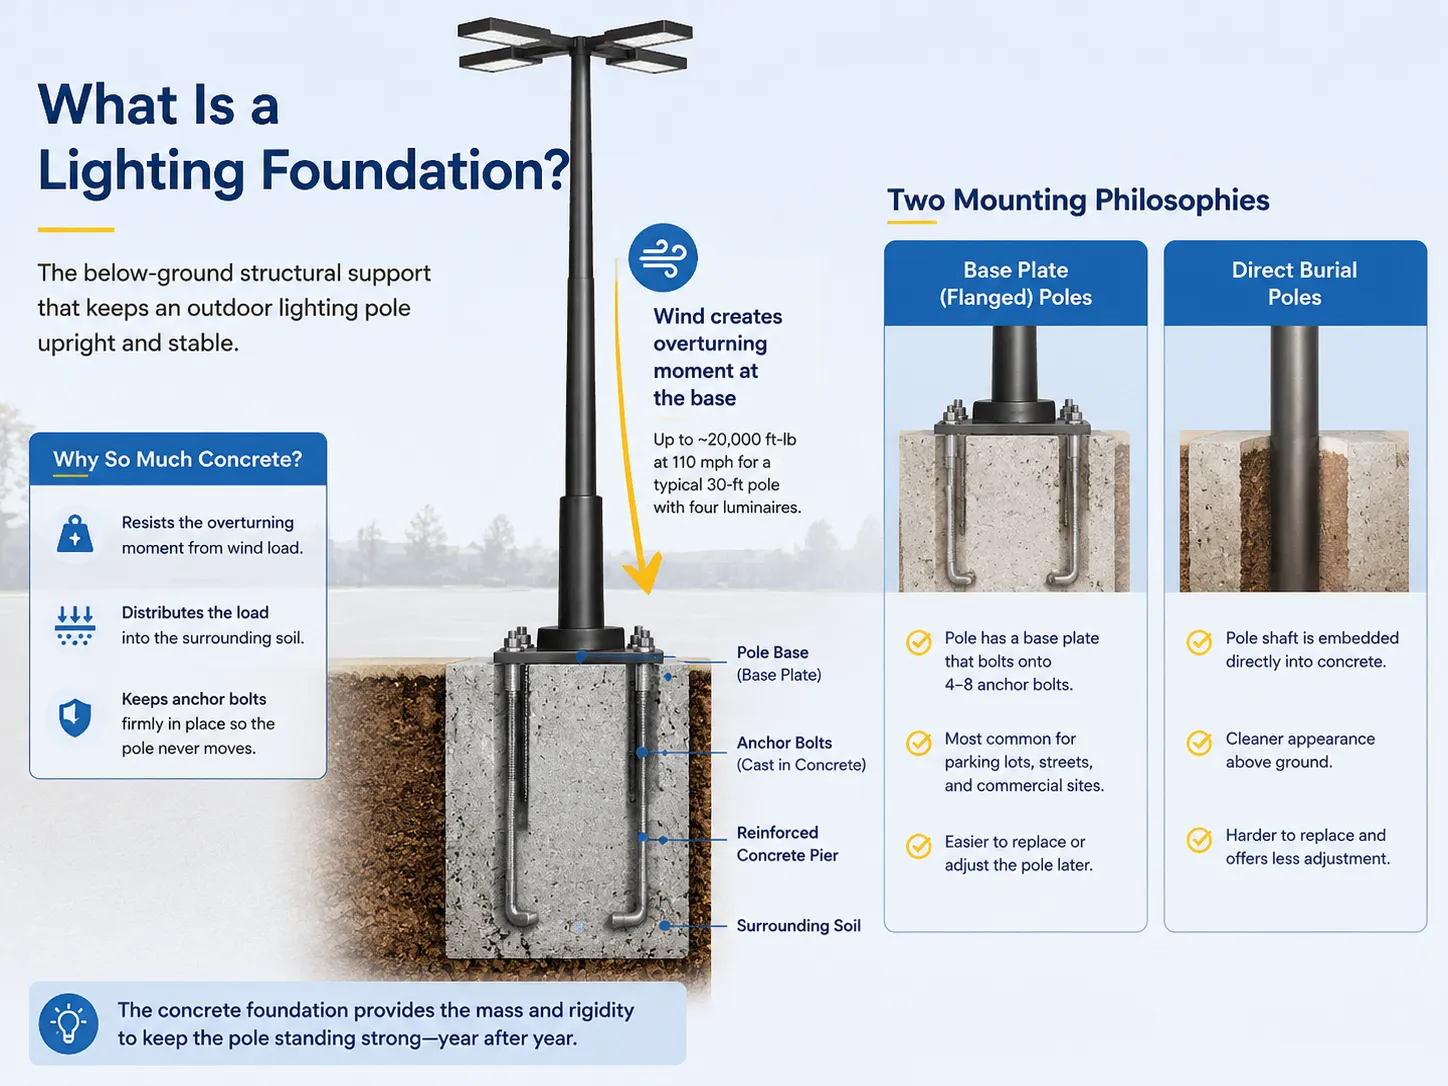
Un cimiento de iluminación (también referido como base de poste de luz, zapata de poste o cimiento de poste) sirve como la estructura de soporte subterránea para un poste de iluminación exterior. Típicamente, un cimiento de iluminación es un pilar de concreto reforzado que se coloca en un agujero excavado y tiene pernos de anclaje (o una funda para poste) fijados en el concreto.
¿Por qué se necesita una cantidad tan significativa de concreto solo para soportar un poste simple? La razón es que el poste actúa como una palanca. El viento que actúa sobre un poste de 30 pies y su luminaria causa un momento de vuelco en la base del poste; en el caso de un poste de iluminación regular con 4 luminarias a 110 mph, este momento puede llegar a alrededor de 20000 ft-lbs. La zapata de concreto proporciona el peso y la rigidez suficientes para resistir el momento de vuelco, transferir la carga al suelo circundante y fijar los pernos de anclaje en su lugar.
Se emplean dos enfoques para montar postes:
- Poste montado sobre placa base (con bridas): este tipo de poste tiene una base plana que se fija a 4 a 8 pernos de anclaje incrustados en un pilar de concreto. Es el más utilizado en estacionamientos y otras aplicaciones comerciales, ya que simplifica el proceso de reemplazo del poste.
- Poste enterrado directamente en concreto: este tipo de poste tiene su eje incrustado en la zapata de concreto. Ofrece una apariencia más limpia pero complica el procedimiento de reemplazo del poste.
Para contexto sobre el lado eléctrico de la iluminación en postes — el cableado, interruptores y controles que alimentan la luminaria — nuestras guías sobre Diferencias de voltaje entre Reino Unido y EE. UU. y Tipos de tomas eléctricas cubren las normas relacionadas que los circuitos de iluminación deben cumplir en diferentes mercados.
Tipos de cimientos para postes de luz
Los cimientos para iluminación vienen en varias configuraciones, cada una adecuada para diferentes tipos de postes y condiciones del sitio:
| Tipo | How It Works | Mejor Para | Costo típico |
|---|---|---|---|
| Pilar de concreto vertido + pernos de anclaje | Agujero excavado relleno con concreto reforzado; pernos de anclaje fundidos en su lugar con una plantilla | Postes estándar para estacionamientos y calles (15-40 pies) | $200-$800 (concreto), $500-$2,000+ mano de obra |
| Entierro directo | Eje del poste incrustado directamente en concreto sin placa base | Postes residenciales, decorativos y más pequeños | $150-$500 (concreto), menos hardware |
| Fundación de concreto prefabricado | Base de concreto fabricada en fábrica entregada y colocada en un agujero preparado | Instalaciones más rápidas, proyectos repetidos, clima frío | $400-$1,200 por base, mano de obra más rápida |
| Pilotes helicoidales / de tornillo | Anclas de tornillo de acero impulsadas en el suelo, poste montado encima | Suelo blando, sitios sin concreto, postes temporales o portátiles | $300-$1,000 por pilote |
| Bases ponderadas / portátiles | Bloques pesados de acero o concreto, sin excavación | Iluminación temporal, sitios de construcción, iluminación para eventos | $500-$3,000 por base |
| Fundaciones desprendibles | Base frangible diseñada para romperse al impacto | Postes al borde de la carretera donde el impacto vehicular es un riesgo | +$200-$800 sobre el estándar |
La opción más común para iluminación comercial y municipal permanente es el pilar de concreto usando bases de concreto con pernos de anclaje. Esta opción es la más predecible estructuralmente y la que más cumple con las normas requeridas.
¿Qué tan profunda debe ser la fundación de un poste de luz?
Esta es una pregunta que todo instalador quiere saber responder. Afortunadamente, la respuesta sigue la regla general estándar en la industria.
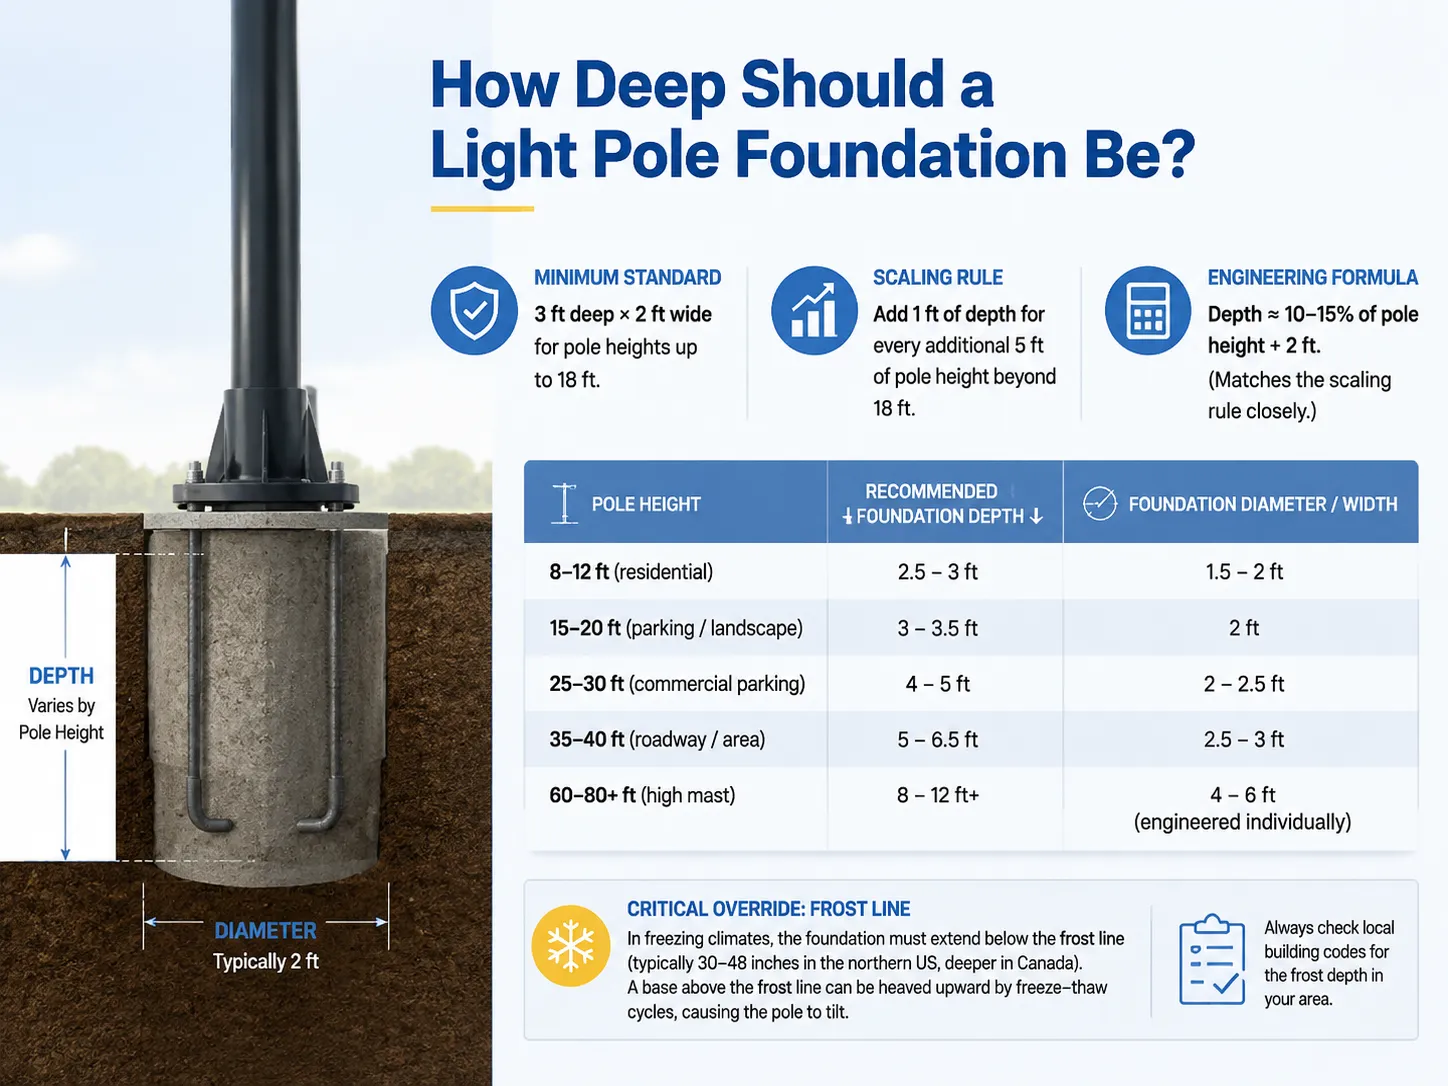
- Estándares mínimos: La proporción de profundidad a ancho de 3 pies por 2 pies siempre se ha utilizado para postes de hasta 18 pies de altura. La regla de escala establece que se debe añadir más profundidad por cada 5 pies que el poste exceda el mínimo de 18 pies. Por ejemplo, si el poste mide 28 pies de alto, se requerirán 4 pies de profundidad en la fundación (3 + 1), mientras que un poste de 33 pies necesitaría 5 pies de profundidad.
- Fórmula de ingeniería: Las fundaciones de postes deben tener aproximadamente 10-15% de la altura del poste más 2 pies, similar a la profundidad de la regla de escala.
- Diámetro: El diámetro de la fundación debe ser aproximadamente de dos pies para postes pequeños y tres pies para postes altos y en instalaciones con viento fuerte.
| Altura del poste | Profundidad recomendada de la fundación | Diámetro / ancho de la fundación |
|---|---|---|
| 8-12 ft (residencial) | 5-3 ft | 5-2 ft |
| 15-20 ft (estacionamiento / paisaje) | 3-3.5 pies | 2 pies |
| 25-30 ft (estacionamiento comercial) | 4-5 pies | 2-2.5 pies |
| 35-40 ft (carretera / área) | 5-6.5 pies | 5-3 ft |
| 60-80+ ft (mástil alto) | 8-12 pies+ | 4-6 ft (diseñado individualmente) |
Consideración crítica: la cimentación debe ser lo suficientemente profunda para estar por debajo de la línea de congelación, que puede variar según su ubicación. En estados del norte, la profundidad de congelación puede variar entre aproximadamente 30 y 48 pulgadas o más en Canadá. Si la base está por encima de la línea de congelación, se moverá hacia arriba debido a los ciclos de congelación y descongelación, lo que puede provocar que un poste se incline lentamente hacia abajo, siendo este uno de los casos más comunes de falla prematura en climas fríos. Es muy importante verificar los códigos locales respecto a la profundidad de congelación en su área.
¿Qué determina el tamaño de la cimentación?
Estos números son solo el punto de partida. La base real será calculada por el ingeniero estructural para su poste y lugar específicos, dependiendo de los siguientes factores:
| Factor | Efecto en la cimentación |
|---|---|
| Altura del poste | Poste más alto = palanca más larga = cimentación más profunda y ancha |
| Peso del accesorio y longitud del brazo | Accesorios más pesados o más anchos aumentan el momento de vuelco |
| Clasificación de velocidad del viento (ASCE 7) | 90 mph estándar, 110 mph costero, 130 mph zonas de huracán — viento más fuerte = base más grande |
| Capacidad portante del suelo | Suelos débiles (arcilla, relleno, orgánico) requieren cimentaciones o pilotes más grandes |
| Profundidad de congelación | La cimentación debe alcanzar por debajo de la línea de congelación en climas fríos |
| Área proyectada efectiva (EPA) de los accesorios | Más superficie del luminario = mayor carga de viento |
| Requisitos de ruptura | Los postes al borde de la carretera pueden necesitar cimentaciones frangibles o bisagras |
Para una aplicación típica en estacionamiento, el ingeniero definirá el momento de vuelco usando el área proyectada efectiva del poste para la velocidad de viento local de diseño y calculará el pilote de concreto y los pernos de anclaje necesarios para resistir el momento de vuelco con el factor de seguridad requerido. Siempre siga los planos de cimentación del fabricante, que contienen datos completos sobre el diámetro de las tuercas, pernos implementados y la cantidad de concreto.
Componentes de la cimentación: pernos de anclaje, varillas de refuerzo y concreto
Las cimentaciones de iluminación vertidas tienen tres componentes estructurales básicos:
- Pernos de anclaje: Los pernos de anclaje estándar son pernos de 4-8, de 1-1.5 pulgadas fijados en el concreto mediante una plantilla de posicionamiento (anillo de pernos). El diámetro del círculo de pernos es aproximadamente 3-5 veces más ancho que el diámetro de la base del poste. Los pernos deben colocarse de manera fija ya que incluso un ligero desplazamiento hace imposible colocar correctamente la placa base del poste.
- Refuerzo: Varillas de refuerzo y su proporción que hacen que el sistema de fortalecimiento sea aproximadamente 0.3-0.5. Este material soporta cargas que el concreto simple no puede resistir.
- Concreto: Es un material de construcción mezclado con C28 de aproximadamente 3000-4000 psi. La solidificación del concreto con este grado debe proceder durante 7-14 días antes de colocar el poste.
Los accesorios también son cruciales: una salida de registro en la base de concreto del poste para el cableado, una terminal de puesta a tierra conectada con la base (desde el punto de vista del NEC) y, en algunos casos, un enchufe para el dispositivo de control fotográfico. La conexión del electrodo de puesta a tierra es un requisito del código — aprenda más en nuestro artículo sobre conceptos básicos de tomas eléctricas y puesta a tierra.
Proceso de instalación paso a paso
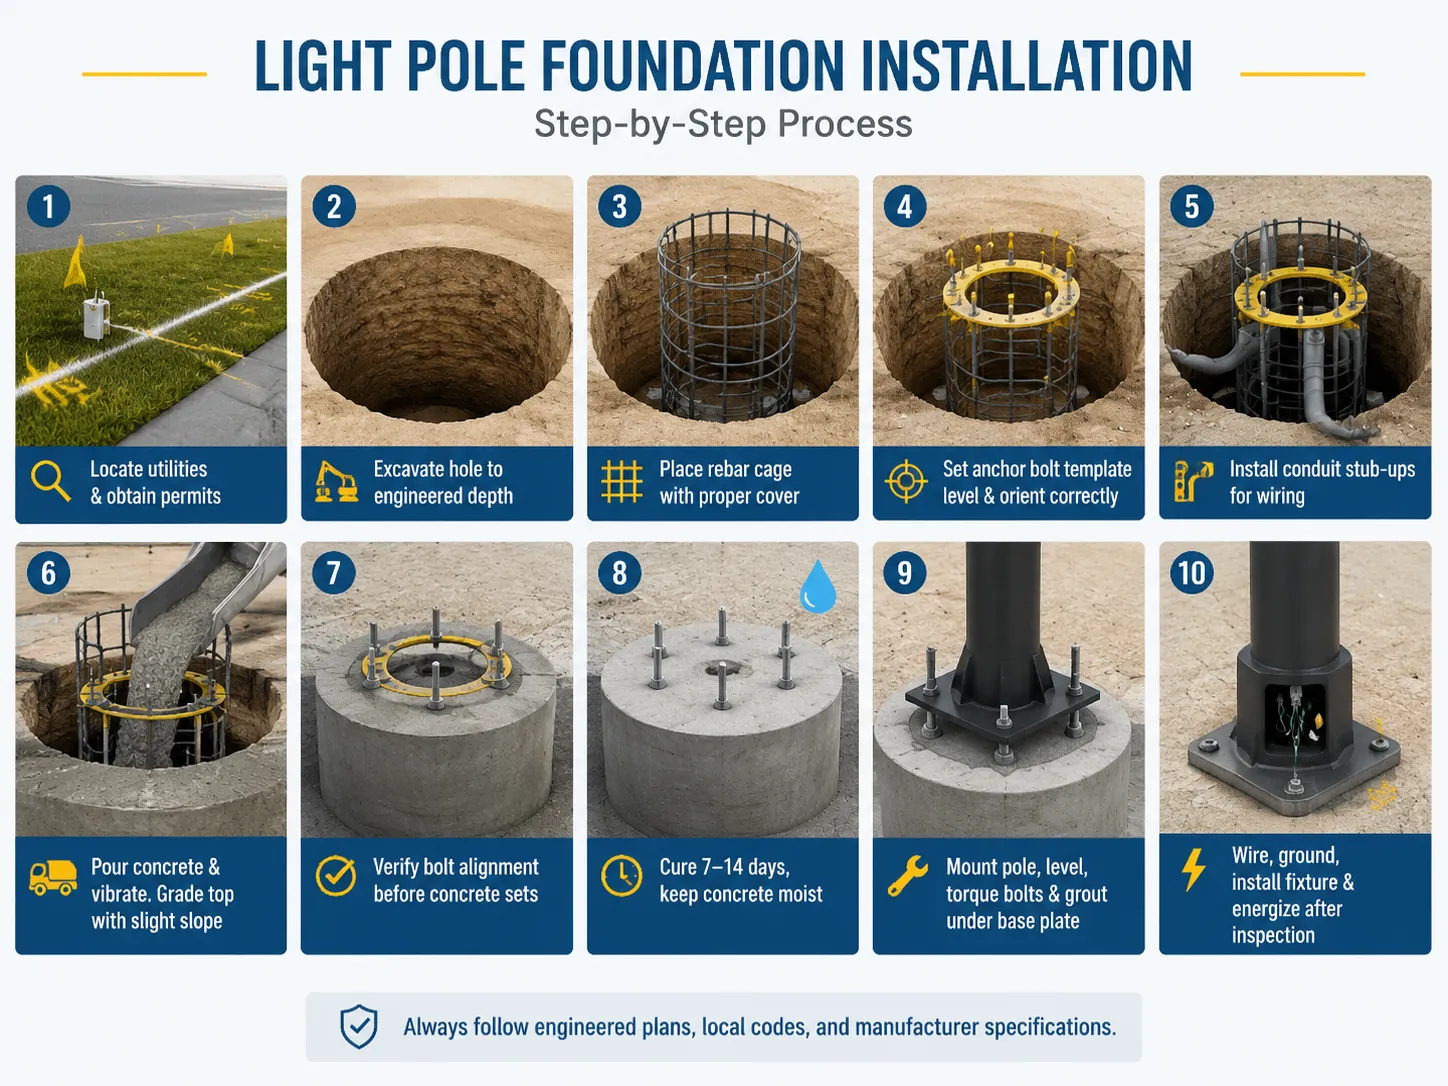
El procedimiento estándar para realizar una base de iluminación de concreto vertido es el siguiente, ejecutado por equipos capacitados:
- Averigüe dónde pasan las instalaciones y obtenga los permisos. Contacte con el servicio local de localización de servicios públicos antes de cualquier excavación y asegúrese de que se cumplan todos los permisos de construcción/electricidad.
- Excave el hoyo a la profundidad y tamaño especificados, más una tolerancia para los encofrados. Observe si hay vacíos y, si se encuentran, deténgase y consulte a un ingeniero.
- Instale la jaula de varillas de refuerzo en el hoyo, manteniéndola separada del fondo con bloques o separadores para mantenerla en el centro y a la profundidad adecuada.
- Fije correctamente la plantilla de pernos de anclaje a la profundidad correcta, especialmente después de nivelarla verticalmente, para asegurar que los pernos que sostiene estén alineados correctamente.
- Antes de verter el concreto, instale los conductos eléctricos verticales, cuidando las curvas apropiadas y utilizando accesorios resistentes a la intemperie.
- Vierta el concreto y vibre para eliminar burbujas de aire alrededor de las varillas y pernos. Nivele la superficie a la altura y pendiente requeridas.
- Verifique si los pernos se mueven después de verter el concreto, mientras el concreto aún no ha endurecido.
- Cure el concreto durante un período de 7 a 14 días, manteniéndolo húmedo con agua. No instale el poste demasiado pronto.
Si lo está haciendo usted mismo, sea honesto sobre su nivel de habilidad: la alineación de los pernos de anclaje y el trabajo con concreto no perdonan. Para que una luminaria funcione correctamente una vez energizada, las conexiones eléctricas también deben ser sólidas; nuestra guía de reemplazo de interruptores de luz y Guía de compatibilidad de atenuadores LED muestra el nivel de cuidado que merece el lado eléctrico.
¿Cuánto cuesta una base para poste de luz?
Los costos de la cimentación varían según la región, el suelo y el tamaño del poste. Aquí están las cifras típicas para 2025-2026 por poste:
| Ítem | Rango típico de costos |
|---|---|
| Materiales para la base de concreto (mezcla, varillas, pernos, plantilla) | $200-$800 |
| Excavación y mano de obra | $500-$2,000+ |
| Ingeniería / planos de cimentación sellados | $200-$1,000 |
| Permisos | $50-$300 |
| Cimentación total instalada | $1,000-$4,000 por poste |
| Poste completo + luminaria + instalación (referencia) | $1,500-$7,000+ por poste |
Los trabajos grandes (más de 10 postes) usualmente obtienen descuentos del 15 al 25 por ciento en materiales y costos de mano de obra por poste. Usar cimentaciones prefabricadas puede ahorrar mano de obra pero costará más por unidad, por lo que podría ser algo a considerar para postes idénticos.
Línea de congelación y consideraciones para climas fríos
La línea de congelación juega un papel particularmente crítico en definir la profundidad de las cimentaciones en climas fríos. Sin extenderse por debajo de la línea de congelación, un pilar de concreto siempre se levantará y moverá de temporada en temporada a medida que se acumula la escarcha en el suelo. Profundidades típicas de la línea de congelación:
- Sur de EE. UU.: 0–12 pulgadas
- Atlántico medio: 24–36 pulgadas
- Norte de EE. UU.: 36–60 pulgadas
- Regiones extremas del norte (Alaska, Norte de Canadá): 60–120 pulgadas o más
Las personas en regiones con escarcha profunda a veces optan por el enterramiento directo de sus postes o instalan los prefabricados y precast. De hecho, es común que los contratistas viertan cimentaciones a finales del otoño porque se secarán antes del invierno.
Alternativas al concreto vertido
La técnica convencional es usar concreto vertido; sin embargo, existen tres alternativas que son buenas para situaciones específicas.
- Cimentaciones prefabricadas de concreto — listas para usar y adecuadas para climas fríos (sin curado en sitio), para proyectos de construcción que usan esta tecnología y en sitios difíciles de moldear. Precio más alto comparado con cimentaciones vertidas, pero la instalación de estas cimentaciones es más rápida.
- Pilotes helicoidales — tornillos metálicos usados en este método que se introducen en el suelo con ayuda de máquinas. El método es adecuado en suelos débiles, en lugares con niveles altos de agua subterránea o en sitios que no pueden ser excavados. Este método se usa frecuentemente para iluminación temporal y sitios de construcción de paneles solares.
- Bases portátiles ponderadas — construcciones metálicas que sostienen postes sin excavar el suelo. Este método se usa ampliamente en instalaciones de iluminación temporal en sitios de construcción.
Cada uno de los enfoques ofrece la posibilidad de sacrificar la firmeza de la construcción a favor de rapidez y conveniencia; es muy importante consultar con el fabricante del poste sobre la posibilidad de tales sustituciones respecto al proyecto.
Errores comunes y cómo evitarlos
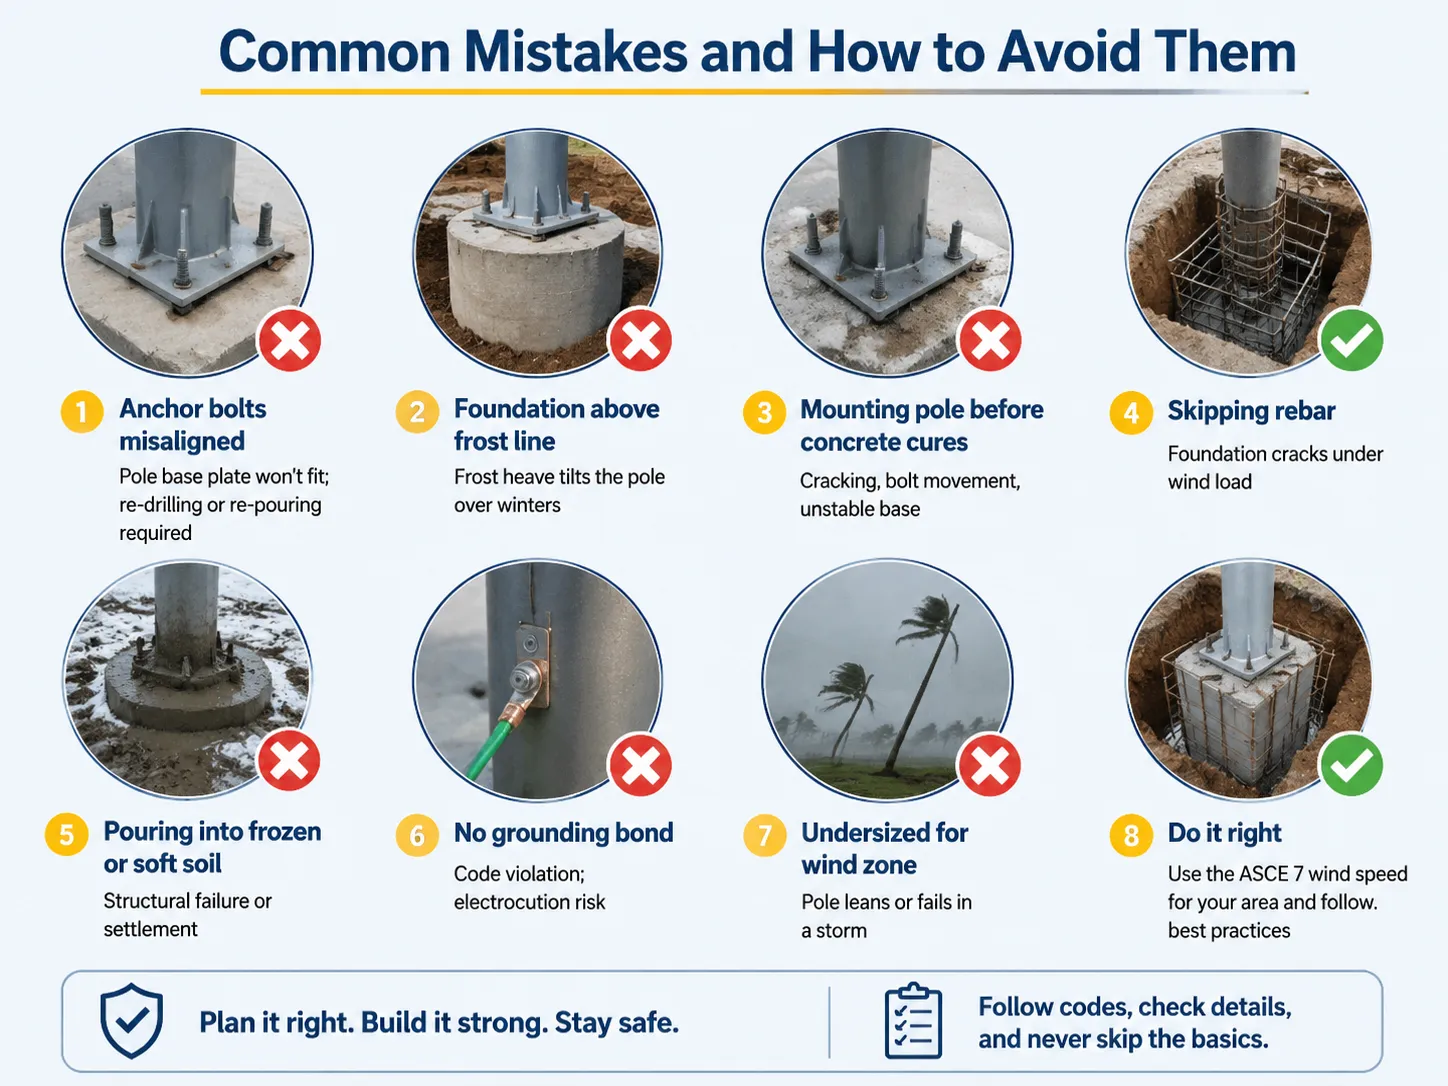
| Error | Consecuencia | Prevención |
|---|---|---|
| Pernos de anclaje desalineados | La placa base del poste no encaja; se requiere volver a perforar o volver a verter | Use una plantilla rígida; verifique la alineación antes y después del vertido |
| Cimentación por encima de la línea de congelación | El levantamiento por helada inclina el poste durante los inviernos | Verifique la profundidad local de congelación; extienda por debajo de ella |
| Montaje del poste antes de que el concreto cure | Grietas, movimiento de pernos, base inestable | Espere de 7 a 14 días; pruebe la resistencia de curado si hay prisa |
| Omitir la varilla de refuerzo | Grietas en la cimentación bajo carga de viento | Siempre use jaula de varilla de refuerzo diseñada |
| Vertido en suelo congelado o blando | Fallo estructural o asentamiento | Revisión geotécnica; detenga el trabajo si el suelo es pobre |
| Sin conexión a tierra | Violación del código; riesgo de electrocución | Terminal de puesta a tierra según NEC |
| Subdimensionado para zona de viento | El poste se inclina o falla en una tormenta | Use la velocidad del viento ASCE 7 para su área |
Inspección y mantenimiento
Después de la instalación, las bases de iluminación requerirán mantenimiento periódico.
- Verifique anualmente postes inclinados, concreto agrietado o descascarado, pernos de anclaje sueltos o corroídos y oxidación de las placas base.
- En áreas costeras, realice una inspección cada seis meses debido a que la corrosión por sal del acero anclado ocurre mucho antes.
- Verifique el torque de los pernos cada año y vuelva a apretar si están sueltos.
- Reemplace las bases si el concreto está agrietado completamente, los pernos corroídos a un nivel inseguro o los postes están visiblemente fuera de plomo.
Preguntas frecuentes
¿Cuáles son los cuatro tipos de bases?
En construcción, existen cuatro tipos de bases tradicionales como: base corrida (tira continua de concreto bajo las paredes que soportan la carga), base aislada (plataformas de concreto separadas bajo columnas o postes específicos, como se usa para postes de luz), base losa o radier (losas sólidas usadas para distribuir el peso sobre un área significativa) y base de pilotes (pilotes hincados o perforados, que transmiten el peso a suelos más densos). Las bases de postes de luz son principalmente bases aisladas pero pueden mejorarse con pilotes en suelos débiles.
¿Qué profundidad debe tener la base de un poste de luz?
Según las normas estándar, la profundidad de las bases de postes debe ser de 3 pies para postes de hasta 18 pies de altura, y un pie adicional por cada 5 pies adicionales de altura del poste — lo que significa que los postes de 25 a 30 pies requerirían una profundidad total de 4 a 5 pies, y los de 35 a 40 pies necesitarían aproximadamente de 5 a 6.5 pies. En regiones con temperaturas bajo cero, las bases deben construirse por debajo de la línea de congelación, que normalmente está entre 30 y 48 pulgadas de profundidad. Siempre es importante cumplir con los diseños de base del fabricante.
¿Cuál es el costo típico de una base de poste de luz de concreto?
El rango de precios para los componentes de una base ordinaria de poste de luz comercial (como mortero, pernos de anclaje, refuerzo de acero) generalmente es de $200-800. El costo total instalado de cada poste de luz, considerando excavación del terreno, mano de obra, licencias e ingeniería, suele ser de $1,000-$4,000. Si se instalan más de 10 postes a la vez, el ahorro puede ser del 15-25%.
¿Cuál es el mejor tipo de base para un cobertizo con postes?
Para la construcción de un cobertizo con postes, la regla general es utilizar postes tratados a presión que se instalen en bases de concreto o pilotes de grava. Usando la línea de congelación como guía, todo el poste debe estar enterrado por debajo de esta línea si se vive en un clima frío. Si, debido al peso de su cobertizo, necesita algo más sólido que una base de pilotes, puede montar sus postes sobre una losa de concreto. Este método es diferente al de la base de un poste de luz porque un cobertizo tiene techo y estructuras laterales que soportan cargas, en lugar de fuerzas de viento que podrían derribar un poste alto.
Referencias
- Experto en iluminación LED — Postes de luz: guía de selección e instalación (reglas de profundidad de cimentación)
- Xinze Light Pole — Guía de ingeniería para postes de iluminación en instalaciones de estacionamiento
- Yangming Lighting — ¿Requiere la instalación de un poste de luz un vertido de concreto?
- Xinze Light Pole — Diseño estructural y fotométrico de soportes verticales exteriores
- ASCE 7 — Cargas mínimas de diseño para edificios y otras estructuras
- NFPA 70 — Código Eléctrico Nacional (NEC)
Conclusión
La cimentación utilizada en la iluminación exterior es el héroe desconocido de cada tarea de iluminación exterior. El pedestal de cemento está diseñado para resistir la presión del viento, el levantamiento por heladas y muchos años de operación. Solo debe recordar ciertas condiciones relacionadas con su diseño: para todos los postes que tengan menos de 18 pies de altura, la base debe excavarse a 3 pies de profundidad, mientras que se debe añadir un pie extra por cada 5 pies adicionales de altura. En regiones frías, la cimentación debe estar por debajo de la línea de congelación. El concreto utilizado debe tener una resistencia de 3,000-4,000 psi, y la estructura debe reforzarse con varillas especiales e instalarse correctamente con pernos de anclaje. El precio de instalación de estas bases puede variar de $1000 a $4000 y nunca debe apresurarse el fraguado del concreto.
La regla a recordar al verter cemento para este tipo de cimentación es simple: siga los planos proporcionados por el fabricante, utilice datos sobre la presión del viento y las heladas en su país, y verifique dos veces la ubicación de los pernos de anclaje antes de que el concreto fragüe.