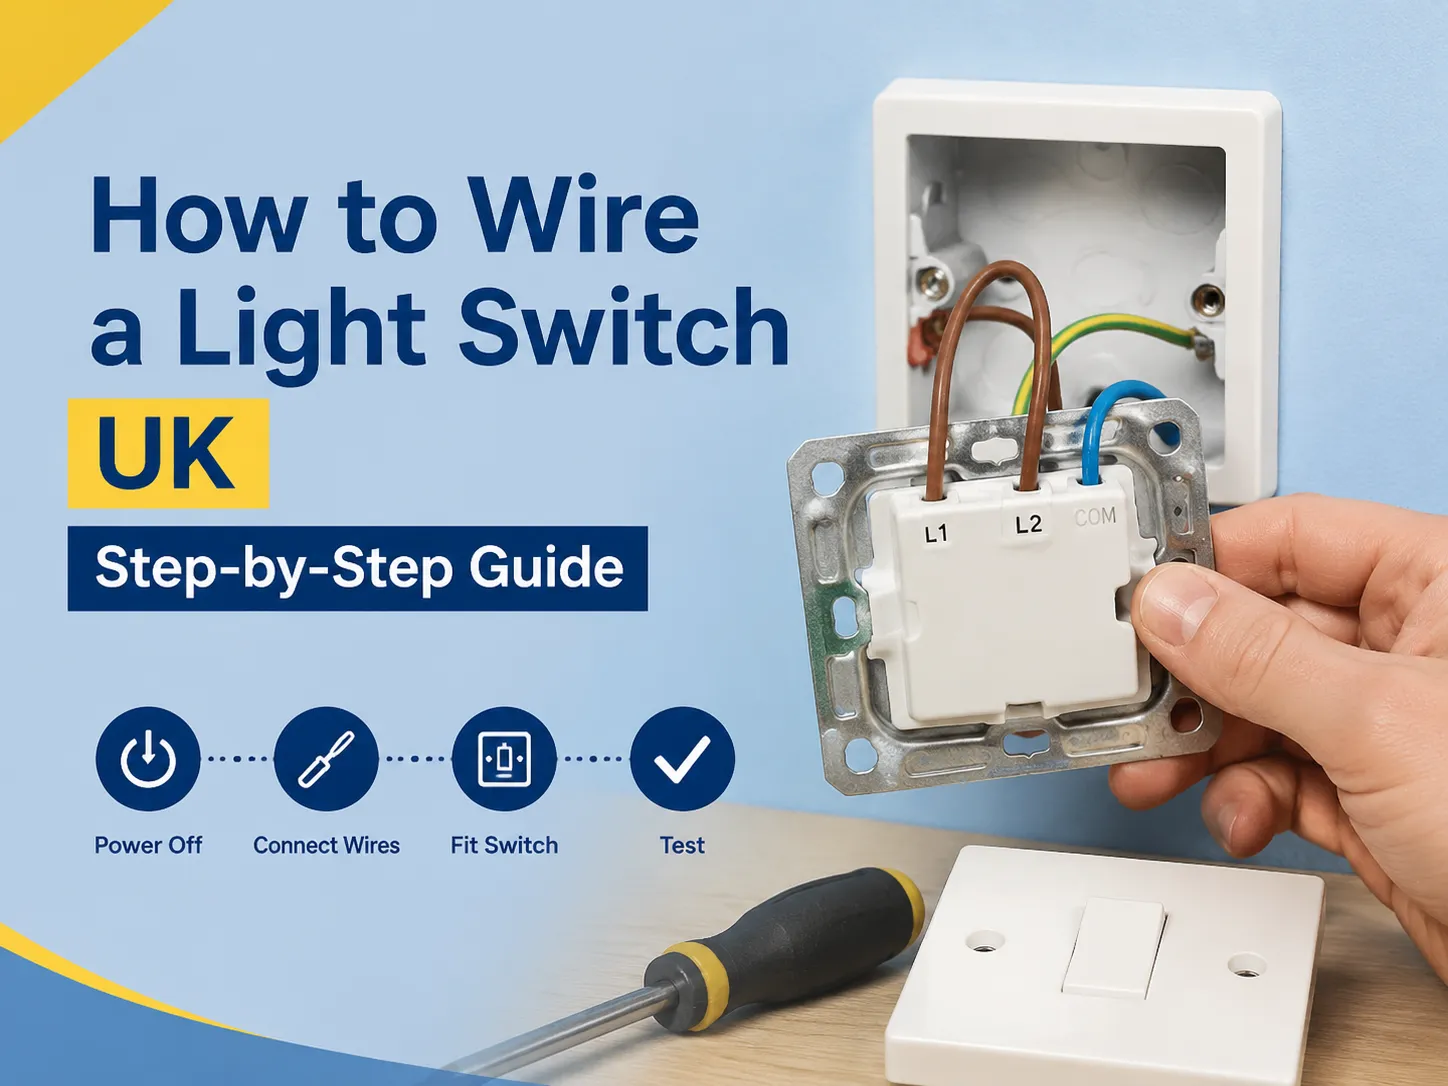
Вы приобрели новый выключатель света — возможно, это клавиша из шлифованной стали, которая заменит ваш старый громоздкий пластиковый выключатель в коридоре. Вы берёте отвёртку, снимаете лицевую панель, и внутри видите множество коричневых, синих и зелёно-жёлтых проводов, которые даже отдалённо не похожи на провода, показанные в видео, которые вы смотрели в Америке. Это произошло потому, что электропроводка в Великобритании регулируется своими правилами, в отличие от Америки.
В этом руководстве вы узнаете всё о проводке выключателей света в Великобритании, включая цветовые коды (старые и новые), значение различных клемм, подключение одноклавишного выключателя, подключение пары двухклавишных выключателей и подключение промежуточного выключателя. Вы также найдёте меры безопасности, которые необходимо соблюдать перед началом работы, и узнаете, когда лучше вызвать специализированного электрика для выполнения работы.
Краткий ответ: В Великобритании введены современные цветовые обозначения для выключателей света, соответствующие BS 7671: коричневый = фаза, синий = нейтраль, зелёно-жёлтый = земля. В одноклавишном выключателе постоянный фазный провод (коричневый) подключается к клемме COM, тогда как фазный провод, идущий к светильнику, подключается к клемме L1. Провод заземления должен быть подключён к клемме заземления (если она есть), а металлическая лицевая панель также должна быть заземлена. Всегда отключайте цепь от распределительного щита и проверяйте отсутствие напряжения с помощью тестера перед касанием — не полагайтесь на то, что выключатель находится в положении “выключено”. В случае двухклавишного выключателя добавляется клемма L2 вместе с перемычкой между двумя выключателями. Если это промежуточный выключатель, то имеется третья клемма. Поскольку замена выключателя света не подлежит уведомлению согласно Части P, все остальные инструкции необходимо соблюдать в соответствии с BS 7671.
Безопасность прежде всего: отключите и убедитесь в отсутствии напряжения
Перед выполнением любых действий сначала обеспечьте безопасность цепи. Это не просто опция, безопасность — это разница между простой задачей и поездкой в больницу.
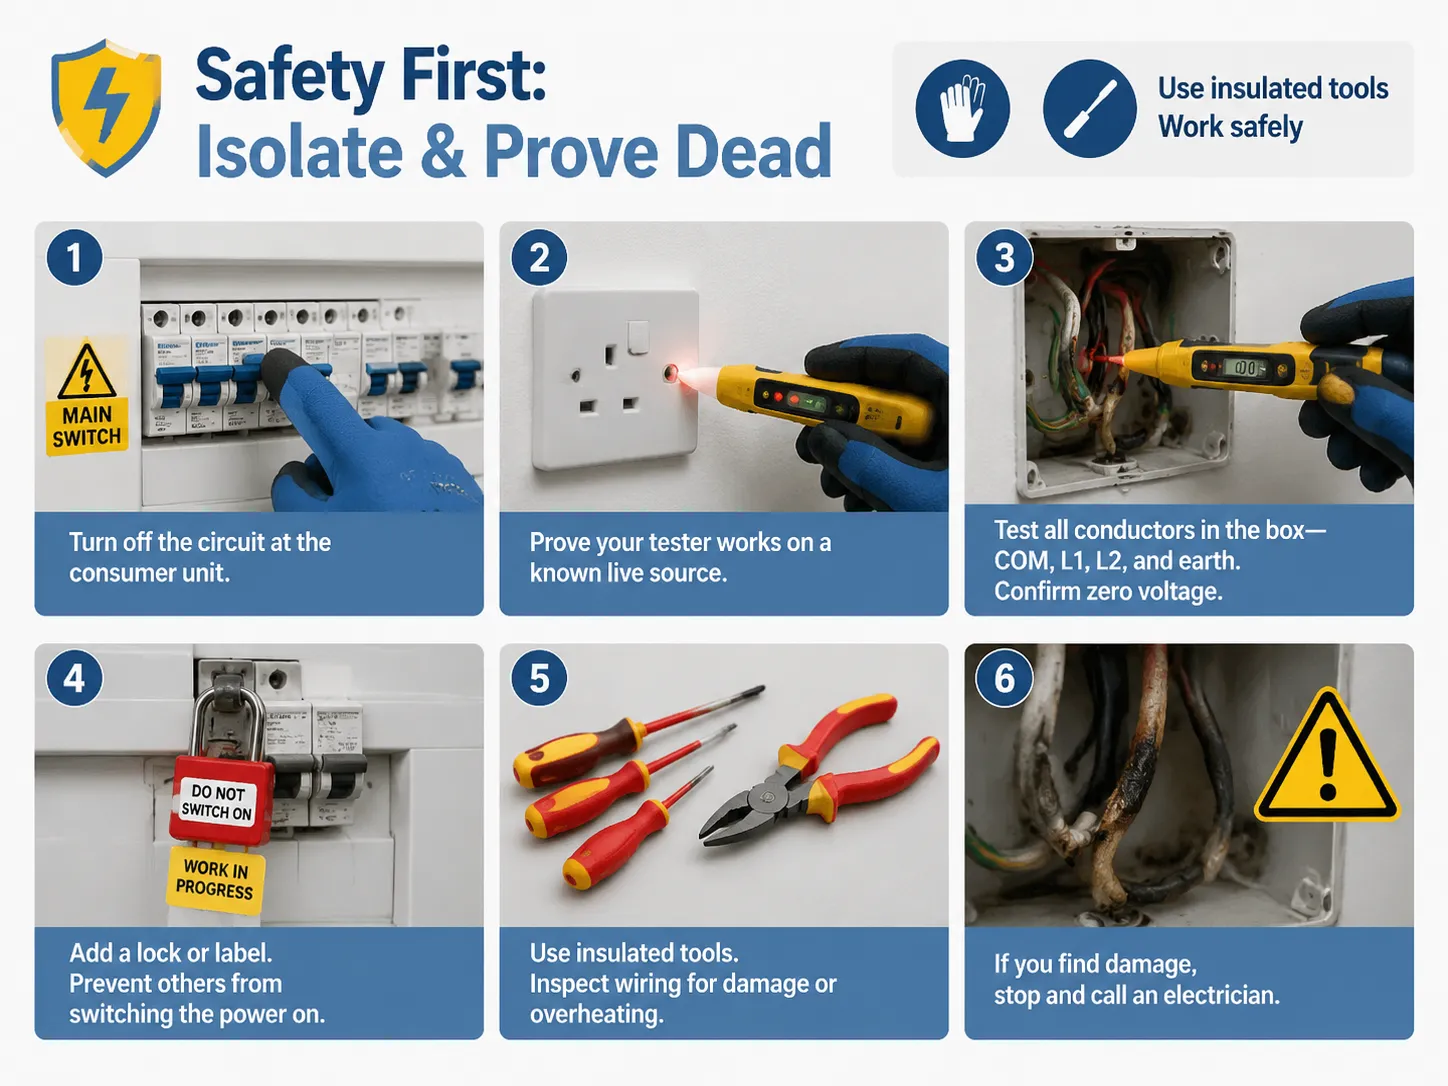
- Отключите цепь в распределительном щите. Найдите соответствующий автоматический выключатель или предохранитель, который соответствует неисправной цепи, или, если сомневаетесь, отключите главный выключатель.
- Убедитесь, что тестер напряжения работает. Перед началом проверки обесточенной цепи убедитесь, что тестер исправен, проверив его на известном источнике напряжения.
- Проверьте все проводники в распределительной коробке. Используйте тестер на всех клеммах, включая COM, L1, L2 и клемму заземления, и убедитесь, что на всех показания равны нулю вольт.
Установите замок или наклейку. Повесьте заметку на автоматический выключатель, чтобы указать, что вы работаете, чтобы никто не включил цепь во время работы. Используйте электрические инструменты правильно, и если вы меняете переключатель где-либо, используйте этот случай, чтобы проверить, нет ли обгоревших проводов.
Инструменты и материалы, которые вам понадобятся
| Инструмент / материал | Зачем он нужен |
|---|---|
| Тестер напряжения (двухполюсный тестер или мультиметр) | Чтобы убедиться, что цепь обесточена перед касанием проводов |
| Изолированные отвертки (плоская + Phillips) | Для винтов клемм и винтов лицевой панели |
| Стрипперы для проводов | Чтобы снять 10–12 мм изоляции с проводников |
| Коричневая ПВХ изолента / трубка | Чтобы изолировать любой не-коричневый проводник, используемый как (переключаемый) фазный |
| Уровень | Чтобы новая лицевая панель была установлена ровно |
| Заменяемый выключатель | Рассчитан на цепь (обычно 10А или 16А для освещения) |
| Фонарь / налобный фонарь | Коробки выключателей редко хорошо освещены |
Цвета проводки в Великобритании: новые и старые
В 2004 году Великобритания гармонизировала цвета проводки с Европой, что означало, что все новые установки должны использовать новые цвета, начиная с 2006 года. Следовательно, если ваш дом был проводен до этого года, вы можете ожидать найти старые цвета.
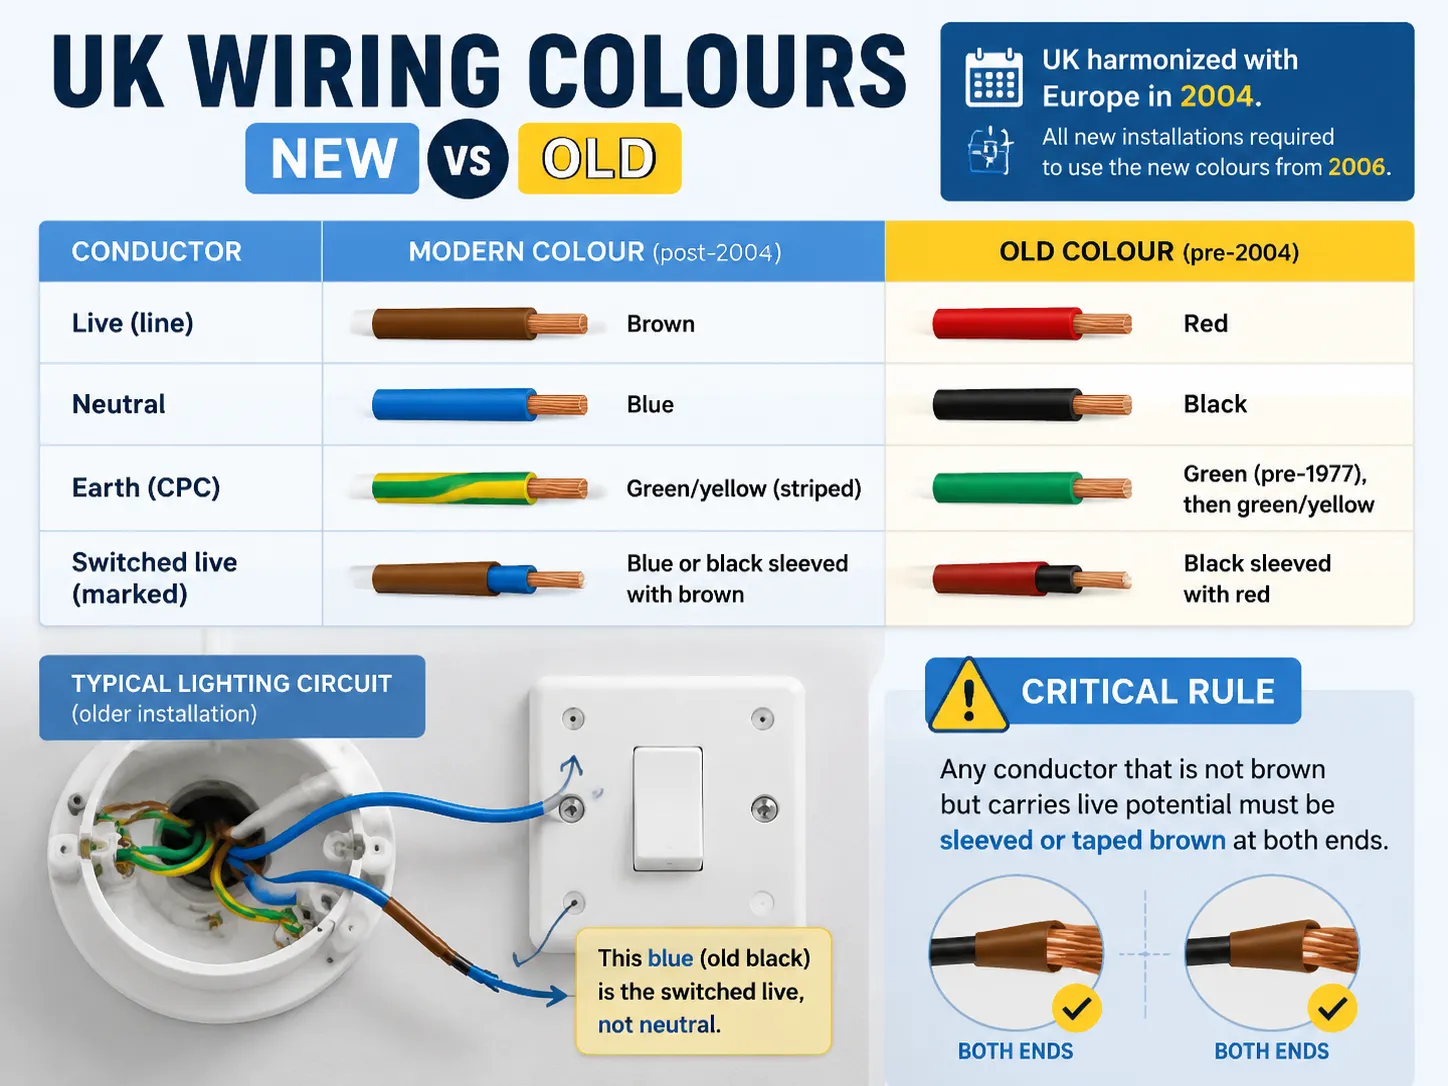
| Проводник | Современный цвет (после 2004 года) | Старый цвет (до 2004 года) |
|---|---|---|
| Фаза (линия) | Великобритания / IEC (BS 7671, текущая версия) | Красный |
| Фаза (входящий провод с напряжением, всегда под напряжением) | Коричневый | Черный |
| Заземление (CPC) | Зеленый/желтый (в полоску) | Зеленый (до 1977 года), затем зеленый/желтый |
| Переключаемая фаза (отмечена) | Синий или черный изолирован коричневым | Черный, изолированный красным |
Самое важное правило: любой провод, который не коричневого цвета, но несет напряжение, должен быть покрыт или изолирован коричневым цветом с обоих концов. В осветительных системах Великобритании линия от кабеля, идущего к выключателю, имеет синий провод (старый черный), который включается; это означает, что он не является нейтральным проводом. Для более глубокого изучения полной цветовой системы наше руководство Цвета электрических проводов в Великобритании подробно рассматривает каждый проводник и переход от старых к новым цветам.
Понимание клемм выключателя: COM, L1, L2
COM (Общий): Вход питания. Постоянный фазный провод (коричневый) подключается к этой клемме и всегда под напряжением, когда включен автоматический выключатель.
- L1: Выход переключаемого освещения. Под напряжением только когда выключатель ВКЛЮЧЕН. Обычно в установках с одним выключателем используется только этот выход.
- L2: Второй выход, используемый в сложных системах переключения, таких как двухклавишные или промежуточные системы. В установках с одним выключателем не используется.
Учтите, что разные производители маркируют клеммы по-разному, например, некоторые используют C вместо COM или L1/L2/L3 для промежуточных выключателей. Но основной принцип всегда одинаков: COM/C — это вход питания, а клеммы L — переключаемые выходы. Всегда обращайтесь к схеме подключения перед установкой. Если вы когда-либо задавались вопросом, что означают эти обозначения, наше объяснение что означает “common” на выключателе подробно рассматривает COM/L1/L2 с диаграммами.
Как подключить одноклавишный выключатель освещения
A one-way switch controls a single light from one location — the most common setup in UK homes. Here’s the full step-by-step:
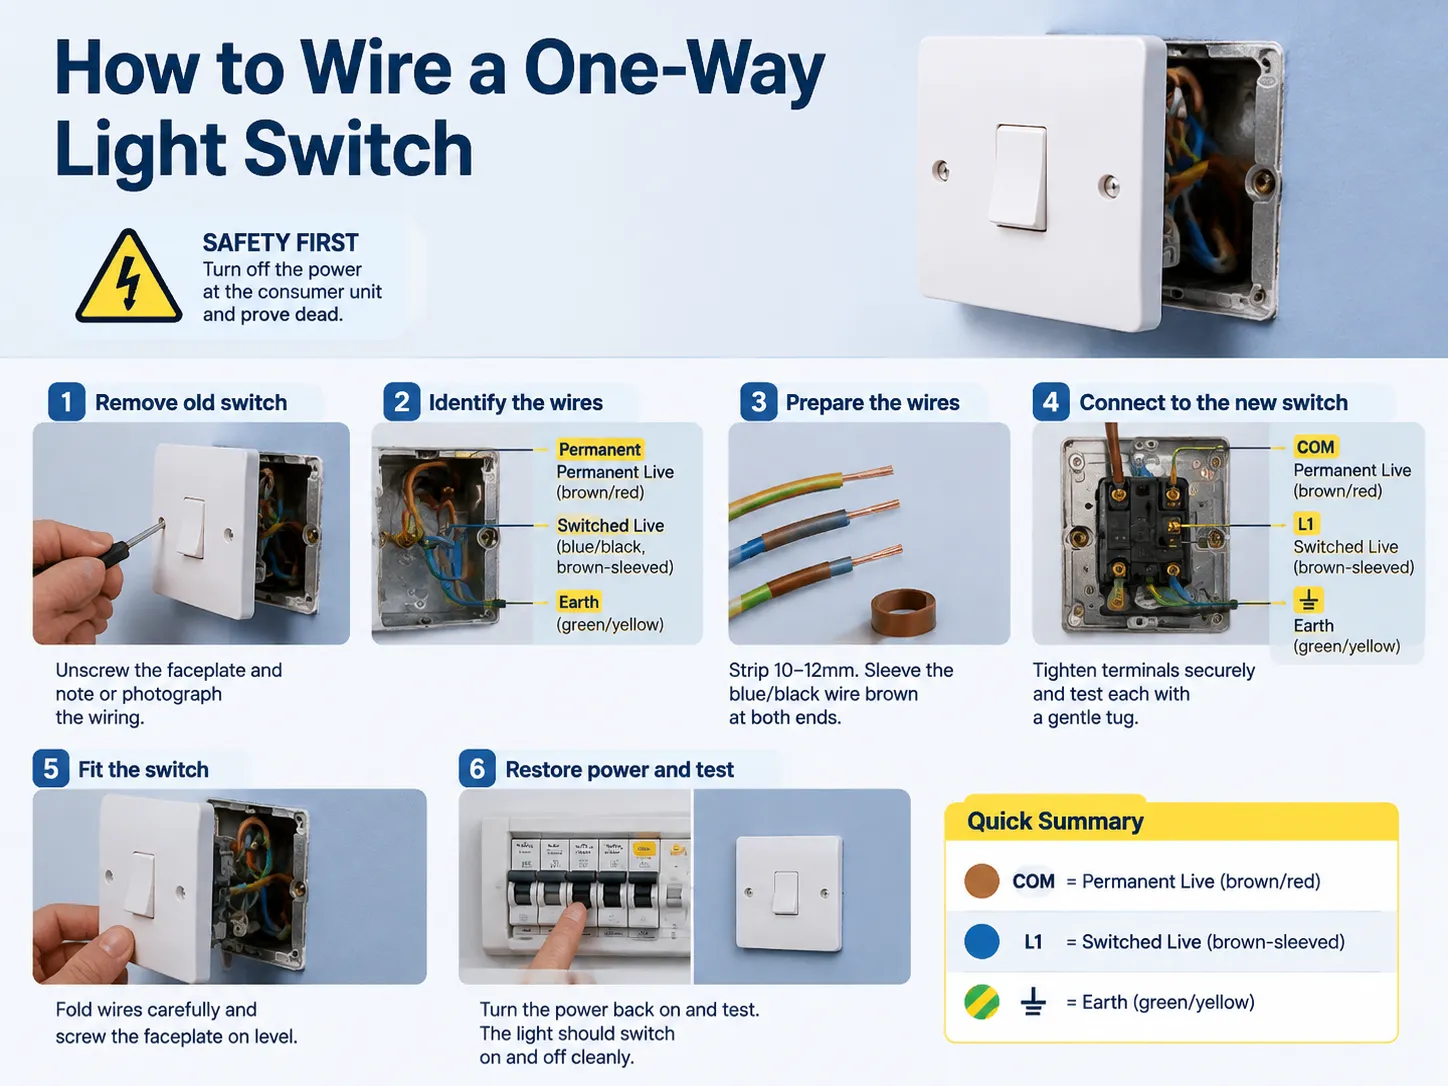
- Isolate the circuit and ascertain that it has indeed become dead (refer to Safety First above).
- Unscrew the old switch and carefully pull it away from the wall. Make sure to take a photo or write down precisely where each wire went before disconnecting anything.
- Identify the wires. In a standard loop-in ceiling circuit in the UK, you would encounter:
The permanent live — brown (more modern) or red (older) supply
Switched live — blue (or old black) wire sleeved brown, traveling up into the light fitting
Earth — green/yellow; this is present in metal boxes and for metal faceplates - Prepare the wires. Strip approximately 10mm to 12mm of insulation off the ends of each conductor. If the blue/black switched live is not already sleeved brown, add a brown sleeve or tape to both ends at this point.
- Connect them to the new switch thus:
Permanent live (brown/red) → COM terminal
Switched live (blue/black, brown-sleeved) → L1 terminal
Earth (green/yellow) → earth terminal (mandatory for metal faceplates; also connect it in plastic boxes if present) - Tighten each terminal, then snag each with yourself testing it with tenderness — loose connections are among the major causes of arcing, which melts the switch or causes flickering.
- Carefully tuck the wires in going concertina-style, so they don’t pinch against the back box, and screw the faceplate in when it is level.
- Restore the power and check. The light should, without a hitch, go on and off. Should it fail or trip the circuit, isolate again and re-check your connections.
How to Wire Two-Way Switching
In two-way switching circuits, one switch controls a single light from two different locations, such as the top and bottom of a set of stairs. This arrangement uses two two-way switches, which incorporate COM, L1, and L2, connected via a 3-core-and-earth cable which consists of two “strapper” wires and the earth wire.
- The connections at Switch 1 are permanent live (brown/red) connected to COM with two strapper wires, usually brown and grey from the 3-core cable, connected to L1 and L2 respectively. The two strapper wires connect L1 and L2 of switch 1 to L1 and L2 of switch 2 respectively.
- Switch 2 has the outgoing switched live (going to the light fitting) connected to COM and the strapper wires connected to L1 and L2 respectively.
Make sure any strapper that is not brown is sleeved brown to indicate it carries live potential. It is easy to remember that electricity enters Switch 1 at COM, is switched off at Switch 1, and travels between L1 and L2 pairs, connected together at Switch 1 and Switch 2 respectively.
Intermediate Switching (Three or More Locations)
An intermediate switch introduces a third (or maybe even a fourth) switch, including one that operates a landing light from the hallway, ground level, and upstairs. This is arranged as follows:
Two two-way switches are set up (wired in the same manner as previously);One or more intermediate switches are included in the arrangement;An intermediate switch comes with four terminals (which are designated either as L1 and L2 or L3 and L4 or some twinning) and acts as a crossing point for the two traveler wires that come from the first switch and reach the second switch after passing through the middle one.
Unlike two-way switches, an intermediate switch has nothing to do with the power supply or the light switched. Intermediate wiring is one of those steps in the process that many DIY enthusiasts find hard to achieve. If the diagram inside the switch doesn’t correspond to what you see in the switch box, it is better to call for help from an electrician as this job is both rather simple for him and extremely complicated for an amateur. Also, it is important to know the type of switch that you are working with.Our guide to the типов выключателей света shows how one-way, two-way, and intermediate switches differ in appearance and terminal layout.
Common Scenarios & What You’ll See in the Box
| Scenario | What’s likely in the box | What to do |
|---|---|---|
| Single switch, one cable | Brown (permanent live) + blue/black sleeved brown (switched live) + earth | One-way wiring: live → COM, switched live → L1 |
| Single switch, two cables | Loop-in circuit: incoming supply + outgoing cable to next light | Two live wires joined (connector) or to COM; switched live → L1. Often needs a connector block for the neutrals |
| Two switches for one light | Two two-way switches with strappers | Two-way wiring as above |
| Three or more switches | Two-way ends + intermediate middle | Intermediate wiring as above |
| Old red/black wiring | Red (live), black (neutral/switched live), green/yellow (earth) | Treat red as brown; sleeve black used as live with red tape; verify with tester |
Wiring Mistakes to Avoid
- Confusing a switched live with a neutral wire. Generally, the blue wire found in the box is switched live and the neutral wire. Connecting the former as a neutral or vice versa causes shorts or lights that may not work.
- Not using a sleeve to cover the switched live brown wire. This is a safety issue and will assist future users of the circuit.
- Exposing too much copper wire. Only strip enough wire for the connection to form (10-12cm will suffice); bare copper wires can create shorts when coming into contact with other terminals.
- Loose connections. Make sure to tug test each connection. Connections may arc and spark causing fires.
- Not earthed plate. If you have no earth wire in your junction box and connect a metal face plate, this could result in electric shocks.
- Working on an active circuit. Don’t operate with power on; take a safer route.
When to Call a Professional Electrician
Replacing a light switch is often seen as a feasible DIY task but you should stop and contact a licensed electrician in the following scenarios:
- You open the junction box and have no idea what you’re looking at
- You find damage to the insulation or evidence of overheating
- You have a metal junction box or faceplate but no earth wire
- You need to install new wiring, modify an existing switch, or have to add new points
- You’ve got a dimmer switch, or a smart switch and don’t know about its compatibility or function
- Your circuit breaker keeps tripping as you worked on it
- You want an electrical installation certificate
An electrician will charge anything from £50 to £90 per hour to fix small jobs and replacing a light switch usually is a quick call-out, which is basically cheap insurance compared to the consequences of a fire or an injury.
UK Regulations: Part P, BS 7671 & Testing
All electrical installation work in England and Wales has to conform to Part P of the Building Regulations, as well as the building and installation requirements of BS 7671 (the IET Wiring Regulations). The good news for those who do electrical work as DIY is that replacing a light switch is seen as minor work and therefore doesn’t need to be reported to the local authority – although it must still comply with BS 7671, and the job needs signing off.If you ever wish to sell or rent the property, having the work certified helps avoid complications in the future.
Часто задаваемые вопросы
Which wires go where in a light switch?
Connecting wires in a UK single switch light is a relatively simple affair. The live wire in a single switch connection should be connected to the COM terminal, while the switched live wire is connected to L1. The earth wire should also be connected to the earth terminal if the face plate or box is metallic in quality. In a two-way switch connection, the COM terminal carries the live at one end and the right switched live wire at the other terminal, while the L1 and L2 connectors are connected through strapper wires. Never forget to check the diagram on the switch before wiring and turning on the circuit.
Does it matter which wires go where on a light switch?
Yes, that does matter. The permanent live must go to the COM/common terminal and the switched live to L1 (single pole). If the two are swapped the switch seems to work, but the light side remains live even when the switch is off—creating an electric shock risk for the person changing the bulb. If the travelers are at the wrong leads at two-way and intermediate circuits, the light will only function when both switches are in a certain position. Acting as if the blue switched live is neutral will produce a short circuit if the circuit is switched on. If you are ever in doubt as to which wire is which, do not hesitate to call the electrician.
What happens if you wire a light switch the wrong way?
It is related to the complication involved. The easiest case is when the switch works but leaves the circuit “live” at all times. This is dangerous when attempting to change the bulb. Possibly more serious is switching a hot lead into the neutral socket, or connecting the wires incorrectly, leading to the short circuit which may cause the circuit breaker to turn off the supply — and if the protection does not work or if the cable is damaged, this may foster arcing and overheating, as well as fire. An improper connection may also cause the switch to flicker, hum, and become heated.
Ссылки
- IET — Wiring Matters: BS 7671 guidance and wiring regulations resources
- GOV.UK — Part P of the Building Regulations (England and Wales)
- NICEIC — competent person schemes and electrical safety guidance
- EngineerFix — UK Light Switch Wiring Diagram and Step-by-Step Guide
- Easy Home Improvement — How Should a Light Switch Be Wired in the UK?
- Homebuilding & Renovating — How to Wire a Light Switch
- Which? — finding a qualified electrician and consumer safety advice
Заключение
Wiring a light switch in the UK is something that can be done quite easily without any major risks if you follow a few rules: switch off the circuit at the distribution box, verify that it is indeed off using a voltage tester, learn the wiring color codes: brown for live wire, blue for neutral, green/yellow for earth (also, it is important to remember the switched live wire).
Your best bet for wiring is to keep it simple, take a picture of the old wiring before you start unwiring anything, do a tug-test on the connectors, earth the metallic faceplate, and don’t try working with a dead circuit! If you happen to run into any issues like wiring being older than what is indicated in any wiring books, colors not being what they are supposed to be, lack of earthing, wires being damaged, or anything else that doesn’t match the wiring textbook, you should definitely call a professional electrician!