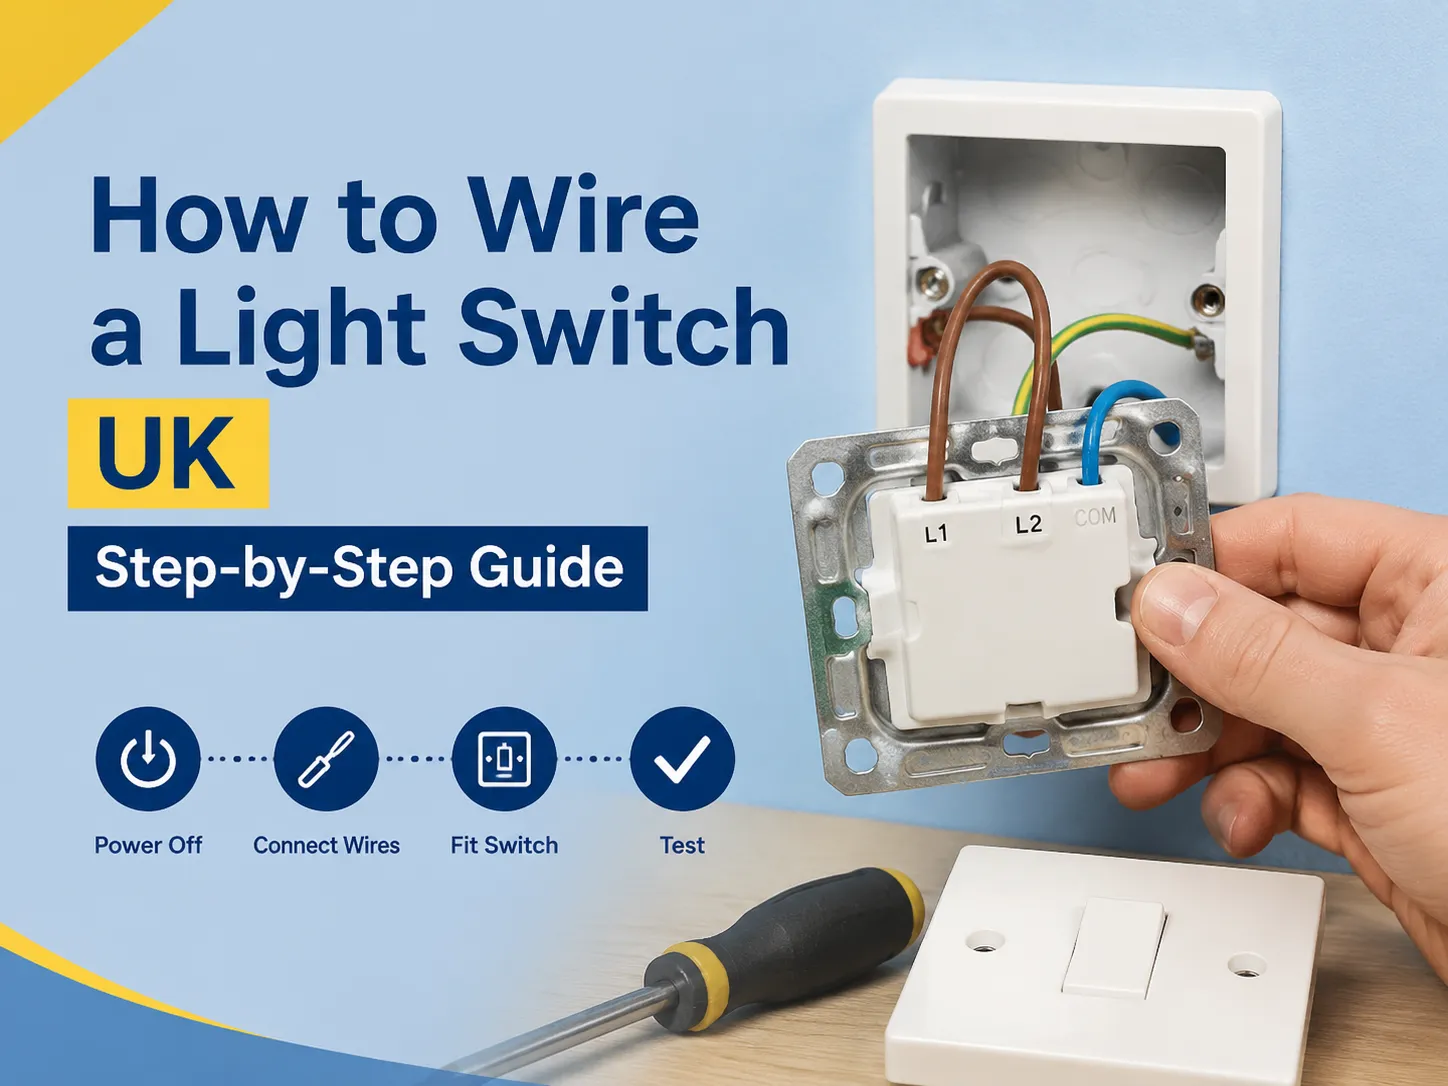
Vous avez acquis un nouvel interrupteur—peut-être un basculeur en acier brossé qui va remplacer votre ancien interrupteur en plastique encombrant dans votre couloir. Vous sortez votre tournevis et retirez la plaque de recouvrement et tout ce que vous voyez à l’intérieur est une multitude de fils marron, bleu et vert-jaune, qui ne ressemblent même pas de près aux fils démontrés dans les vidéos que vous avez regardées aux États-Unis. Cela s’explique par le fait que le câblage au Royaume-Uni est régi par ses propres règles, contrairement aux États-Unis.
Dans ce guide, vous découvrirez tout sur le câblage des interrupteurs au Royaume-Uni, y compris les codes couleur (anciens et nouveaux), la signification des différents bornes, le câblage d’un interrupteur unipolaire, le câblage d’une paire d’interrupteurs bipolaires et le câblage d’un interrupteur intermédiaire. Vous trouverez les mesures de sécurité à prendre avant toute intervention et saurez quand il est préférable d’appeler un électricien spécialisé pour effectuer le travail.
Réponse rapide : Des couleurs modernes ont été introduites dans les interrupteurs au Royaume-Uni, et elles suivent la norme BS 7671 : marron = phase, bleu = neutre, et vert/jaune = terre. Dans un interrupteur unipolaire, le fil de phase permanent (marron) est câblé à la borne COM, tandis que le fil de phase (qui va vers la lampe) est connecté à la borne L1. Le fil de terre doit être câblé à la borne de terre (si disponible), et la plaque métallique doit également être mise à la terre. Isolez toujours le circuit depuis le tableau de distribution et vérifiez que le circuit est hors tension à l’aide d’un testeur de tension avant de le toucher – ne comptez pas sur le fait que l’interrupteur soit “ éteint ”. Dans le cas d’un interrupteur bipolaire, il y aura une borne L2 supplémentaire ainsi qu’un fil navette entre les deux interrupteurs. S’il s’agit d’un interrupteur intermédiaire, une troisième borne est également présente. Puisque le remplacement de l’interrupteur est considéré comme non déclarable selon la Partie P, toutes les autres instructions doivent être respectées en suivant la norme BS 7671.
Sécurité avant tout : Isoler et vérifier l’absence de tension
Avant toute intervention, assurez-vous d’abord de la sécurité du circuit. Ce n’est pas une option, la sécurité fait la différence entre une tâche simple et un passage à l’hôpital.
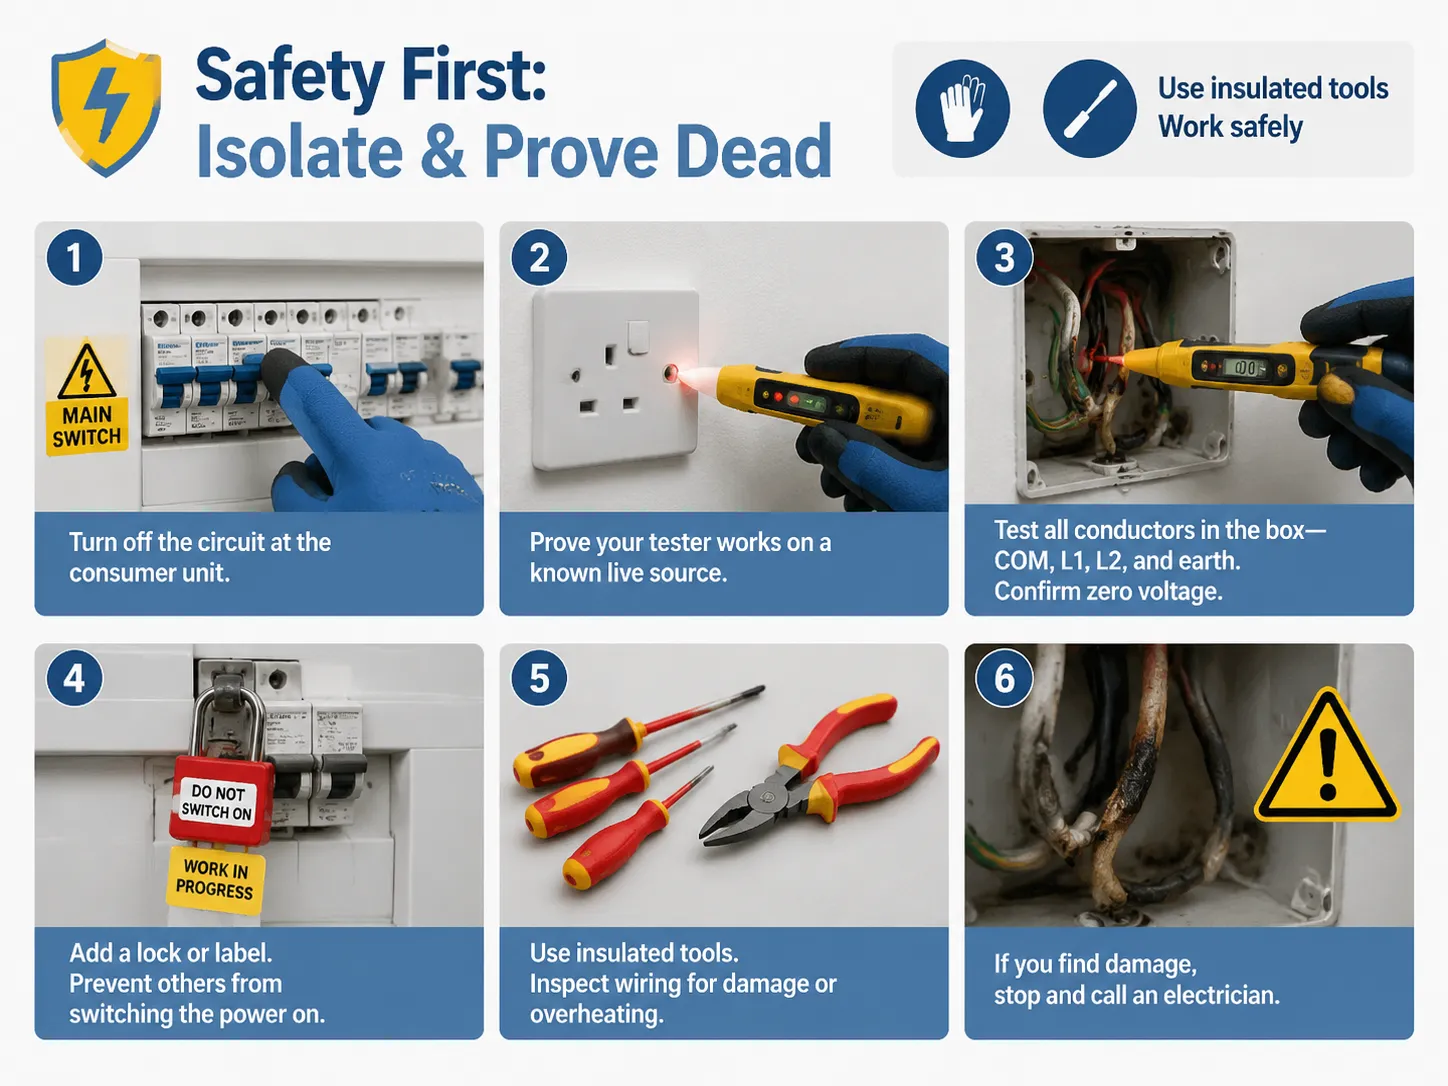
- Coupez le circuit dans le tableau électrique. Trouvez le disjoncteur ou le fusible approprié correspondant au circuit défectueux, ou en cas de doute, coupez le disjoncteur principal.
- Vérifiez que le testeur de tension fonctionne. Avant de commencer à tester le circuit hors tension, assurez-vous que le testeur fonctionne en l’appliquant sur une source d’alimentation connue sous tension.
- Testez tous les conducteurs dans la boîte d’interrupteur. Utilisez le testeur sur toutes les bornes, y compris COM, L1, L2 et la borne de terre, et assurez-vous que toutes indiquent zéro volt.
Installez un verrou ou une étiquette. Mettez une note sur le disjoncteur pour indiquer que vous travaillez afin que personne ne remette le circuit sous tension pendant votre intervention. Utilisez les outils électriques de manière appropriée, et si vous changez l’interrupteur, profitez-en pour vérifier s’il y a des câbles brûlés.
Outils et matériaux nécessaires
| Outil / Matériel | Pourquoi vous en avez besoin |
|---|---|
| Testeur de tension (testeur bipolaire ou multimètre) | Pour prouver que le circuit est hors tension avant de toucher les fils |
| Tournevis isolés (plat + Phillips) | Pour les vis de bornier et les vis de plaque de finition |
| Dénudeurs de fils | Pour dénuder 10–12 mm d’isolant des conducteurs |
| Ruban / gaine isolante en PVC marron | Pour gaîner tout conducteur non marron utilisé comme phase (commutée) |
| Niveau à bulle | Pour que la nouvelle plaque de finition soit bien droite |
| Interrupteur de remplacement | Adapté au circuit (typiquement 10A ou 16A pour l’éclairage) |
| Torche / lampe frontale | Les boîtes d’interrupteurs sont rarement bien éclairées |
Couleurs de câblage au Royaume-Uni : Nouveau vs Ancien
En 2004, le Royaume-Uni a harmonisé ses couleurs de câblage avec l’Europe, ce qui signifie que toutes les nouvelles installations devaient utiliser les nouvelles couleurs à partir de 2006. Ainsi, si votre domicile a été câblé avant cette année, vous pouvez vous attendre à trouver les anciennes couleurs.
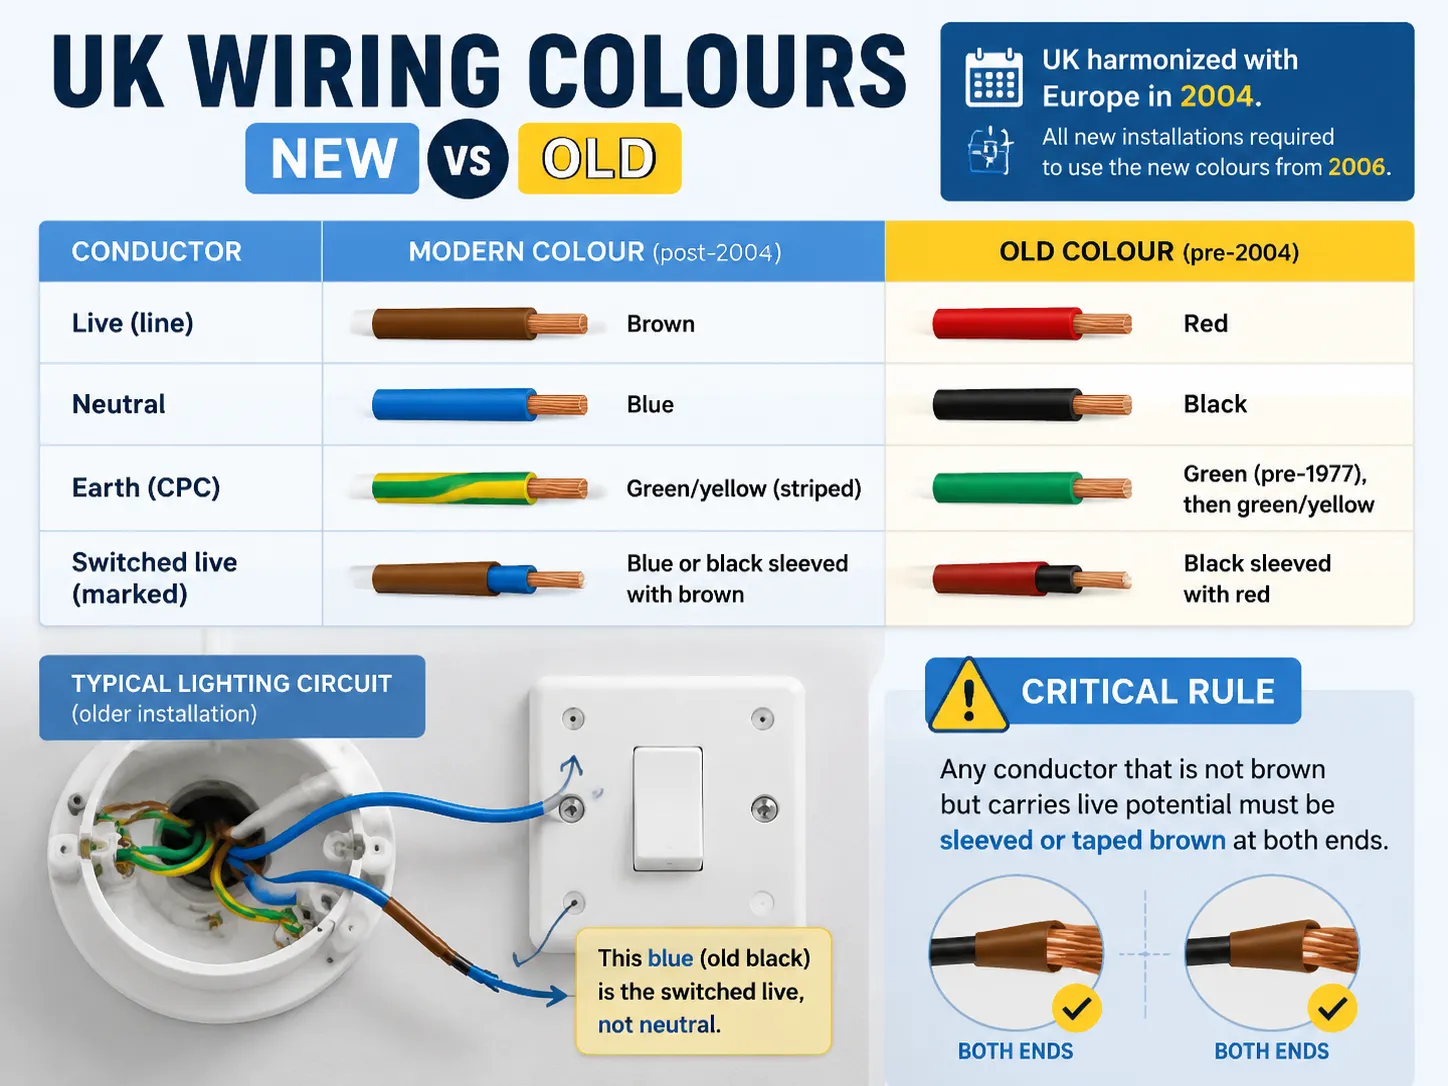
| Conducteur | Couleur moderne (post-2004) | Couleur ancienne (pré-2004) |
|---|---|---|
| Phase (ligne) | Marron | Rouge |
| Neutre | Bleu | Noir |
| Terre (CPC) | Vert/jaune (rayé) | Vert (pré-1977), puis vert/jaune |
| Phase commutée (marquée) | Bleu ou noir gainé de marron | Noir gainé de rouge |
La réglementation la plus importante est la suivante : tout fil qui n’est pas de couleur marron, mais qui transporte une tension sous tension doit être recouvert ou rubanné en marron à ses deux extrémités. Dans les systèmes d’éclairage du Royaume-Uni, la phase du câble descendant vers l’interrupteur est un fil bleu (anciennement noir), qui est activé ; ce qui signifie qu’il ne s’agit pas d’un fil neutre. Pour une analyse approfondie du système complet des couleurs, notre guide les couleurs des fils électriques au Royaume-Uni couvre en détail chaque conducteur et la transition de l’ancien au nouveau.
Comprendre les bornes d’interrupteur : COM, L1, L2
COM (Commun) : L’entrée d’alimentation. Le fil phase constant (marron) est connecté à cette borne et il est toujours sous tension lorsque le disjoncteur est activé.
- L1 : La sortie de la lumière commutée. Elle est alimentée uniquement lorsque l’interrupteur est ON. Normalement, dans les installations à un seul interrupteur, c’est la seule sortie utilisée.
- L2 : La deuxième sortie utilisée dans les systèmes de commutation avancés tels que les systèmes va-et-vient ou intermédiaires. Dans les installations à un seul interrupteur, elle reste inutilisée.
Sachez que différents fabricants étiquettent les bornes différemment, par exemple certains utilisent C au lieu de COM ou L1/L2/L3 pour leur interrupteur intermédiaire. Mais le principe de base est toujours le même : COM/C est l’entrée d’alimentation, tandis que les bornes L sont des sorties commutées. Référez-vous toujours au schéma de câblage avant l’installation. Si vous vous êtes déjà demandé ce que signifient ces marquages, notre explication de ce que signifie “ commun ” sur un interrupteur explique COM/L1/L2 avec des schémas.
Comment câbler un interrupteur unipolaire
Un interrupteur unipolaire commande une seule lumière depuis un seul emplacement — la configuration la plus courante dans les maisons au Royaume-Uni. Voici la procédure complète étape par étape :
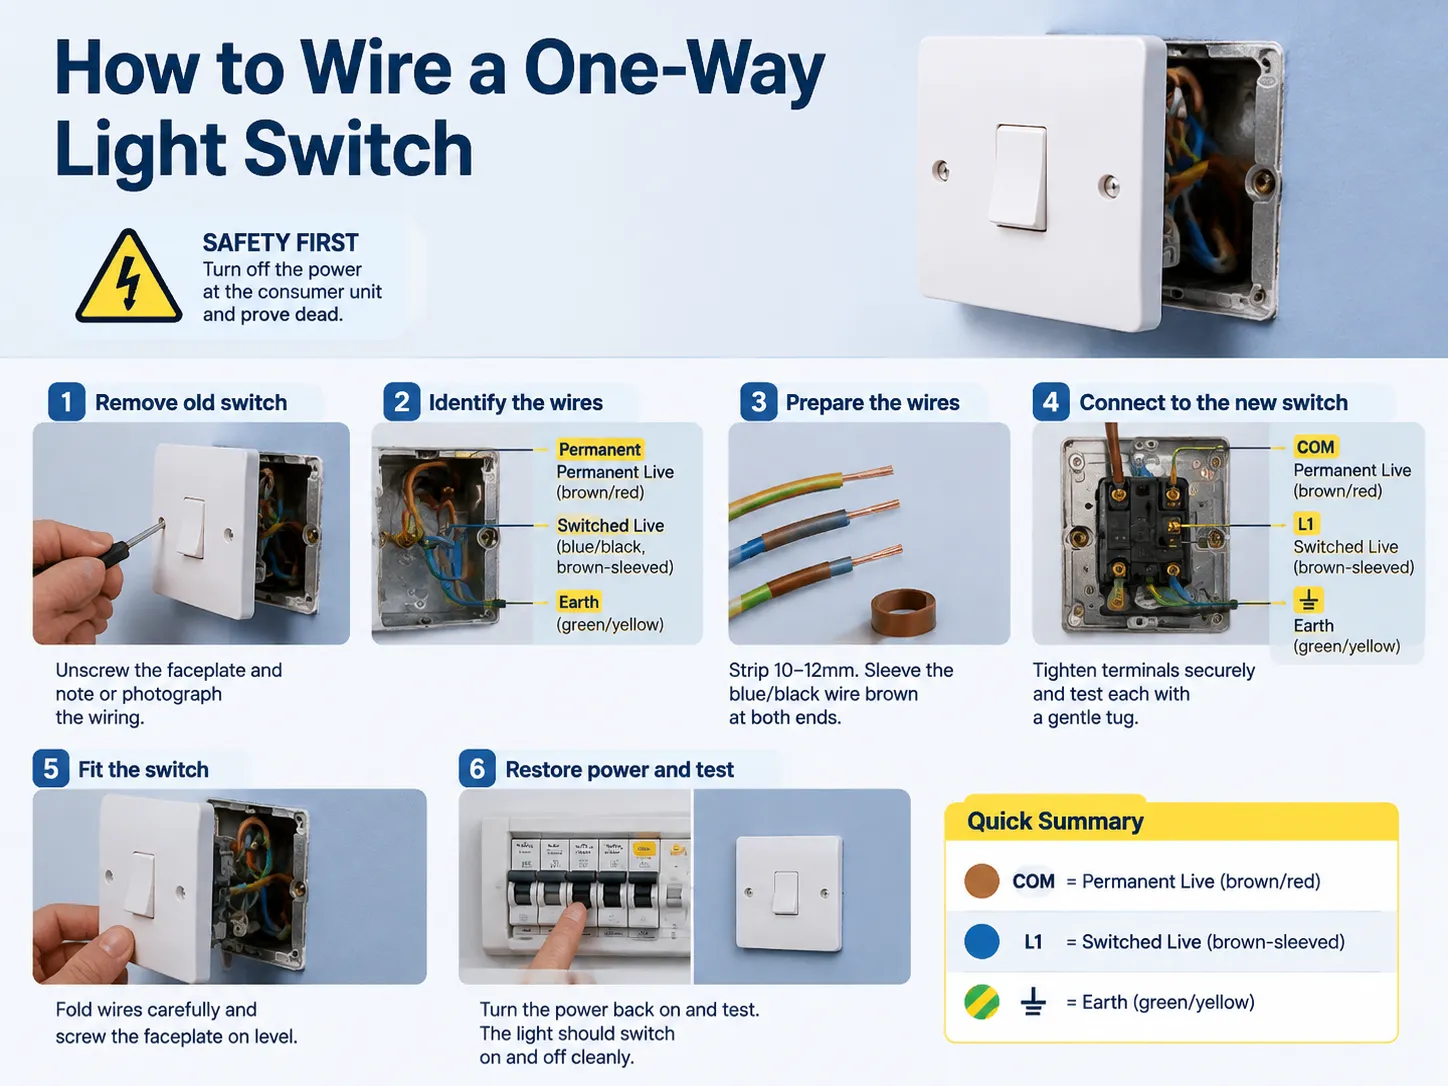
- Isolez le circuit et assurez-vous qu’il est bien hors tension (référez-vous à Sécurité d’abord ci-dessus).
- Dévissez l’ancien interrupteur et tirez-le doucement hors du mur. Assurez-vous de prendre une photo ou de noter précisément où chaque fil était connecté avant de débrancher quoi que ce soit.
- Identifiez les fils. Dans un circuit de plafond en boucle standard au Royaume-Uni, vous rencontrerez :
Le conducteur permanent sous tension — marron (plus moderne) ou rouge (plus ancien)
Le conducteur sous tension commuté — fil bleu (ou ancien noir) gainé marron, montant vers le luminaire
La terre — vert/jaune ; présente dans les boîtes métalliques et pour les plaques de finition métalliques - Préparez les fils. Dénudez environ 10 mm à 12 mm d’isolant aux extrémités de chaque conducteur. Si le fil bleu/noir sous tension commuté n’est pas déjà gainé marron, ajoutez une gaine ou un ruban marron aux deux extrémités à ce stade.
- Connectez-les au nouvel interrupteur comme suit :
Conducteur permanent sous tension (marron/rouge) → borne COM
Conducteur sous tension commuté (bleu/noir, gainé marron) → borne L1
Terre (vert/jaune) → borne de terre (obligatoire pour les plaques métalliques ; connectez-la aussi dans les boîtes en plastique si présente) - Serrez chaque borne, puis testez-les délicatement avec vous-même — les connexions lâches sont parmi les principales causes d’arcs électriques, qui font fondre l’interrupteur ou provoquent des scintillements.
- Rangez soigneusement les fils en accordéon pour qu’ils ne soient pas pincés contre la boîte arrière, puis vissez la plaque de finition lorsqu’elle est de niveau.
- Rétablissez l’alimentation et vérifiez. La lumière doit s’allumer et s’éteindre sans problème. En cas de défaillance ou de déclenchement du circuit, isolez à nouveau et vérifiez vos connexions.
Comment câbler un interrupteur va-et-vient
Dans les circuits va-et-vient, un interrupteur commande une seule lumière depuis deux emplacements différents, comme en haut et en bas d’un escalier. Cette configuration utilise deux interrupteurs va-et-vient, qui comportent COM, L1 et L2, reliés par un câble 3 conducteurs plus terre composé de deux fils navette et du fil de terre.
- Les connexions au premier interrupteur sont le conducteur permanent sous tension (marron/rouge) connecté à COM avec deux fils navette, généralement marron et gris du câble 3 conducteurs, connectés respectivement à L1 et L2. Les deux fils navette relient L1 et L2 de l’interrupteur 1 à L1 et L2 de l’interrupteur 2 respectivement.
- L’interrupteur 2 a le conducteur sous tension commuté sortant (allant vers le luminaire) connecté à COM et les fils navette connectés à L1 et L2 respectivement.
Assurez-vous que tout fil navette qui n’est pas marron soit gainé marron pour indiquer qu’il porte une tension. Il est facile de retenir que l’électricité entre dans l’interrupteur 1 par COM, est coupée à l’interrupteur 1, et circule entre les paires L1 et L2, connectées ensemble à l’interrupteur 1 et à l’interrupteur 2 respectivement.
Interrupteur intermédiaire (trois emplacements ou plus)
Un interrupteur intermédiaire introduit un troisième (ou peut-être même un quatrième) interrupteur, incluant un qui commande une lumière de palier depuis le couloir, le rez-de-chaussée et l’étage. Cela s’organise comme suit :
Deux interrupteurs va-et-vient sont installés (câblés de la même manière que précédemment) ; Un ou plusieurs interrupteurs intermédiaires sont inclus dans l’installation ; Un interrupteur intermédiaire dispose de quatre bornes (désignées soit L1 et L2, soit L3 et L4, ou une autre paire) et agit comme un point de croisement pour les deux fils navette qui viennent du premier interrupteur et atteignent le second après être passés par l’interrupteur du milieu.
Contrairement aux interrupteurs va-et-vient, un interrupteur intermédiaire n’a aucun lien avec l’alimentation électrique ou la lumière commandée. Le câblage intermédiaire est une étape du processus que beaucoup de bricoleurs trouvent difficile à réaliser. Si le schéma à l’intérieur de l’interrupteur ne correspond pas à ce que vous voyez dans la boîte d’encastrement, il est préférable de faire appel à un électricien car ce travail est à la fois assez simple pour lui et extrêmement compliqué pour un amateur. Il est également important de connaître le type d’interrupteur avec lequel vous travaillez. Notre guide sur le types d’interrupteurs d’éclairage montre comment les interrupteurs unipolaires, va-et-vient et intermédiaires diffèrent en apparence et en disposition des bornes.
Scénarios courants et ce que vous verrez dans la boîte
| Scénario | Ce qui est probablement dans la boîte | Que faire |
|---|---|---|
| Interrupteur simple, un câble | Marron (phase permanente) + bleu/noir gainé marron (phase commutée) + terre | Câblage unipolaire : phase → COM, phase commutée → L1 |
| Interrupteur simple, deux câbles | Circuit en boucle : alimentation entrante + câble sortant vers la lumière suivante | Deux fils de phase reliés (connecteur) ou à COM ; phase commutée → L1. Souvent nécessite un domino pour les neutres |
| Deux interrupteurs pour une lumière | Deux interrupteurs va-et-vient avec navettes | Câblage va-et-vient comme ci-dessus |
| Trois interrupteurs ou plus | Va-et-vient aux extrémités + intermédiaire au milieu | Câblage intermédiaire comme ci-dessus |
| Ancien câblage rouge/noir | Rouge (phase), noir (neutre/phase commutée), vert/jaune (terre) | Traiter le rouge comme marron ; gaîner le noir utilisé comme phase avec du ruban rouge ; vérifier avec un testeur |
Erreurs de câblage à éviter
- Confondre une phase commutée avec un fil neutre. Généralement, le fil bleu trouvé dans la boîte est le neutre et le fil noir est la phase commutée. Connecter l’un comme neutre ou inversement provoque des courts-circuits ou des lumières qui ne fonctionnent pas.
- Ne pas utiliser de gaine pour couvrir le fil marron de phase commutée. C’est un problème de sécurité et cela aidera les futurs utilisateurs du circuit.
- Exposer trop de cuivre. Ne dénudez que la longueur nécessaire pour la connexion (10-12 mm suffisent) ; les fils cuivre nus peuvent provoquer des courts-circuits en entrant en contact avec d’autres bornes.
- Connexions lâches. Assurez-vous de tester chaque connexion en tirant dessus. Les connexions peuvent provoquer des arcs et des étincelles, causant des incendies.
- Plaque non mise à la terre. Si vous n’avez pas de fil de terre dans votre boîte de dérivation et que vous connectez une plaque métallique, cela peut entraîner des chocs électriques.
- Travailler sur un circuit actif. Ne pas intervenir sous tension ; optez pour une méthode plus sûre.
Quand faire appel à un électricien professionnel
Remplacer un interrupteur est souvent considéré comme une tâche de bricolage réalisable, mais vous devriez arrêter et contacter un électricien agréé dans les cas suivants :
- Vous ouvrez le boîtier de connexion et ne comprenez pas ce que vous voyez
- Vous constatez des dommages à l’isolation ou des signes de surchauffe
- Vous avez un boîtier de connexion ou une plaque de recouvrement métallique mais pas de fil de terre
- Vous devez installer un nouveau câblage, modifier un interrupteur existant ou ajouter de nouveaux points
- Vous avez un variateur, ou un interrupteur intelligent et ne connaissez pas sa compatibilité ou son fonctionnement
- Votre disjoncteur saute constamment après votre intervention
- Vous souhaitez obtenir un certificat d’installation électrique
Un électricien facture généralement entre £50 et £90 par heure pour les petits travaux, et remplacer un interrupteur est souvent une intervention rapide, ce qui constitue une assurance peu coûteuse comparée aux conséquences d’un incendie ou d’une blessure.
Réglementations UK : Partie P, BS 7671 & Tests
Tous les travaux d’installation électrique en Angleterre et au Pays de Galles doivent respecter la Partie P des règlements de construction, ainsi que les exigences de construction et d’installation de la norme BS 7671 (les règlements de câblage IET). La bonne nouvelle pour les bricoleurs est que remplacer un interrupteur est considéré comme un travail mineur et ne nécessite donc pas de déclaration à l’autorité locale – bien que cela doive toujours être conforme à la BS 7671, et que le travail doive être certifié. Si vous souhaitez vendre ou louer le bien, faire certifier les travaux évite des complications ultérieures.
Questions fréquemment posées
Quels fils vont où dans un interrupteur ?
Connecter les fils dans un interrupteur simple au Royaume-Uni est relativement simple. Le fil phase dans une connexion à interrupteur simple doit être connecté à la borne COM, tandis que le fil de phase commutée est connecté à L1. Le fil de terre doit également être connecté à la borne de terre si la plaque de recouvrement ou le boîtier est métallique. Dans une connexion à va-et-vient, la borne COM transporte la phase à une extrémité et le fil de phase commutée à l’autre borne, tandis que les connecteurs L1 et L2 sont reliés par des fils navette. N’oubliez jamais de vérifier le schéma sur l’interrupteur avant de câbler et de mettre le circuit sous tension.
Est-ce important de respecter l’emplacement des fils sur un interrupteur ?
Oui, c’est important. La phase permanente doit aller à la borne COM/commune et la phase commutée à L1 (simple pôle). Si les deux sont inversés, l’interrupteur semble fonctionner, mais le côté lumière reste sous tension même lorsque l’interrupteur est éteint — ce qui crée un risque de choc électrique pour la personne qui change l’ampoule. Si les navettes sont mal connectées dans les circuits va-et-vient et intermédiaires, la lumière ne fonctionnera que lorsque les deux interrupteurs sont dans une certaine position. Prendre la phase commutée bleue pour un neutre provoquera un court-circuit si le circuit est sous tension. En cas de doute sur l’identification des fils, n’hésitez pas à appeler un électricien.
Que se passe-t-il si vous câbler un interrupteur de manière incorrecte ?
Cela est lié à la complexité impliquée. Le cas le plus simple est lorsque l’interrupteur fonctionne mais laisse le circuit “ sous tension ” en permanence. Cela est dangereux lors du changement de l’ampoule. Plus grave encore, il peut s’agir de brancher un conducteur sous tension sur la prise neutre, ou de connecter les fils incorrectement, ce qui entraîne un court-circuit pouvant provoquer la coupure de l’alimentation par le disjoncteur — et si la protection ne fonctionne pas ou si le câble est endommagé, cela peut favoriser les arcs électriques et la surchauffe, ainsi qu’un incendie. Une connexion incorrecte peut également provoquer des scintillements, des bourdonnements et une surchauffe de l’interrupteur.
Références
- IET — Wiring Matters : ressources sur la norme BS 7671 et la réglementation du câblage
- GOV.UK — Partie P du Code de la Construction (Angleterre et Pays de Galles)
- NICEIC — schémas de personnes compétentes et conseils de sécurité électrique
- EngineerFix — Schéma de câblage d’un interrupteur au Royaume-Uni et guide étape par étape
- Easy Home Improvement — Comment câbler un interrupteur au Royaume-Uni ?
- Homebuilding & Renovating — Comment câbler un interrupteur
- Which? — trouver un électricien qualifié et conseils de sécurité pour les consommateurs
Conclusion
Câbler un interrupteur au Royaume-Uni est une opération qui peut être réalisée assez facilement sans risques majeurs si vous suivez quelques règles : couper le circuit au tableau de distribution, vérifier qu’il est bien hors tension à l’aide d’un testeur de tension, connaître les codes couleurs du câblage : marron pour le fil sous tension, bleu pour le neutre, vert/jaune pour la terre (il est également important de se souvenir du fil sous tension commuté).
La meilleure approche pour le câblage est de rester simple, de prendre une photo de l’ancien câblage avant de commencer à débrancher quoi que ce soit, de faire un test de traction sur les connecteurs, de mettre à la terre la plaque métallique, et de ne jamais travailler sur un circuit sous tension ! Si vous rencontrez des problèmes tels que des câbles plus anciens que ceux indiqués dans les manuels de câblage, des couleurs non conformes, l’absence de mise à la terre, des fils endommagés ou tout autre élément ne correspondant pas au manuel de câblage, vous devez absolument faire appel à un électricien professionnel !