One of the most common electrical projects for the homeowner is to wire a single pole switch. This is the easiest type of switch, as it turns on (or off) just one light or one outlet from only one place. Replacing a switch that has gone bad in your bedroom is probably one of the easiest projects to do if you know where each of the wires goes in your electrical box. This guide will help you safely complete the process of wiring a single-pole switch and explain common variations that you might find when working with your electrical box. It will also answer some of the frequently asked questions that can stop people from beginning electrical projects.
What Is a Single Pole Switch?
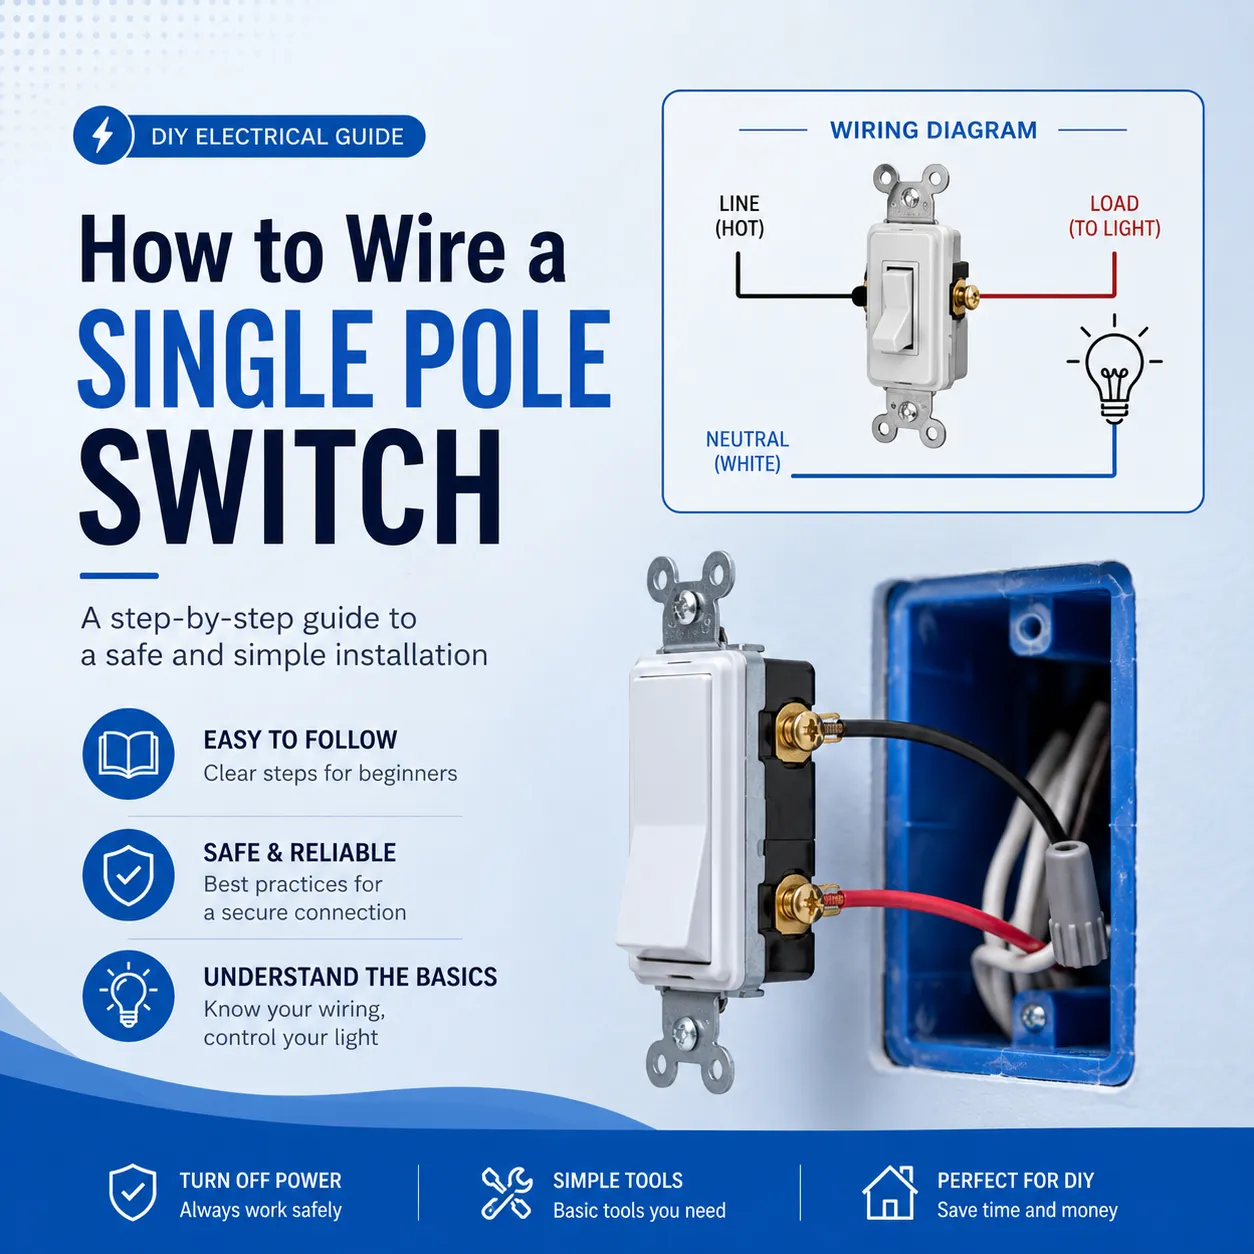
The single pole switch is one of the most common types of light switches found in homes today. It turns your light on or off from one location (like when you enter a room or turn on an exterior light). A single pole switch will contain two (2) brass screw terminals (with a green ground) used to break the “hot” wire supplying power to the light fixture/outlet. When the switch is “up”, it closes the circuit allowing electricity to flow to the light so that it turns on. When the switch is “down”, it opens the circuit so that no electricity flows to the light, thus turning it off. Because of this, single pole switches are the most widely used type of switches for lighting in residential applications, and they differ substantially from 3-way switches (used to control a light from two locations). If you need a refresher on the full family of switch types before you start, our overview of different types of light switches shows you where the single pole fits in the bigger picture.
Safety First: What to Do Before Touching Any Wires
Disable the power to the circuit breaker panel, not only to the switch. To identify which breaker feeds that circuit, turn the light on, flip breakers one by one until you find one that turns off the light. After turning the light off, ensure that the switch box has no power by using a non-contact voltage tester. Test each wire and the switch terminals with the tester. If the tester makes noise or lights up, the circuit still has power. Only once the tester shows that all conductors are free of power can you proceed safely. This is not negotiable, no matter how quickly you think you can finish the job.
Tools You’ll Need
- Flathead and Phillips screwdrivers
- Needle-nose pliers
- Wire strippers
- Non-contact voltage tester
- Buy a new single-pole switch that has the same amperage rating as your current switch. Most circuit ratings are 15 Amps for 14-gauge wire & 20 Amps for 12-gauge wire.
- Wire nuts (if you need to pigtail or cap unused wires)
Step-by-Step: How to Wire a Single Pole Switch
After you have opened the electrical box and disconnected the existing wall switch (if applicable), or if you are doing new construction, you can proceed to do the following:
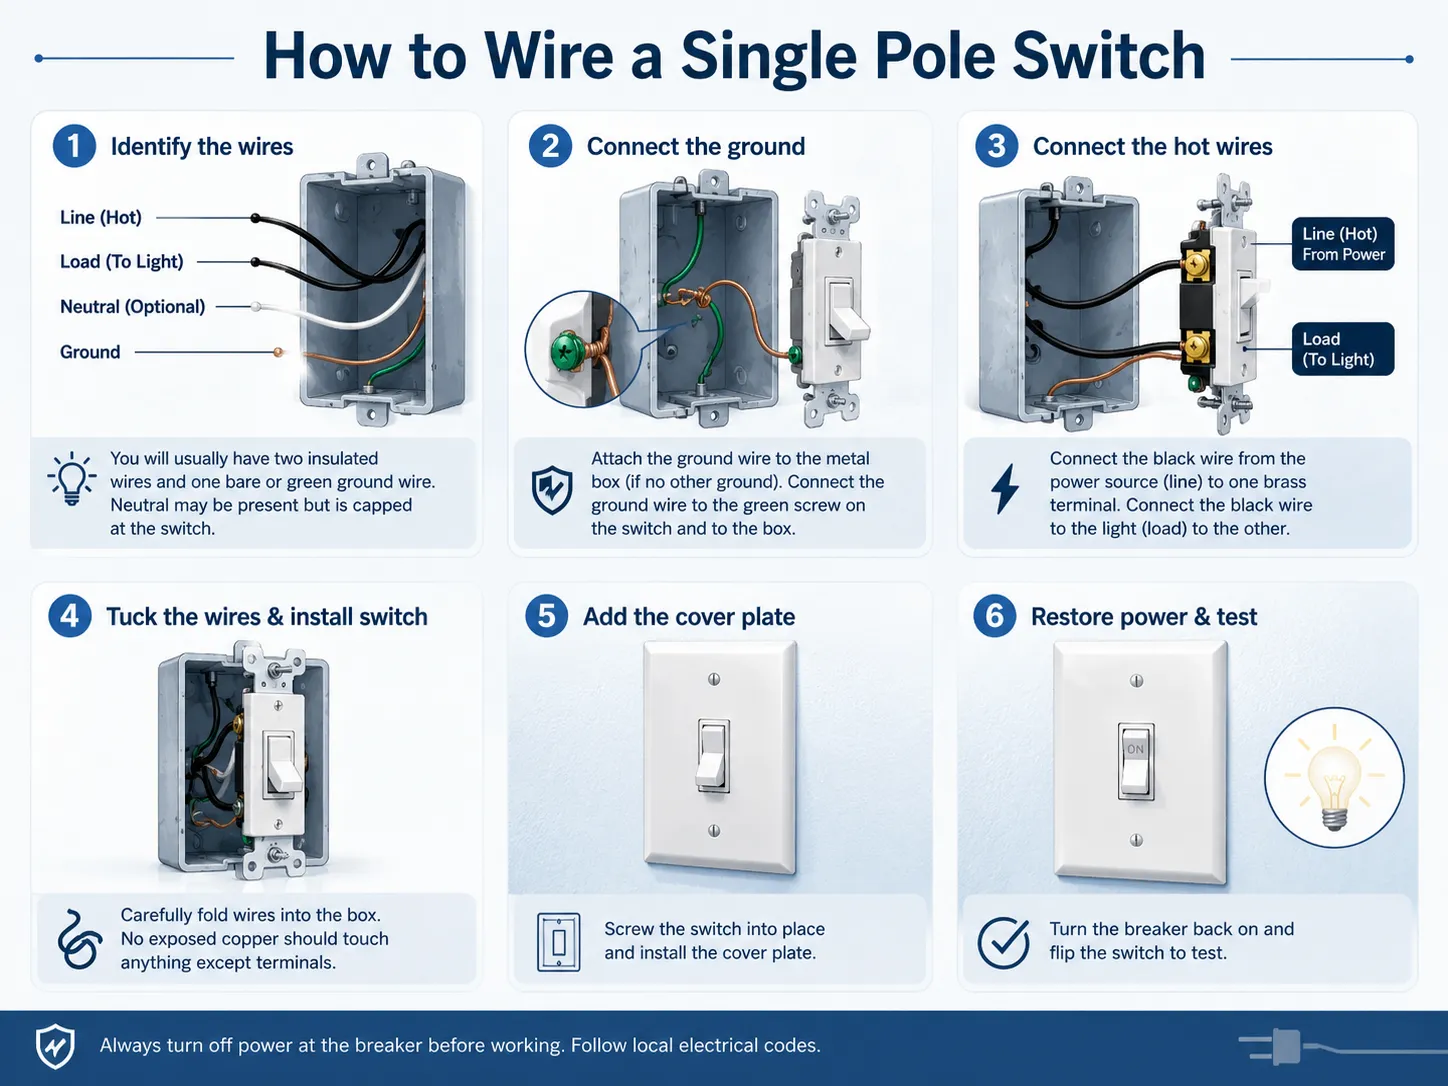
- Identify the wires in your box. There will usually be at least two insulated wires and one bare or green-ground wire in the box. For example, if you have only two wires, one will be black and the other will be black, and one wire will be black and connect to the power supply and the other will connect to the light fixture. There is also an option for a white neutral wire in the box of wiring from the power source to the electrical switch. Sometimes a switch loop will have the white wire serve as a hot wire, but according to modern electrical code, the neutral should be capped at the switch.
- Attach the ground wire to the metal box if there is no other ground connection. Connect the ground wire using a pig tail to the metal box. Connect the ground wire with the green ground screw on the switch and to the metal box.A properly grounded switch is a critical safety requirement — our detailed guide on how to replace a light switch covers this and other code requirements in depth.
- Attach the hot wires to their respective brass terminal connections. Using the black wire from the power source (the line), make a clockwise loop around any of the black terminals – this is the power wire to the lighting fixture. Finally, using the black wire to the lighting fixture (the load), create a clockwise loop around the remaining black terminal. Ensure that both connections are securely tightened. Note that polarity is not important when using a single-pole switch; either black wire can connect to either brass terminal; the switch allows for the opening and closing of the electrical current.
- After you attach the switchmount and wirefold, be careful to keep excess wire bunched in the box, with no exposed copper touching anything (except the terminal it connects to). After you screw the switch into place, you can place your coverplate.
- Restore power and test. Turn the breaker back on and flip the switch. If it works like it should, meaning that the light works and the switch operates smoothly, then you’ve done it right.
Special Case: Wiring a Single Pole Switch with Two Wires
In many old homes, when there are only two wires going into the box (one black and one white), the way they are wired can be referred to as a “switch loop.” In this case, the white wire will be providing the hot feed to the switch from the breaker panel and should be marked at both ends with black tape or a marker (making sure to identify it as a hot conductor and not a neutral). Once you have done this correctly, you can wire the black wire to one of the brass terminals and the white wire (with black markings) to the other brass terminal; then you would ground the switch to the green screw terminal if so equipped. If you have any concerns regarding this old wiring technique and how it does not meet the current National Electric Code (NEC) for new construction, then you should probably consult an electrician.
Wiring a Single Pole Switch to Control an Outlet
To connect a standard electrical outlet to a single pole switch, run hot wire from breaker panel to one brass terminal on switch then run wire from other brass terminal of switch to brass hot terminal on outlet. The neutral wire will bypass the switch and connect directly to the silver terminal on the outlet. This will allow the switch to control power to any device plugged into that outlet, such as floor lamps in a living room with no ceiling light fixture.If you’re looking to combine a switch and an outlet in a single device, our guide on how to wire a switch outlet combo walks you through that more compact installation.
Frequently Asked Questions
Which wires go where on a single pole switch?
On a standard single pole switch, the two hot wires (usually black) connect to the two brass terminal screws. The bare or green ground wire connects to the green ground screw. If a white neutral wire is present in the box, it does not connect to the switch; it should be capped with a wire nut or joined to other neutral wires. The switch only interrupts the hot conductor.
Does it matter where you put the hot wire on a single pole switch?
No, it does not matter which hot wire goes to which brass terminal on a single pole switch. The switch is a simple mechanical break in the circuit; either terminal can serve as the line (incoming power) or the load (outgoing to the light). There is no “top” or “bottom” electrical distinction. This is different from a 3-way switch, where the common terminal must be identified and connected correctly.
How to wire a single pole light switch to an outlet?
To wire a single pole switch to control an outlet, bring power from the panel to the switch first. Connect the incoming hot to one brass terminal of the switch. Run a second hot wire from the other brass terminal to the brass terminal of the outlet. Run a neutral wire directly from the panel to the silver terminal of the outlet (the neutral is not switched). This gives the switch complete control over the outlet while the neutral remains uninterrupted.
How to wire a single pole switch with two wires?
If your box contains only two insulated wires (plus a possible ground), you have a switch loop. The black wire is typically the hot feed, and the white wire should be the switched hot returning to the light — but the white wire must be marked with black tape at both ends to identify it as a hot conductor. Connect the black to one brass terminal, the marked white to the other brass terminal, and the ground to the green screw. This wiring method does not meet current NEC requirements for new installations, which require a neutral at the switch box, but it is common in older homes.
Wiring a single pole switch is a skill that pays for itself the first time you avoid an electrician’s callout. The key is respecting the procedure: always confirm the power is off, always connect the ground, and always tighten your terminal screws with care. Whether you’re dealing with a straightforward two-wire replacement or adding a switch to control an outlet, the principles stay the same. As you gain confidence, you’ll find that a simple switch swap opens the door to larger home electrical improvements — and GOG Electric’s range of switches, from classic white toggles to smart home-ready dimmers, ensures you’ll find a reliable device that fits the look and function you want in every room.